
4 Rudder Types for Sailboats

Last Updated by
Daniel Wade
June 15, 2022
A rudder is an ancient piece of technology that people still use to steer sailboats today. Modern sailboats use many different types of rudders.
If you turn the rudder to the left, the stern will turn right, and vice versa. You can use either a steering wheel or a tiller to move the rudder. Not every type of boat has the same kind of rudder, nor should every boat - different boats need significantly different rudders.
There are several different types of rudders in common use. Sailboats use full keel rudders, spade rudders, outboard rudders, and skeg-mounted rudders, plus variations on each type. What type of rudder is best depends on the shape of the hull and the boat's size.
Table of contents

Different rudder types and their advantages
Full keel rudders.
Many sailboats have a full keel rather than a fin keel, which requires a particular type of rudder. A full keel is the standard type of keel, or flat blade at the bottom of a sailboat. A full keel is designed for stability, not speed - it can keep you safe in rough water.
A generation or two ago, nearly all cruising boats had full keels. However, this is no longer true. Many customers today prefer fin keels, which are designed with speed rather than stability in mind.
A fin keel is smaller than a full keel and shaped differently. Fin keels are more popular today because many sailors today never go far from the coast. If you are near the coast, fin keels are relatively safe.
With a full keel sailboat , the rudder appears to be part of the keel. It is attached with a hinge and looks like a continuation of the keel. There may be a hole between the keel and the rudder, where the propeller is, although not all boats use this design.
What is the advantage of a full keel rudder?
A full keel rudder is strong and protects the boat from harm. A full keel rudder helps a boat survive a storm. Any debris floating by will not snag on a full keel rudder as it will snag on some other rudders.
Do full keel rudders have any disadvantages?
It is harder to move a full rudder than to move other types of rudders. Water flowing by the boat puts a great deal of pressure on a full keel rudder and makes the rudder hard to move. It takes a lot of force to push the rudder against the water moving past the boat.
Spade rudders
Spade rudders are for fin keel boats rather than full keel boats. A spade rudder sticks straight down into the water. A spade rudder can rotate left or right with a rudder post that extends into the hull.
Advantages and disadvantages of spade rudders
The most obvious advantage of the spade rudder is that it can be part of a fin keel boat. A full keel rudder requires a full keel - you could not attach a rudder of this type to another type of boat.
It is also not nearly as difficult to turn a spade rudder as it is to turn a full keel rudder. The water does not put all of its force on one side of the rudder, so it does not take as much force to turn it.
One disadvantage is that debris floating in the water can get caught on a spade rudder. Spade rudders are more delicate than full keel rudders in many ways. Debris can damage a spade rudder.
A spade rudder can also be damaged by rough water. Large waves may exert enough pressure on a spade rudder that it will break. A large wave can bend the rudder post, and after that happens, your rudder becomes useless.
Outboard rudders
An outboard rudder is not part of the boat's hull and is mounted outside of it, at the back of the boat. Usually, an outboard rudder is not hooked up to a steering wheel.
Instead, it is hooked up to a tiller, which is a steering lever. A tiller can take a bit of getting used to if you are used to a steering wheel, but a tiller is not hard to use. Many sailors prefer a tiller, especially for smaller boats.
Advantages and disadvantages of outboard rudders
If an outboard rudder is damaged, it is not likely to damage the rest of the boat. Since there is no rudder post running through the hull, damage to the rudder usually won't mean damage to anything else as well.
You may also be able to remove and fix a damaged outboard rudder while you are still out at sea. There is no way to remove a rudder that is part of the hull and beneath the boat, but a rudder attached to the boat with hinges may be possible to fix at sea.
Outboard rudders are not necessarily weaker than and can be stronger than other types of rudders. The hinges that hold an outboard rudder in place may be stronger than a rudder post.
In some ways, an outboard rudder is worse than either a spade rudder or a full keel rudder. Unlike a full keel rudder, things like rope floating in the water can get caught on an outboard rudder. Objects floating by can also hit and damage an outboard rudder more easily than they can damage a more durable full keel rudder.
Compared to a spade rudder, the outboard rudder is harder to turn. The water pressure will always be on one side of the rudder; this is not always the case with spade rudders.
Skeg mounted rudders
Skeg rudders are both durable and possible to use on fin keel rather than full keel boats. Skeg mounted rudders are more durable than the spade rudders you usually find on fin keel boats.
Skeg mounted rudders have the same disadvantage as full keel rudders and outboard rudders, which is that they require more energy to turn. The water will put all of its pressure on one side of the rudder. Only spade rudders avoid this problem.
Is a tiller better than a wheel?
Either for inexperienced or veteran sailors, a tiller can work better. With a tiller, you will get immediate feedback. If you turn a wheel, the boat won't turn right away, which can confuse or annoy a new sailor.
The tiller should be long enough, as it is harder to turn if it is shorter. In strong winds, you need a long lever to turn your boat without it taking a great deal of strength.
It is easier to turn a wheel than to turn a tiller, as there is more leverage with a steering wheel. Therefore, wheels are better for larger boats; as a tiller is harder to turn with a bigger boat.
A tiller's advantage is that it is more responsive than a wheel, even though it is harder to turn. The boat will start to change direction almost immediately if you use a tiller. In racing, it is normal to use a tiller because you can change direction more quickly.
How does a rudder work?
A rudder works through water pressure. If you turn the rudder, the pressure becomes higher on one side of the rudder than the other. The rudder then moves toward the side with the lower pressure, which causes the boat to change direction.
When a sailboat turns, it pivots around a point near the middle of the boat. Both the stern and the bow move simultaneously, with the middle of the boat not moving. You have to take this into account while sailing, or else you might swing the end of your ship into another boat.
What is the purpose of the keel?
The keel keeps the boat stable. Without a keel sticking down from the boat into the water, it would be easy for the wind to push the boat around. Without a keel, the wind could easily push you sideways and make the ship much harder to control.
A keel is also weighted. The keel is full of ballast, which is weight that keeps the boat from flipping over. Without ballast, a boat would be top-heavy and unsafe.
Keels are usually made out of the same material as the rest of the boat - if the boat is aluminum, the keel will be as well. The ballast is usually lead.
While full keels are better in rough weather in most ways, a fin keel does a better job of preventing the wind from blowing your boat around. Wind can create leeway, which is sideways movement of the boat. Leeway is most likely if you are sailing into the wind.
Do rudders often fail at sea?
Yes, a rudder failure is one of the more common hazards you might encounter at sea. Not every sailboat has a good, durable rudder. The rudders on cheap boats, especially cheap fiberglass boats, can fail.
The rudder pole should neither be too weak nor too strong. If the rudder pole is too weak, it will bend easily. If it is too strong, it may damage the hull rather than bend, which is even more dangerous.
A rudder has a metal framework inside of it. If the framework breaks, the rudder will become unusable. With a cheaper boat, the metal framework may not be welded together properly.
Make sure you buy a sailboat that has a reputation for safety. Don't buy the cheapest boat you can find - look into whether or not the boat is safe to take out to sea.
Related Articles
I've personally had thousands of questions about sailing and sailboats over the years. As I learn and experience sailing, and the community, I share the answers that work and make sense to me, here on Life of Sailing.
by this author
Learn About Sailboats
Sailboat Parts
Most Recent

What Does "Sailing By The Lee" Mean?
October 3, 2023

The Best Sailing Schools And Programs: Reviews & Ratings
September 26, 2023
Important Legal Info
Lifeofsailing.com is a participant in the Amazon Services LLC Associates Program, an affiliate advertising program designed to provide a means for sites to earn advertising fees by advertising and linking to Amazon. This site also participates in other affiliate programs and is compensated for referring traffic and business to these companies.
Similar Posts

Affordable Sailboats You Can Build at Home
September 13, 2023

Best Small Sailboat Ornaments
September 12, 2023

Discover the Magic of Hydrofoil Sailboats
December 11, 2023
Popular Posts

Best Liveaboard Catamaran Sailboats
December 28, 2023

Can a Novice Sail Around the World?
Elizabeth O'Malley

4 Best Electric Outboard Motors

How Long Did It Take The Vikings To Sail To England?

10 Best Sailboat Brands (And Why)
December 20, 2023

7 Best Places To Liveaboard A Sailboat
Get the best sailing content.
Top Rated Posts
Lifeofsailing.com is a participant in the Amazon Services LLC Associates Program, an affiliate advertising program designed to provide a means for sites to earn advertising fees by advertising and linking to Amazon. This site also participates in other affiliate programs and is compensated for referring traffic and business to these companies. (866) 342-SAIL
© 2024 Life of Sailing Email: [email protected] Address: 11816 Inwood Rd #3024 Dallas, TX 75244 Disclaimer Privacy Policy
How to Build a Sailboat Rudder From Scratch

Introduction: How to Build a Sailboat Rudder From Scratch

Step 1: Previous Rudder

Step 2: Rebuild


Step 3: Sanding

Step 4: Fiberglass Layup

Step 5: First Layer and Sanding

Step 6: Additional Layers and Difficult Spots

Step 7: Notes of Caution

Step 8: Hardware Holes

Step 9: Painting

Step 10: The End!

Recommendations

Text Contest

Puzzles and Games Contest

Make it Resilient


Boat Plans, Patterns and Supplies For the Amateur Boat Builder!
- Boat Plans Catalog – 300 Boats You Can Build!
- Boatbuilding Supplies & Epoxy
- Inboard Hardware
- Electrical Design Plans
- Books, DVD’s & Audio
- Boat Trailer Plans
- Raptor® Fastenings & Tools
- Glen-L RV Plans
- Gift Certificates
- Boatbuilder Blogs
- Boatbuilder Galleries
- Newsletter Archives
- Customer Photos Archives
- Where Do I Start…
- About Our Plans & Kits
- Boatbuilder Forum
- Boatbuilder Gatherings
- Boatbuilding Methods
- Featured Design on TV’s NCIS
- Our Boats in Action
Small boat kick-up rudder
Rigging small sailboats.
….. deck fittings
Some comments on winches have been made previously. The variety and type of winches available to the sailor is enormous, but for the small boat sailor, winches usually are restricted to the smaller sizes used to control the jib and Genoa sheets. Winches can be used for the halyards, boom vang, and mainsheets, if desired. On small boats the cost is usually prohibitive, and the extra power gained is not required, as these lines can be handled by the crew or by other means, such as tackles, equally well.
RUDDER FITTINGS
Small sailboats usually have rudders which are called “outboard” rudders because they hang onto the aft end of the boat in full view. Boats which have rudders under the hull and the rudder stock passing through the hull bottom are said to have “inboard” rudders, but these are usually associated with large boats. The ordinary small boat rudder is attached to the boat with fittings that also allow the rudder to pivot or turn. These fittings are called GUDGEONS and PINTLES. These are arranged in pairs, with the gudgeons usually being attached to the boat, and the pintles fastened to the rudder. The pintles are strap-like fittings with the rudder fitting between the straps, and with a pin at the forward edge which fits into the “eye” of the gudgeons (see Fig. 6-10). As with most fittings, many sizes and types are available. Often gudgeons and pintles come in pairs which have a long pintle and a shorter one. These types make it easier to put the rudder on the boat, as the long pintle will be in position first, thereby acting as a guide for the short one. If both pintles are the same length, both must fit into the gudgeons at the same moment, which is frustrating at times, especially when trying to place the rudder in position when afloat. Because many small boat rudders are made of wood, the tendency is for these to float up and out of the gudgeons, of course, making for an immediate loss of steering and much embarrassment. A device called a RUDDER STOP can be used to prevent this from occuring. These are standard marine hardware items very simple in nature.
| FIG. 6-11 – This special factory-made kick-up rudder fitting incorporates the rudder gudgeons and pintles. The fitting mounts to the transom of the boat but allows the rudder to be removed. This fitting is normally used on small boats only. (You can order an updated version of this part in the ). | |
For small sailboats which land on the beach, it is desirable to have the rudder “kick up” when approaching shallow waters. Special “kick-up” rudder fittings such as shown in Fig. 6-11 are available, which also have the gudgeons and pintles attached as an integral unit, and perform this function. With a little effort, you can make your own “kick-up” rudder similar to the detail shown in Fig. 6-12.
FIG. 6-12 – One method of making a kick-up rudder using wood. When the pin is removed, the rudder will automatically come up when hitting the beach.
FIG. 6-13 – This tiller extension was made by merely cutting the tiller in half at the forward end and fastening it with a bolt. A more convenient type uses a swivel connection in lieu of the bolt for universal action. The line shown is a rope traveler which can be adjusted in length and is secured to the jam cleat on the deck.
The rudder is controlled by a handle called the TILLER. Sometimes the tiller passes through a hole in the transom (back of the boat), but usually it is located above the aft deck area and pivots up and down so the crew can move about easily. The length of the tiller is best determined in actual use, so it should be made longer than necessary. It’s much easier to cut off a long tiller than to add length to a short one. A device recommended for easier control, especially when tacking or sailing to windward, is a TILLER EXTENSION or “hiking stick,” an example of which is shown in Fig. 6-13. When sailing to windward in a small boat, the boat usually heels considerably and the crew must lean out to windward (or “hike out”) to counteract this. In order to hang onto the tiller in this position, an extension is required, fixed to the forward end of the tiller and preferably fitted with a universal-type joint. Naturally, the length of such a unit is best determined in actual use, so it is best to get a long one which can be cut, instead of getting one too short which can’t be added to.
The next WebLetter will start Part II …how to install the rigging.
Comments are closed.
Connect with us:
Customer builds.
Useful Information
- Cost & Time To Build
- Links & Suppliers
- Online Glossary
- Support Knowledge Base
- Teleseminars
- Wood & Plywood
Building Links
- How Fast Does It Go?
- Install A Jet Ski Motor
- Modifying The Motorwell
- Sailboat Hardware Notes
Glen L Marine Design
- About Glen L
- How To Place an Order
- Privacy Policy
Copyright Info.
Copyright 2006-2022 by Glen L Marine Designs. All rights reserved.
Mailing Address: 826 East Park Ave. Port Townsend, WA 98368
Web design by Big Guns Marketing , LLC.

Small Craft Advisor
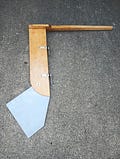
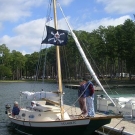
Build Your Own Kick Up Rudder
William mantis offers up plans for a creative and effective diy rudder.
by Bill Mantis
I built a rudder for my 8.5’ x 4.5’ sailboat—named City Slicker 2. 0—the same time I built the boat itself, two years ago . Since I was in a hurry to get it done, I didn’t bother designing a kick-up rudder, figuring I could make the modification at a later date. But then I lost it. I lost my rudder. How does one lose a rudder? I can’t explain how it happened. I only know I had it when I came ashore one day, and didn’t have it the next time I tried to launch. Fortunately, I’d been designing a kick up rudder before suffering the loss, and I had the necessary epoxy and lumber on hand. Only the material for the rudder blade and new pintles had to be ordered. As a result, I lost only one week of the sailing season.

Keep reading with a 7-day free trial
Subscribe to Small Craft Advisor to keep reading this post and get 7 days of free access to the full post archives.

World Class Rudders, Tillers, and other Gear for Real Life Sailing
Sailboat rudders, sailboat tillers, custom rudders/ tillers, sailboat accessories, rudder repair worksheet, instructional handbook, looking for a product for your sailboat.
Can't Find your Sailboat?
Why Rudder Craft?
At Rudder Craft we build every sailboat rudder with the singular focus of improving your sailboat’s steering performance. In order to accomplish this our sailboat rudders incorporate a hydrofoil design, as a matter of course. Sailboats ranging from the West Wight Potter 15, all the way up to the MacGregor 36 and Catalina 42, will find a more accurate helm once a Rudder Craft hydrofoil sailboat rudder is installed.
Why Hydrofoil?
Operating on principles similar to airplane wings, the foiled sailboat rudder design generates lift as the sailboat makes way. By employing the sailboat rudder to reduce drag, and increasing the force the sailboat rudder is able to exert, any sailboat will find themselves performing better: weather helm is reduced, tacking is crisper, points of sail are easier to keep, and helm effort is greatly reduced in light and moderate air.
Why Use a Kick-up Rudder?
Subscribe to our blog.
Join our mailing list to receive the latest news and updates from our team.
You have Successfully Subscribed!
No results found.
The page you requested could not be found. Try refining your search, or use the navigation above to locate the post.
Blog Coming Soon!
Customer reviews.
Building, restoration, and repair with epoxy

How to Build Rudders & Centerboards
by Captain James R. Watson
When the centerboard of my Searunner trimaran broke in the middle of a windy race around the Black Hole, the question I kept asking was “Why now, after working fine all of this time, and when we were leading the race?”
“Guess it just wore out” was my excuse to myself. This centerboard was built of laminated layers of plywood, resulting in a thickness of 2″. It was then covered with two layers of 6-oz woven fiberglass fabric. It was a deep and wide board with a lot of area, and like any rudder or centerboard on a boat that is sailed hard, it was exposed to a fair amount of stress.
The answer to “Why now – while leading the race?” could have been fate. But there is a more scientific answer. Extensive laboratory testing at Gougeon Brothers, Inc. defines why the centerboard failed. Understanding why can help us design and construct components that will perform more efficiently and last much longer.
The plywood centerboard did, in fact, wear out – or more accurately – it failed from rolling shear fatigue. Fatigue cracks in a material result from repeated (cyclic) stress. Fatigue is a reality of all structures and materials and eventually culminates in structural failure. Repeated loading and unloading or even worse, loading one way and then the other (reverse axial), rapidly reduces a material’s physical integrity and accelerates degradation. The higher the load is as a percentage of the material’s ultimate strength, the more rapid is the deterioration.
Some materials have a greater fatigue life than others. Ounce per ounce, wood is capable of operating at a much higher percentage of its ultimate stress level than most other materials. That is why such wonderfully efficient structures can be built with wood. However, plywood is not a good choice for cantilevered structures such as rudder blades and centerboards. This is because plywood is susceptible to rolling shear, shearing forces that roll the structural fibers across the grain. Plywood’s unidirectional wood fibers are laid in alternating layers, approximately half of them are oriented 90 degrees to the axis of the loads. Like a bundle of soda straws, which resist bending moments quite well one way, they simply lack cross-grain strength laterally and can roll against one another and fail under relatively low stress, especially in a cyclic environment. Therefore, when anticipated loads are primarily unidirectional, it is ideal to use a material with good unidirectional strength. Since only half of the plywood’s wood fiber is used to advantage, a plywood rudder blade or centerboard going from tack to tack (reverse axial loads) will fatigue much more rapidly than one built as described in this article.
If you were to look at the end of the board, say a fish’s view of a centerboard or rudder blade, you’d view its cross-section. A section that has a faired airfoil shape is preferred over one that is flat with parallel sides. This is because the airfoil shape produces lift when moving through the water, thereby counteracting the sideward forces exerted by the sail rig. A flat section produces less lift and at a great expense of drag, slowing the boat and making it more difficult to steer.
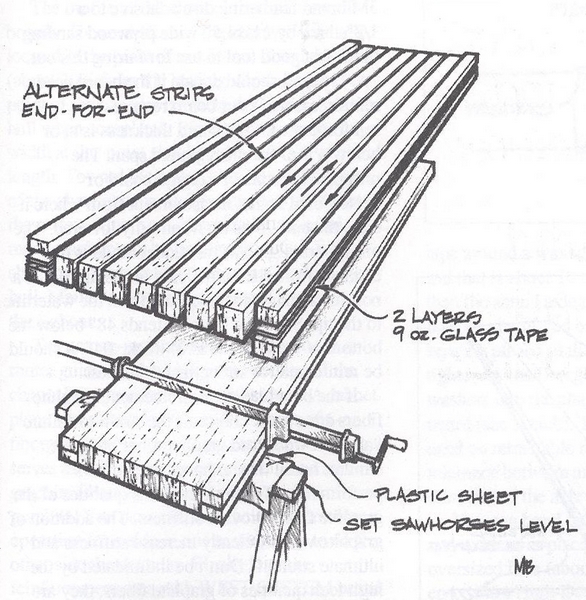
“Turn every other ripping end-for-end to neutralize the effects of any grain that does not run exactly parallel to the blank, and to reduce tendencies to twist. Rotate the rippings 90 degrees to expose the vertical grain and to permit easier shaping with a plane.
The selection of a proper camber and section can be a subject of great theoretical debate. One can become intimidated with technical terms such as thickness distribution, Reynolds number, boundary layer, and so on. These terms do relate to the subject, however, for the builder/sailor whose boat floats forlornly in need of a rudder blade the following will do just fine. In fact, the best designers and builders will be hard-pressed to do better.
An excellent choice for most craft is a realistically accurate and fair NACA (National Advisory Committee for Aeronautics) 0012 airfoil, where maximum board thickness is 12% of the fore/aft length (chord length). Maximum thickness is located about 30% of the chord length measured from the leading edge (see sketch). The dimensions used to establish a specific shape (called offsets) are given in the appendix of Abbott & Doenhoff’s The Theory of Wing Sections. You’ll also find further information in my article How to loft Airfoil Sections.
From offsets make a good drawing of half the section on transfer paper.
Western red cedar and redwood are good choices of wood to use for rudder blades and centerboards for boats up to 25 feet. Both of these woods bond very well are generally clear and straight-grained, have good dimensional stability, are easily worked and affordable. Cedar is just a little heavier than the foams used for rudders, is much stiffer, and has far greater shear strength values. On larger craft, a higher-density material like African mahogany is a better choice. Oak is not a good choice.
Buy flat-grained 2’x6″s or 2’x8″s, and then rip them to the designed board thickness. Turn every other ripping end-for-end to neutralize the effects of any grain that does not run exactly parallel to the blank, and to reduce tendencies to warp or twist (see sketch). Rotating the rippings 90 degrees to expose vertical grain will permit easier shaping with a plane. The last trick is to rip the end pieces of the nose and tail in half. Bonding with a couple of layers of glass tape between keeps the fine edge of the tail from splitting too easily and offers a precise centerline.
Bond the ripping with a slurry of epoxy and 404 High-Density filler. Plastic strips prevent inadvertent bonding to leveled sawhorses (see sketch). With both sawhorses leveled, you’re positive no twist exists in the laminated blank. Bar clamps should be snugged until excess glue squeezes from the joints. Over tightening only stresses joints and tends to squeeze all the adhesive from them. When the laminate is cured, a light planing to clean the surfaces is all that is needed before shaping begins.
Centerboards and rudder blades are often overlooked components that are vital to a boat’s performance.
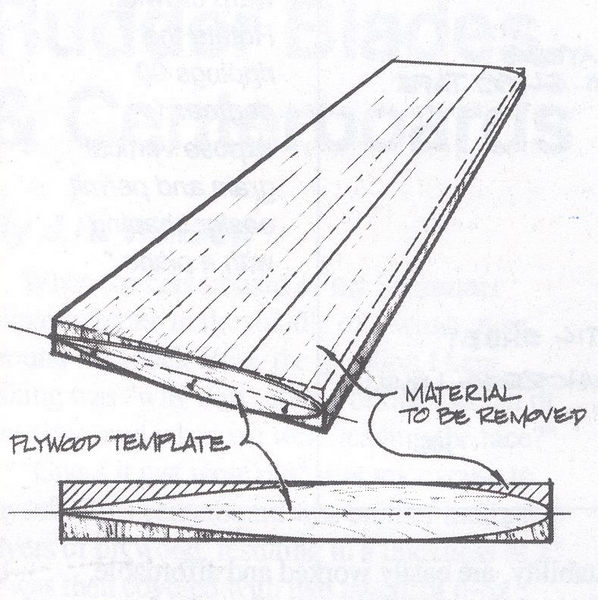
First, tack the 1/8″-thick plywood template that describes the cross-section shape to the blank’s ends. This is sawn from the impression made when traced with the transfer paper you originally drew it on. The key to producing an accurate and symmetrical board is maintaining a systematic removal of material from one side, then from the other. To do this, mark the shape to be removed, stick to straight-line shapes (see sketch). Use a smoothing plane to remove the wood.
After planing to the guidelines on one side, flip the blank over and plane the same shape on the other side. The procedure is similar to producing a round shape from a square by first forming an octagon, and then flattening the resulting eight corners to produce a 16-sided shape and refining that until very minute flat surfaces exist. Fifty-grit sandpaper bonded with 3M brand feathering disc adhesive to a 1/2″-thick by 11’x4.5″-wide plywood sanding block is a good tool to use for fairing this out.
Now you should decide if the board needs reinforcement. Your board requires reinforcement if the chord thickness is at or below 4% of the unsupported span. The unsupported span of a daggerboard or centerboard is that measurement from where it exits the hull, to its tip when fully lowered. The unsupported span of the rudder blade is the distance from the rudder case to the tip. If it is a non-retracting blade, measure from the waterline to the tip. So, if the board extends 48″ below the bottom of the hull and is 2″ thick, .04″, it should be reinforced for strength and stiffness.
If the board needs reinforcement, graphite fibers are a good choice as the strain-to-failure values of wood and graphite fiber are quite similar, hence they enhance each other’s performance. The high-modulus qualities of the graphite fibers provide stiffness. The addition of graphite will efficiently increase stiffness and ultimate strength. Don’t be intimidated by the high-tech qualities of graphite fibers, they are easy to work with.
The amount of reinforcement needed is usually figured at 10% chord thickness. Using the same board for our example, the board is 2″ thick, then 10% equals .20″ total reinforcement, .10″ per side. Graphite fiber tows are .01″ thick, so 10 tows per side should give the necessary reinforcement to do the job.
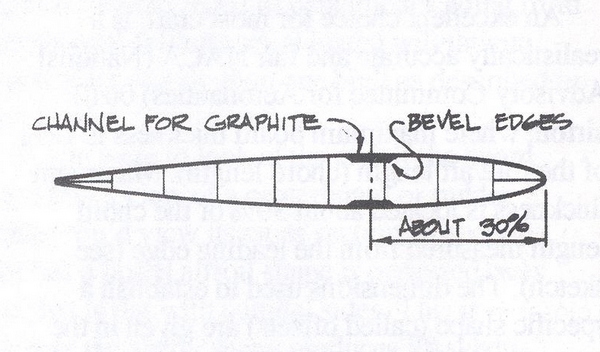
The graphite fibers will be laid into a channel routed into the shaped centerboard.
The graphite fibers will be laid into a channel that is routed into the shaped board (see sketch). The specific depth of the channel is determined by the above rule. Make the channel a little deeper than what’s required (1/16″) so you won’t be sanding the graphite fibers.
The profile of the channel is similar on all boards. The centerline of the channel is usually located at the point of maximum chord thickness (about 30% from the leading edge). The widest point of the channel is where the board exits the hull when completely lowered. The channel width at this point should be about 16% of chord length. Toward the ends of the board, the width of the channel narrows by about one-third that of the widest dimension. Keeping this in mind, more graphite can be laid in that area, a little above and more below that point that exits the hull. Maintain a consistent channel depth throughout.
Take a one-inch-square stick to serve as a router guide. It’s best to bevel the edge of the channel to reduce stress concentration. A rabbet plane serves best for this task. A layer of 6-oz fiberglass cloth is laid in the channel first (this serves as an interface between the wood and graphite fiber), followed by the schedule of graphite. You can complete the entire bonding operation for a side in one session. Try to do the other side the next day. Finally, fair the reinforcement area with WEST SYSTEM brand epoxy and a low-density filler.
A layer of 6-oz woven-glass fabric should then be bonded to the faired board to improve the cross-grain strength and abrasion resistance. The radius of the leading edge should be about a 1% radius of the chord length, and may not permit the fiberglass fabric to lie flat around the radius. In that event, cut a strip of woven glass fabric on the bias (which will lie around a tighter radius) and bond it around the leading edge.
It is better to leave the trailing edge slightly squared rather than razor-sharp. This will cause less drag and the centerboard will be less vulnerable to damage. Flatten the trailing edge to 1/16 or 1/8 of an inch on small boards, and closer to 1/4 of an inch on larger boards.
Any board, no matter how stiff, will deflect. To prevent the axle hole that the centerboard pivots on from binding when deflection occurs, make the hole somewhat larger than the pin diameter. The perimeter of the axle hole should be thoroughly protected with fiberglass, as exposed end grain can absorb moisture.
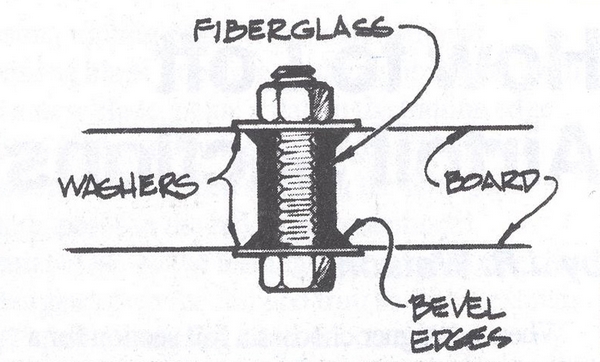
To prevent the axle hole from binding when deflection occurs, make the hole a little larger than the pin diameter.
Abrasion of the axle against the axle hole dictates that you should bond fiberglass into the hole’s perimeter. To do that, wrap fiberglass tape around a waxed (use auto paste wax) metal rod that is about 10 to 15% larger in diameter than the actual axle pin. The hole should be heavily chamfered on each side, so when the wet layup is placed in the hole and the nuts tightened, the fiberglass is pressed by the large washers into the chamfers on both sides of the board (see sketch). The same procedure may be used on retractable rudder blades, but the tolerance between axle hole diameter and the diameter of the axle pin should be closer.
You can bond control lines for centerboards and rudders-in-place by wetting a slightly oversized hole (about 1.5″ to 2″ deep) with epoxy/404 High-Density filler mixture. It helps to mark the hole’s depth on the rope with vinyl electricians tape to serve as a guide. Then, after soaking that end of the rope to be bonded in epoxy for a minute or so, shove it in the full depth of the hole.
Centerboards and rudder blades are often overlooked components that are of vital importance to a boat’s performance. Built correctly, they will reliably operate with the efficiency of a fish’s fin, and you should note a measurable improvement in the quality of pointing and steering of your windship.
References:
1. Jozset Bodig, Ph.D., Benjamin A Jayne Ph.D., Mechanics of Wood and Wood Composites 2. Johnston, Ken, Some Thoughts on Rudder Sections , Multihulls Magazine (Jan/Feb 1980) 3. Eck Bransford, Everything You Ever Wanted To Know About 505 Fins 4. Lindsay, Mark, Centerboards and Rudders , Yacht Racing/Cruising Magazine (April 1981) 5. Abbott and Doenhoff, Theory of Wing Sections, Dover Publications, Inc. New York (1959) 6. Captain James R. Watson, How to Loft Airfoil Sections , Epoxyworks 1 (Fall 1992)

IMAGES
VIDEO
COMMENTS
Sailboats use full keel rudders, spade rudders, outboard rudders, and skeg-mounted rudders, plus variations on each type. What type of rudder is best depends on the shape of the hull and the boat's size.
How to Build a Sailboat Rudder From Scratch: This particular rudder is built off of the original rudder for a ~20' Bayliner Buccaneer sailboat. The original had cracked and rotted pretty badly. The owner of the sailboat cut the top of the rudder off and made a wooden 'boot' to cap …
For small sailboats which land on the beach, it is desirable to have the rudder “kick up” when approaching shallow waters. Special “kick-up” rudder fittings such as shown in Fig. 6-11 are available, which also have the gudgeons and pintles attached as an integral unit, and perform this function.
Build Your Own Kick Up Rudder. William Mantis offers up plans for a creative and effective DIY rudder. Sep 06, 2023. ∙ Paid. 9. 1. Share. by Bill Mantis. I built a rudder for my 8.5’ x 4.5’ sailboat—named City Slicker 2.0—the same time I built the boat itself, two years ago.
The foiled sailboat rudder design extends through our entire sailboat rudder catalog, and is used in our patented kick-up sailboat rudder, fixed blade, and spade sailboat rudder designs.
Centerboards and rudder blades are often overlooked components that are of vital importance to a boat’s performance. Built correctly, they will reliably operate with the efficiency of a fish’s fin, and you should note a measurable improvement in the quality of pointing and steering of your windship.