Great choice! Your favorites are temporarily saved for this session. Sign in to save them permanently, access them on any device, and receive relevant alerts.
- Sailboat Guide
Lightning is a 18 ′ 11 ″ / 5.8 m monohull sailboat designed by Sparkman & Stephens and built by Nickels Boat Works, Inc., Skaneateles Boat & Canoe Co., Helms - Jack A. Helms Co., Siddons & Sindle, Lippincott Boat Works, J.J. Taylor and Sons Ltd., Lockley Newport Boats, Eichenlaub Boat Co., Mobjack Manufacturing Corp., Clark Boat Company, Allen Boat Co., and Loftland Sail-craft Inc. starting in 1938.


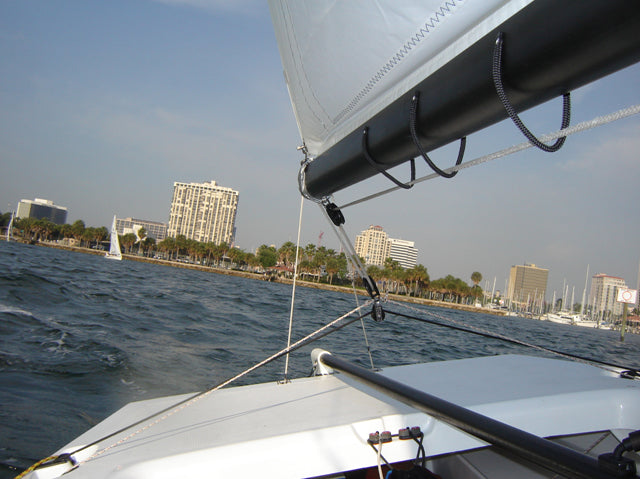
Rig and Sails
Auxilary power, accomodations, calculations.
The theoretical maximum speed that a displacement hull can move efficiently through the water is determined by it's waterline length and displacement. It may be unable to reach this speed if the boat is underpowered or heavily loaded, though it may exceed this speed given enough power. Read more.
Classic hull speed formula:
Hull Speed = 1.34 x √LWL
Max Speed/Length ratio = 8.26 ÷ Displacement/Length ratio .311 Hull Speed = Max Speed/Length ratio x √LWL
Sail Area / Displacement Ratio
A measure of the power of the sails relative to the weight of the boat. The higher the number, the higher the performance, but the harder the boat will be to handle. This ratio is a "non-dimensional" value that facilitates comparisons between boats of different types and sizes. Read more.
SA/D = SA ÷ (D ÷ 64) 2/3
- SA : Sail area in square feet, derived by adding the mainsail area to 100% of the foretriangle area (the lateral area above the deck between the mast and the forestay).
- D : Displacement in pounds.
Ballast / Displacement Ratio
A measure of the stability of a boat's hull that suggests how well a monohull will stand up to its sails. The ballast displacement ratio indicates how much of the weight of a boat is placed for maximum stability against capsizing and is an indicator of stiffness and resistance to capsize.
Ballast / Displacement * 100
Displacement / Length Ratio
A measure of the weight of the boat relative to it's length at the waterline. The higher a boat’s D/L ratio, the more easily it will carry a load and the more comfortable its motion will be. The lower a boat's ratio is, the less power it takes to drive the boat to its nominal hull speed or beyond. Read more.
D/L = (D ÷ 2240) ÷ (0.01 x LWL)³
- D: Displacement of the boat in pounds.
- LWL: Waterline length in feet
Comfort Ratio
This ratio assess how quickly and abruptly a boat’s hull reacts to waves in a significant seaway, these being the elements of a boat’s motion most likely to cause seasickness. Read more.
Comfort ratio = D ÷ (.65 x (.7 LWL + .3 LOA) x Beam 1.33 )
- D: Displacement of the boat in pounds
- LOA: Length overall in feet
- Beam: Width of boat at the widest point in feet
Capsize Screening Formula
This formula attempts to indicate whether a given boat might be too wide and light to readily right itself after being overturned in extreme conditions. Read more.
CSV = Beam ÷ ³√(D / 64)
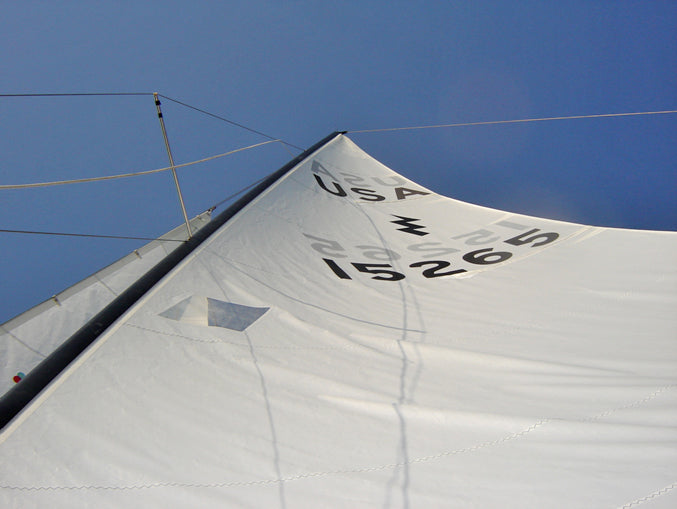
One of the most popular one-design classes in the US since the 1940’s. But fleets also exist in other parts of the world. Although originally designed for wood planked construction, nearly all boats since the early 1960’s have been built of fiberglass. Ballast above is max weight of centerboard.
Embed this page on your own website by copying and pasting this code.
- About Sailboat Guide
©2024 Sea Time Tech, LLC
This site is protected by reCAPTCHA and the Google Privacy Policy and Terms of Service apply.
No risk to you — 100% satisfaction guaranteed! Order Now
LIGHTNING BOATS Serial Number Lookup and Hull Identification Number Decoder
Get a free boat vin lookup and decode for lightning boats..
The first three characters of the Hull Identification Number (boat VIN) affixed to the transom of the boat hull designate the manufacturer of the boat. This is called the Manufacturers Identification Code (MIC) and are assigned by the U.S. Coast Guard. The MIC for LIGHTNING BOATS is LXG.
All manufacturers who historically used LXG:
- LIGHTNING BOATS
No Longer in Business This boat manufacturer is no longer in business.
Contact Details for LIGHTNING BOATS.
These are just some of the LIGHTNING BOATS Hull Id Numbers / Boat VINs we've seen when analyzing accident, registration and coast guard databases to try to determine if there is anything to worry about in the boat's history.
Sample LIGHTNING BOATS Hull Identification Numbers (HINs)
International Lightning Class Association
Class contact information.
Click below
Class Email
Class Website
One-Design Class Type: Dinghy
Was this boat built to be sailed by youth or adults? Both
Approximately how many class members do you have? 1600
Photo Credit:Douglas Wake

Photo Credit: Art Petrosemolo

About International Lightning Class Association
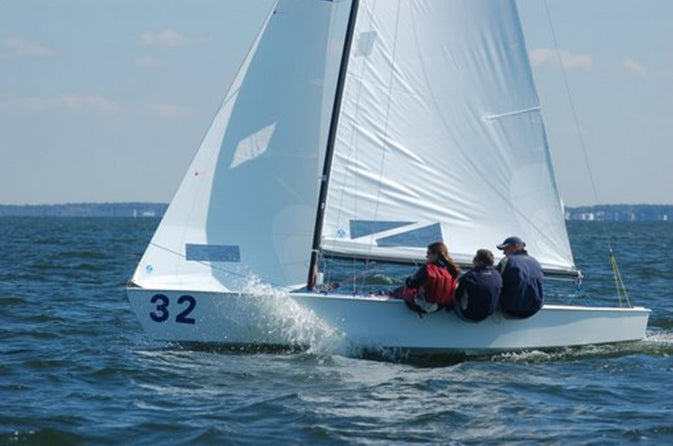
The Lightning truly excels as an affordable racing boat. The rig is simple but offers sophisticated sail shape controls. The hull features a unique hard chine design that combines the stability that provides sail-carrying power, with flat bottom sections that promote planing. At 700 pounds all up, the trailerable centerboard sloop is tough enough to avoid frequent breakdowns, but light enough to plane wildly on the reaches. Membership is diverse with sailors aged 8 to 80+. Many families sail together at top events and it is common to see females make up at least 40% of competitors.
The Lightning is sailed in more than thirteen countries and in the Pan American Games. A World, Master World and Youth World Championships are held every two years. North American, South American and European Championships are held each year as are innumerable regional and District championships. Major regattas attract some of the finest sailors in the world, but you find Class members friendly and the sailmakers’ complete tuning guides helpful at getting you up to speed in a hurry.
The International Lightning Class Association is one of the oldest and best organized class associations in sailboat racing. Its primary purpose is to serve its membership, preserve the integrity of the Lightning and provide high-quality competitive events. In addition, the Lightning Class publishes monthly e-blasts and a quarterly newsletter Flashes with up-to-date regatta news, boat brokerage and ideas on how to get the most out of your Lightning. The professionally managed association and dedicated volunteers are always on hand to assist both current and potential members.
If you’re looking for a boat you can be proud to sail, one that offers dinghy handling with the performance of a sport boat, a refined design that’s free of fads, complete with the technology of today for both racing and day sailing – look at the Lightning.
Boats Produced: 15630+
Class boat builder(s):
Allen Boat Company, Buffalo, NY: https://www.allenboatco.com/
WindRider International: https://www.windrider.com/
Approximately how many boats are in the USA/North America? 11,000+
Where is your One-Design class typically sailed in the USA? List regions of the country:
East of the Mississippi, Mid-West, Texas, Denver, San Diego, Pacific Northwest Click Here for Fleet Finder Map: https://www.lightningclass.org/content.aspx?page_id=451&club_id=93488
Does this class have a spinnaker or gennaker? Yes
How many people sail as a crew including the helm? 3
Ideal combined weight of range of crew: 490
Boat Designed in 1938
Length (feet/inches): 19’0″
Beam: 6’6″
Weight of rigged boat without sails: 700 lbs
Draft: (board down): 4’11”, (board up): 5″
Mast Height: 26’2″
Back to One-Design Central
Copyright ©2018-2024 United States Sailing Association. All rights reserved. US Sailing is a 501(c)3 organization. Website designed & developed by Design Principles, Inc. -->

BoatScope TM
Visit our database page for the nation's premier boat history report with a full compliment of title search resources. Includes eight maritime databases all rolled into one convenient interface. A must-have service for any prospective buyer, marine lender, or maritime professional.
More Information
Hull Number Guidelines Hull Number Verification Check Boat Lien Registry Search Stolen Boat Registry Search State Boat Registration Basics Boat Title Search Resources Boat Title Search Guidelines Boat Titling Glossary
Advertisement
Owner Background Search
Criminal Records Assets - Properties Personal Details
Know your seller!
Sponsored by

Note: The letters "I", "O", and "Q" are forbidden in the Production or Serial Number
In addition to the above formats, you may encounter those which are preceded by country codes such as "US" for the United states, "CN" for Canada, and "FR" for France. This means that the vessel was built for consumption in that respective country. You may also find hull numbers on two separate lines. In this case the second line is not typically considered as part of the hull number. State assigned hull numbers are not always consistent with federal standards.

BoatWiki.Com
The Free Boating Encyclopedia
Databases Guidelines Resources
Definitions Forms Blogs Profiles
All you should know about buying, owning, operating, and selling a boat.
MarineTitle.com
A Division of Maritime Partners, LLC State of Washington USA © Copyright 1998 - 2021 All rights reserved.
Terms of Use Privacy Policy Glossary Partners Contact Us
Service Locator
- Angler Endorsement
- Boat Towing Coverage
- Mechanical Breakdown
- Insurance Requirements in Mexico
- Agreed Hull Value
- Actual Cash Value
- Liability Only
- Insurance Payment Options
- Claims Information
- Towing Service Agreement
- Membership Plans
- Boat Show Tickets
- BoatUS Boats For Sale
- Membership Payment Options
- Consumer Affairs
- Boat Documentation Requirements
- Installation Instructions
- Shipping & Handling Information
- Contact Boat Lettering
- End User Agreement
- Frequently Asked Questions
- Vessel Documentation
- BoatUS Foundation
- Government Affairs
- Powercruisers
- Buying & Selling Advice
- Maintenance
- Tow Vehicles
- Make & Create
- Makeovers & Refitting
- Accessories
- Electronics
- Skills, Tips, Tools
- Spring Preparation
- Winterization
- Boaters’ Rights
- Environment & Clean Water
- Boat Safety
- Navigational Hazards
- Personal Safety
- Batteries & Onboard Power
- Motors, Engines, Propulsion
- Best Day on the Water
- Books & Movies
- Communication & Etiquette
- Contests & Sweepstakes
- Colleges & Tech Schools
- Food, Drink, Entertainment
- New To Boating
- Travel & Destinations
- Watersports
- Anchors & Anchoring
- Boat Handling
- ← News & Issues
Hull Identification Numbers
Advertisement
Confusion over model years, especially on outboard engines, can frustrate buyers. Here's how to find that info on the products themselves.

Photo: Mark Corke
General Motors introduced planned obsolescence in the 1920s as a way of discerning one model year from another, in order to convince the public that buying the latest model car was fashionable, if not exactly necessary. The tradition set by GM survives today. Eventually, consumers began to rely on the model-year change, which usually happened in the fall, to assure that they were getting the latest and greatest. Car buyers still eagerly anticipate the newest technology, and dealers often offer deep discounts to move out last year's models.
Manufacturers of other big-ticket items, such as boats and outboards, followed suit, hoping to convince buyers that the newer the boat, the better the boat. For years, U.S. Coast Guard regulations required boat manufacturers to use August 1 of the previous year as the cutoff date for the next model year. For example, a boat built in September 2011 could be called a 2012 model, but if it was built in July, it had to be sold as a 2011.
When buying a used boat, take a rubbing of the boat's HIN using a pencil and paper to ensure it matches the seller's documents.
In 2012, boatbuilders petitioned the Coast Guard to change the date to June 1, allowing for an extra two months of production to still be labeled as next year's model. Manufacturers argued that because of marine production schedules, which, unlike automaker schedules, tend to fall at erratic times throughout the year, they needed to have more flexibility in designating the time span of their new model year.
The Coast Guard agreed to make the change, permitting a couple of months of last year's boats to be called this year's.
Fortunately, it's fairly simple to find your boat's build date. (See "HINs By The Numbers" below) The information with the boat's model year is contained in the hull identification number (HIN), which is a label permanently affixed to the boat. The number includes a date assigned by the builder. This date is technically not the date of manufacture; rather, it's the date on which the boat was certified by the builder to meet Coast Guard regulations.
HINs By The Numbers
A typical hull identification number (HIN) consists of 12 letters and numbers, as in ABC12345D404 .
Here's what the letters and numbers mean:
ABC: This is the U.S. Coast Guard-assigned manufacturer identification code (MIC). Go to the USCG Manufacturers Indentification page to access the Coast Guard's MIC database.
12345: This is the serial number assigned to the hull by the manufacturer. This may be a combination of letters and numbers. The letters "I," "O," and "Q" are excluded because they could be mistaken for numbers.
D: This is the month of certification, indicating the month in which construction began. "A" represents January and "L" represents December. In our example, "D" means April.
4: This is the year of certification. The number is the last digit of the year in which the boat was built. "4" in this case designates 2004.
04: This indicates the boat's model year.
Some boats, especially large ones, may be on the floor for months before completion (even straddling the June cutoff date), while others may be finished in a matter of days. To be consistent, the Coast Guard uses the date the manufacturer says the boat meets federal regs. Once the HIN is assigned and affixed, that date becomes the boat's model year, regardless of when it was actually finished.
Once a HIN has been put on the boat, it can't be changed without permission from the commandant of the Coast Guard, which rarely happens. New boat buyers should look at the HIN and verify that the boat in which they're interested actually belongs to the model year that the dealer claims for it. Used-boat buyers should also decipher the HIN and make sure it matches what the seller and paperwork state.
What About My Engine?

The Coast Guard has no model-year regulations for outboard engines, making it harder for consumers to determine the year in which they were built. In 2007, Yamaha stopped designating model years for its outboard engines entirely. Though the reasoning is sound, it creates a challenge for consumers.
Unlike cars, in which engines are built into the product, a selection of engines usually can be fitted on outboard boats. Dealers have struggled for years to make sure that the engines bought from an engine manufacturer during one year get sold that same year on new boats.
If a boat on the showroom floor comes with a 200-hp engine but a buyer wants a 250-hp engine, the dealer may have to order the bigger engine and keep the smaller one in stock. If it takes a couple of years to finally sell that 200-hp engine, a buyer may be reluctant to buy it if the model year isn't current, and the dealer may have to subsequently discount it. Buyers typically want a 2017 engine, for example, on their 2017 boat.
Eliminating the model year solves the problem for the manufacturer and dealer but can be confusing for buyers. Other outboard manufacturers, including Mercury and Honda, adopted Yamaha's practice, and most outboard engines today don't have model-year designations. Outboard manufacturers say that until they make a significant change to an engine, the year it was built is irrelevant. While that's true, buyers are concerned that if there's no model-year designation, they don't know if they're getting the newest technology.
Fortunately, there's still a way to determine when an outboard was built. After discontinuing model years, engine manufacturers replaced the model-year designator on the engine's serial number with a code that signifies an "era" in which all engines are supposed to be the same, with similar upgrades. Consumers, however, are concerned that with computer controls, mechanically identical engines could have electronic updates applied to a batch of similar models, and earlier ones might not benefit.
What's considered an upgrade? In the end, the engine manufacturer gets to decide what it is and when there's enough of one to create a new model. Fortunately, dealers usually know which engines in their stock have the most current changes, and you should ask before buying.
What About Warranties?
Manufacturers say that the warranty begins when the engine is sold, regardless of its build date. BoatUS members have asked BoatUS Consumer Protection about engines that may have been sitting around for two or three years. What if they've been damaged over time? By unknowingly buying an engine that may be one, two, or even three years older than their new boat, will they be hit with higher depreciation when it comes time to sell their boat?
Fortunately, the manufacturer's warranty will cover even older engines of the same model, but buyers should verify how many hours are on an engine before buying it. Manufacturers say that depreciation should not be an issue on two identical engines of the same model, regardless of age, but most buyers want the newest one available, and an older engine, even if it's indistinguishable from a newer one, is typically worth less to a first or second buyer.
The good news for consumers is that while outboard engines may not have model years, it's possible to find out when the engine was made. In recent years, a permanent sticker typically can be found on the transom bracket, usually near the serial-number sticker, that gives the month and year of engine manufacture. As a buyer, you can negotiate for the newest engine — or for a discounted older one — if you know what to look for.
Related Articles
The truth about ceramic coatings for boats.
Our editor investigates the marketing claims of consumer-grade ceramic coatings.
Fine-Tune Your Side Scan Fishfinder
Take your side-scanning fishfinder off auto mode, and you’ll be spotting your prey from afar in no time
DIY Boat Foam Decking
Closed-cell foam flooring helps make boating more comfortable. Here’s how to install it on your vessel
Click to explore related articles
Charles Fort
Contributing Editor, BoatUS Magazine
Charles Fort is BoatUS Magazine's West Coast Editor. He often writes local news items for BoatUS Magazine's Waypoints column and contributes to Reports, in-depth tech features in every issue written to help readers avoid accidental damage to their boats. He is a member of the National Association of Marine Surveyors, he's on ABYC tech committees, and has a 100-ton U.S. Coast Guard license. He lives in California.
BoatUS Magazine Is A Benefit Of BoatUS Membership
Membership Benefits Include:
Subscription to the print version of BoatUS Magazine
4% back on purchases from West Marine stores or online at WestMarine.com
Discounts on fuel, transient slips, repairs and more at over 1,200 businesses
Deals on cruises, charters, car rentals, hotel stays and more…
All for only $25/year!
We use cookies to enhance your visit to our website and to improve your experience. By continuing to use our website, you’re agreeing to our cookie policy.
Memorial Day Savings: 15% Off When You Spend $200+ (Applies In Cart)
- Call Us +1-503-285-5536
- Sign in & Register
- Recently Viewed
- One Design Parts
Lightning Parts
West Coast Sailing is your source for Lightning sailboat parts and accessories. The Lightning has 60 years of tradition behind it. This competitive 19-foot trailerable centerboarder is one of the most competitive one-design classes today. But whether you're interested in serious racing or just want to go for a ride, the Lightning gives you what you're looking for. Some great sailors have been 'struck by Lightning': Ted Turner, Dennis Conner, Ken Read, Bill Shore, and Greg Fisher to name a few.
- Qty in Cart

Lightning Jib Sheet 2:1 Continuous

Lightning Jib Sheet 2:1

Lightning Jib Sheet 1:1

Lightning Mainsheet (Fusion)
")
Lightning Mainsheet (SSR)

Lightning Spin Halyard
")
Lightning Spinsheet (SSR)

Lightning Spinsheet Tapered
")
Lightning Spinsheet (Ultra-Lite)

Harken 13 mm Traveler Car w/ Shackle

Harken Cam Cleat Swivel Base w/ 150 Aluminum Cam

Harken 22 mm Double Upright Bullet Block

Harken 40 mm Carbo Block Traveler w/ 29 mm Block

Harken 29 mm Carbo Clew Blocks w/ Ring

Harken Thru-Deck 44 mm Dinghy Block

Ronstan Cam Cleat Fairlead Medium Grey
- Total: items /
- Add all to cart
Adding your products to cart
Rigging - halyards, sheets, and wires.
West Coast Sailing has a full range of designs for all Lightning running and standing rigging which can be built to order in our rig shop. Email our team at [email protected] to learn more . Products coming to our online store Spring 2022.
Rigging Diagram
Use the diagram below to reference Harken part numbers to appropriate application on your Lightning sailboat. Parts recommendations are offered as a guide for common applications.
Adjustable Ball bearing Lead Car
Upgrading to an adjustable lead car system allows you to change your lead under sail without having to tack to unload the car. The Micro CB traveler cars are very small and lightweight, but strong—perfect for the Lightning.
Belowdeck Vang System
This split boom vang lets you easily adjust the vang from both sides while hiking. The 24:1 purchase uses lightweight Carbo blocks for the power needed to control sail shape without adding weight to the boat. The cascading system uses small high-tech line to help keep everything clean above deck.
Diagram provided by Harken. West Coast Sailing is an approved seller of Harken sailboat hardware.
Looking for other sailboat parts? We can help!
General Parts & Hardware - We offer a huge selection of General Parts including hardware, blocks, cleats, shackles, accessories and more here .
Product Suggestions - If you're looking for a specific part for Lightning sailboat that you cannot find, let us know. We are actively working to expand our one design parts offering and welcome your input for parts you think we should be stocking to make it easier for you to get back out on the water. Submit you idea via our Product Suggestion Form (opens in new tab).
Subscribe To Our Newsletter
Sign up for our newsletter to receive exclusive discounts, new product announcements, and upcoming sales.
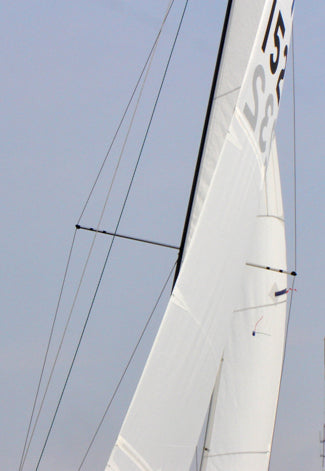
The Lightning is a 19.0ft fractional sloop designed by Sparkman & Stephens and built in wood or fiberglass by Clark Boat Company since 1938.
15550 units have been built..
The Lightning is an ultralight sailboat which is a very high performer. It is reasonably stable / stiff and has a low righting capability if capsized. It is best suited as a racing boat.

Lightning for sale elsewhere on the web:
Main features
Login or register to personnalize this screen.
You will be able to pin external links of your choice.

See how Sailboatlab works in video

We help you build your own hydraulic steering system - Lecomble & Schmitt
Accommodations
Builder data, other photos.

Modal Title
The content of your modal.
Personalize your sailboat data sheet
Yachting Monthly
- Digital edition

Sailing in lightning: how to keep your yacht safe
- In partnership with Katy Stickland
- July 22, 2022
How much of a concern is a lightning strike to a yacht and what can we do about it? Nigel Calder looks at what makes a full ‘belt and braces’ lightning protection system

Storm clouds gather at Cowes, but what lightning protection system, if any, does your boat have for anchoring or sailing in lightning? Credit: Patrick Eden/Alamy Stock Photo
Most sailors worry about sailing in lightning to some extent, writes Nigel Calder .
After all, going around with a tall metal pole on a flat sea when storm clouds threaten doesn’t seem like the best idea to most of us.
In reality, thunder storms need plenty of energy, driven by the sun, and are much less frequent in northern Europe than in the tropics.
However, high currents passing through resistive conductors generate heat.
Small diameter conductors melt; wooden masts explode; and air gaps that are bridged by an arc start fires.

Sailing in lightning: Lightning is 10 times more likely over land than sea, as the land heats up more than water, providing the stronger convection currents needed to create a charge. Credit: BAE Inc/Alamy Stock Photo
On boats, radio antennas may be vaporised, and metal thru-hulls blown out of the hull, or the surrounding fiberglass melted, with areas of gelcoat blown off.
Wherever you sail, lightning needs to be taken seriously.
Understanding how lightning works, will help you evaluate the risks and make an informed decision about the level of protection you want on your boat and what precautions to take.
Most lightning is what’s called negative lightning, between the lower levels of clouds and the earth. Intermittent pre-discharges occur, ionising the air.
Whereas air is normally a poor electrical conductor, ionised air is an excellent conductor.
These pre-discharges (stepped leaders) are countered by a so-called attachment spark (streamer), which emanates from pointed objects (towers, masts, or lightning rods) that stand out from their surroundings due to their height.

Summer is the season for lightning storms in the UK. Here, one finds early at Instow, Devon. Credit: Terry Matthews/Alamy Stock Photo
This process continues until an attachment spark connects with a stepped leader, creating a lightning channel of ionised air molecules from the cloud to ground.
The main discharge, typically a series of discharges, now takes place through the lightning channel.
Negative lightning bolts are 1 to 2km (0.6 to 1.2 miles) long and have an average current of 20,000A.
Positive lightning bolts are much rarer and they can have currents of up to 300,000A.
Preventing damage when sailing in lightning
A lightning protection system (LPS) is designed to divert lightning energy to ground (in this case the sea), in such a way that no damage occurs to the boat or to people.
Ideally, this also includes protecting a boat’s electrical and electronic systems, but marine electronics are sensitive and this level of protection is hard to achieve.
Lightning protection systems have two key components: First, a mechanism to provide a path with as little resistance as possible that conducts a lightning strike to the water.
This is established with a substantial conductor from an air-terminal to the water.

Components of an external and internal lightning protection system. Credit: Maxine Heath
This part of the LPS is sometimes called external lightning protection.
Second, a mechanism to prevent the development of high voltages on, and voltage differences between, conductive objects on the boat.
This is achieved by connecting all major metal objects on and below deck to the water by an equipotential bonding system.
Without this bonding system high enough voltage differences can arise on a boat to develop dangerous side flashes.
The bonding system can be thought of as internal lightning protection.
Rolling ball concept
Lightning standards, which apply ashore and afloat, define five lightning protection ‘classes’, ranging from Class V (no protection) to Class I.
There are two core parameters: the maximum current the system must be able to withstand, which determines the sizing of various components in the system, and the arrangement and number of the air terminals, aka lightning rods.
Let’s look at the arrangement of the air terminals first. It is best explained by the rolling ball concept.
A lightning strike is initiated by the stepped leaders and attachment sparks connecting to form the lightning channel.
The distance between the stepped leader and the attachment sparks is known as the breakdown distance or striking distance.
If we imagine a ball with a radius equal to the striking distance, and we roll this ball around an object to be protected, the upper points of contact define the possible lightning impact points that need to be protected by air terminals.

Lightning protection theories and classifications rely on a ‘rolling ball’ concept to define requirements, areas of risk and protected areas. Credit: Maxine Heath
The air terminal will theoretically provide a zone of protection from the point at which the terminal connects with the circumference of the rolling ball down to the point at which that circumference touches the water.
The shorter the striking distance, the less the radius of the rolling ball and the smaller the area within the protection zone defined by the circumference of the rolling ball.
The smaller the protection zone, the more air terminals we need. So, we use the shortest striking distance to determine the minimum number and location of air terminals.
Class I protection assumes a rolling ball radius of 20m; Class II assumes a rolling ball radius of 30m.
Continues below…

Lightning: why we were struck
A personal investigation into how and why a catamaran was hit by lightning

‘Lightning destroyed the boat’s electronics’
Paul Tinley recounts a truly shocking lightning experience aboard his Beneteau 393 Blue Mistress and the subsequent insurance claim

Expert advice: boating emergency
A boating emergency is the sort of thing that everyone taking to the water should be prepared for even if,…

How batteries can explode – and how to avoid it
Marine electrical expert Nigel Calder explains why boat batteries emit hydrogen and how to minimise the dangers
Boat building standards are based on a striking distance/rolling ball radius of 30m (Class II).
For masts up to 30m above the waterline, the circumference of the ball from the point at which it contacts the top of the mast down to the water will define the zone of protection.
For masts higher than 30m above the waterline, the ball will contact the mast at 30m and this will define the limit of the zone of protection.
If Class I protection is wanted, the radius of the ball is reduced to 20m, which significantly reduces the zone of protection and, on many larger recreational boats, may theoretically necessitate more than one air terminal.
Protection classes
With most single-masted monohull yachts, an air terminal at the top of the mast is sufficient to protect the entire boat to Class I standards.
The circumference of the rolling ball from the tip of the mast down to the surface of the water does not intercept any part of the hull or rig.
However, someone standing on the fore or aft deck might have the upper part of their body contact the rolling ball, which tells us this is no place to be in a lightning storm.
Some boats have relatively high equipment or platforms over and behind the cockpit.

Protection classes to protect your boat while anchored or sailing in lightning
These fittings and structures may or may not be outside the circumference of the rolling ball.
Once again, this tells us to avoid contact with these structures during a lightning storm.
Ketch, yawl, and schooner rigged boats generally require air terminals on all masts, except when the mizzen is significantly shorter than the main mast.
The external LPS
The external LPS consists of the air terminal, a down conductor, and an earthing system – a lightning grounding terminal.
The down conductor is also known as a primary lightning protection conductor.
All components must be sized to carry the highest lightning peak current corresponding to the protection class chosen.
In particular, the material and cross-sectional area of the air terminal and down conductor must be such that the lightning current does not cause excessive heating.
The air terminal needs to extend a minimum of 150mm above the mast to which it is attached.

A graph depicting NASA’s record of yearly global lightning events. The Congo once recorded more than 450 strikes per km2
It can be a minimum 10mm diameter copper rod, or 13mm diameter aluminum solid rod.
It should have a rounded, rather than a pointed, top end.
VHF antennas are commonly destroyed in a lightning strike.
If an antenna is hit and is not protected by a lightning arrestor at its base, the lightning may enter the boat via the antenna’s coax cable.
A lightning arrestor is inserted in the line between the coax cable and the base of the antenna.
It has a substantial connection to the boat’s grounding system, which, on an aluminum mast, is created by its connection to the mast.
In normal circumstances, the lightning arrestor is nonconductive to ground.
When hit by very high voltages it shorts to ground, in theory causing a lightning strike to bypass the coax – although the effectiveness of such devices is a matter of some dispute.
Down conductors
A down conductor is the electrically conductive connection between an air terminal and the grounding terminal.
For many years, this conductor was required to have a resistance no more than that of a 16mm² copper conductor, but following further research, the down conductor is now required to have a resistance not greater than that of a 20mm² copper conductor.
For Class I protection, 25mm² is needed. This is to minimise heating effects.
Let’s say instead we use a copper conductor with a cross-sectional area of 16mm² and it is hit by a lightning strike with a peak current corresponding to Protection Class IV.

Sailing in lightning: This catamaran relies upon cabling to ground from the shrouds but stainless steel wire is not a good enough conductor. Credit: Wietze van der Laan
The conductor will experience a temperature increase of 56°C. A 16mm² conductor made of stainless steel (for example, rigging ) will reach well over 1,000°C and melt or evaporate.
Shrouds and stays on sailboats should be connected into a LPS only to prevent side flashes.
The cross-sectional area of the metal in aluminum masts on even small sailboats is such that it provides a low enough resistance path to be the down conductor.
Whether deck- or keel-mounted, the mast will require a low resistance path, equivalent to a 25mm² copper conductor, from the base of the mast to the grounding terminal.
Grounding terminal
Metal hulled boats can use the hull as the grounding terminal. All other boats need an adequate mass of underwater metal.
In salt water this needs a minimum area of 0.1m². In fresh water, European standards call for the grounding terminal to be up to 0.25m².
A grounding terminal must be submerged under all operating conditions.
An external lead or iron keel on monohull sailing boats can serve as a grounding terminal.

This owner of this Florida-based yacht decided to keep the keel out of the equation when is came to a grounding plate. High electrical currents don’t like sharp corners, so a grounding plate directly beneath the mast makes for an easier route to ground. Credit: Malcolm Morgan
In the absence of a keel , the cumulative surface area of various underwater components – propellers, metal thru-hulls, rudders – is often more than sufficient to meet the area requirements for a grounding terminal.
However, these can only be considered adequate if they are situated below the air terminal and down conductor and individually have the requisite surface area.
Metal through-hulls do not meet this requirement.
If underwater hardware, such as a keel, is adequate to be used as the grounding terminal, the interconnecting conductor is part of the primary down conductor system and needs to be sized accordingly at 25mm².
Propellers and radio ground plates
Regardless of its size, a propeller is not suitable as a grounding terminal for two reasons.
First, it is very difficult to make the necessary low-resistance electrical connection to the propeller shaft, and second, the primary conductor now runs horizontally through the boat.
The risk of side flashes within the boat, and through the hull to the water is increased.

Sailing in lightning: GRP hull, fairing filler and iron keel will have carried different voltages during the strike – hence this damage
An engine should never be included in the main (primary) conducting path to a grounding terminal.
On modern engines, sensitive electronic controls will be destroyed in a lightning strike, and on all engines, oil in bearings and between gears will create resistance and therefore considerable heat which is likely to result in internal damage.
However, as it is a large conductive object, the engine should be connected to the internal lightning protection system.
Internal lightning protection
On its way to ground, lightning causes considerable voltage differences in adjacent objects – up to hundreds of thousands of volts.
This applies to boats with a functioning external lightning protection system but without internal protection.
Although the lightning has been given a path to ground along which it will cause as little damage as possible, dangerous voltages can be generated elsewhere, resulting in arcing and side flashes, threatening the boat and crew, and destroying electronic equipment.
We prevent these damaging voltage differences from arising by connecting all substantial metal objects on the boat to a common grounding point.

One of the holy grails of marine photography – a direct lightning strike on a yacht’s mast. Credit: Apex
The grounding terminal is also wired to the common grounding point.
By tying all these circuits and objects together we hold them at a common voltage, preventing the build-up of voltage differences between them.
All conductive surfaces that might be touched at the same time, such as a backstay and a steering wheel, need to be held to the same voltage.
If the voltages are the same, there will be no arcing and no side flashes.
The bonding conductors in this internal LPS need to be stranded copper with a minimum size of 16mm².
Note that there can be bonding of the same object for corrosion prevention, lightning protection, and sometimes DC grounding.
We do not need three separate conductors.
Electronic Device Protection
With lightning protection systems, we need to distinguish electric circuit and people protection from device protection.
Even with an internal LPS, high induced voltages may occur on ungrounded conductors (such as DC positive) which will destroy any attached electronics.
A mechanism is needed to short high transient voltages to ground.
This is done with surge protection devices (SPD), also known as transient voltage surge suppressors (TVSS) or lightning arrestors.

Marine-specific SPDs are few in number and domestic models are not suitable for boats
In normal circumstances these devices are non-conductive, but if a specified voltage – the clamping voltage – is exceeded they divert the spike to ground.
There are levels of protection defined in various standards depending on the voltages and currents that can be handled, the speed with which this occurs, and other factors.
This is a highly technical subject for which it is advisable to seek professional support.
Most SPDs are designed for AC circuits.
When it comes to DC circuits there are far fewer choices available to boat owners although there are an increasing number for solar installations that may be appropriate.
There is no such thing as a lightning-proof boat, only a lightning-protected boat, and for this there needs to be a properly installed LPS.

Nigel Calder is a lifelong sailor and author of Boatowner’s Mechanical and Electrical Manual. He is involved in setting standards for leisure boats in the USA
Even so, in a major strike the forces involved are so colossal that no practical measures can be guaranteed to protect sensitive electronic equipment.
For this, protection can be provided with specialised surge protection devices (SPDs).
The chances of a direct lightning strike on a yacht are very small, and the further we are north or south of the equator, the smaller this chance becomes.
It’s likely your chances of receiving a direct lightning strike are very much higher on a golf course than at sea.
‘Bottle brush’-type lightning dissipators are claimed by sellers to make a boat invisible to lightning by bleeding off static electrical charge as it builds up.
The theory rests upon the concept that charged electrons from the surface of the earth can be made to congregate on a metal point, where the physical constraints caused by the geometry of the point will result in electrons being pushed off into the surrounding atmosphere via a ‘lightning dissipator’ that has not just one point, but many points.
It is worth noting that the concept has met with a storm of derision from many leading academics who have argued that the magnitude of the charge that can be dissipated by such a device is insignificant compared to that of both a cloud and individual lightning strikes.
It seems that the viable choices for lightning protection remain the LPS detailed above, your boatbuilder’s chosen system (if any), or taking one’s chances with nothing and the (reasonable) confidence that it’s possible to sail many times round the world with no protection and suffer no direct strikes.
Whichever way you go, it pays to stay off the golf course!
Enjoyed reading Sailing in lightning: how to keep your yacht safe?
A subscription to Yachting Monthly magazine costs around 40% less than the cover price .
Print and digital editions are available through Magazines Direct – where you can also find the latest deals .
YM is packed with information to help you get the most from your time on the water.
- Take your seamanship to the next level with tips, advice and skills from our experts
- Impartial in-depth reviews of the latest yachts and equipment
- Cruising guides to help you reach those dream destinations
Follow us on Facebook , Twitter and Instagram.

HIN Search User Guide for iOS, macOS, and Android
Thank you for using HIN Search , our Hull Identification Number decoder and Boat Manufacturer lookup tool!
HIN Search has compressed and optimized the entire US Coast Guard's database of over 16,000 boat companies, and over 30,000 brands to fit on your iOS or Android device, so you can have lightning fast results wherever you are, with NO Internet access needed!
What is a HIN?
Where is the hin, decoding the hin, validating the hin, about the data.
Builder data used compliments of the US Coast Guard.
The Hull Identification Number, or HIN for short, is a 12 or 15 character number that uniquely identifies the boat. All boats manufactured or imported into the US on or after November 1, 1972 should have a HIN, including fishing boats, power boats, sail boats, PWCs (i.e. "Jet Skis"), and most kayaks and canoes. A boat's HIN is different than it's State registration number, which is usually displayed on the bow of the boat. The vessel's HIN will usually be shown on state registrations, bills of sale, and any USCG documentation papers.
Some manufacturers added brand-specific information after the HIN, often separated by a hyphen. Please do not enter this data.
Encoded in the HIN is a 3 digit Manufacturer Identification Code (MIC) assigned by the US Coast Guard. This App includes a database of MIC codes and their assigned companies, so no Internet connection is needed. The data is collected and maintained by the USCG.

On most boats, the HIN will be located on exterior of the hull on the boats upper starboard transom (upper right, back).
On vessels where placing the HIN on the transom is not possible (such as kayaks and canoes) the HIN will usually be located near the stern on the starboard side.
HIN Search will do this for you, but if you're curious about how HINs are encoded, read on. Real HINs do not contain spaces, but we added them to the examples below to make reading them easier.
For boats built or manufactured from November, 1972 until July 31, 1984, the HIN format may look like:

- Manufacturer Identification Code (MIC)
- Hull or Serial Number
- Certification Date (2 digit month, followed by 2 digit year)
Alternatively, some manufacturers used the following format:

For boats built or manufactured August 1, 1984 or later:

On some newer boats you may see a 15 digit HIN, like:

- ISO Country Code of manufacture, usually followed by a dash
- MIC code, and so on as above.
HIN Search will pop up a message if a HIN you enter does not follow any known format, with a hint as to what might be wrong.
For HINs which do follow known formats, HIN Search will perform a variety of checks to make sure the HIN is internally consistent. For instance, making sure the format used was one commonly used at the time, and that the model year and manufacture year are appropriate. HINs which fail the consistency check will be flagged "Suspicious", with the reason given.
If the manufacturer that HIN Search retrieves does not appear to match the boat, it's possible the HIN has been altered, misread, or perhaps not registered properly with the USCG.
HIN Search's validation and consistency checks are good tools for identifying incorrect or altered HINs, but they are not foolproof. There is no centralized database of stolen boat HINs like there is of stolen automobile VINs. If you suspect a boat may be stolen or that it's HIN has been altered you should contact local authorities.
How to Use HIN Search
HIN Search has 4 tabs along the bottom of the screen.

HIN Lookup (Tab 1)
If you have a vessel's full 12 or 15 digit HIN, you can can use this to decode the HIN to determine the boats manufacturer, serial number, and depending on the style of HIN, the boats model year, manufacture year and month. You may tap the "+" button to add it to your favorites for later review.

MIC Lookup (Tab 2)
If you only want to know a boat's manufacturer, you can enter the three digits of the boats Manufacturer Identification Code to retrieve information about the builder or importer. You may tap the "+" button to add it to your favorites for later review.

Builder Lookup (Tab 3)
If you don't know a boats HIN or MIC, you can enter the builder's or importer's name here. It's also good just for retrieving a little bit of history about any company you are curious about. The database has some interesting snippets about some of the companies.

Favorites (Tab 4)
You can review any boats or builders you marked as "Favorites" here.

Settings (Tab 5)
App Settings and Info.
Data Retrieved
The USCG data may contain some or all of the following fields. Most companies do not have all fields populated. This App will only display fields with non-empty data.
The manufacturer data used was collected by the US Coast Guard. The data seems reasonably accurate for recent decades, but the business dates are sometimes inaccurate for older companies. The data included with this App is what the USCG had made publicly available as of this product's version release. Historically, the data changes very slowly. But it is our intent to make periodic updates.
A Special Note on State Issued HINs
Each state has a special MIC for issuing HINs (ie TXZ, NYZ). In the past, this was primarily used for registering homebuilt boats. However, in recent years states have been “re issuing” HINs on older boats. This is usually done in situations where the HIN is not known, lost, not issued, or originally formatted incorrectly. The last scenario for incorrectly formatted (for often seemingly trivial reasons) can be aggravating as all the useful information (manufacturer, serial number, build date, etc.) which is normally encoded in the HIN is lost. The date used in the date portion of state HINs is usually the inspection or issue date, not the actual build date.
A Note on Model Numbers
When looking at unknown boats, figuring out their model numbers is something many of us would like to be able to do. Unfortunately, there is no way to universally determine model number based on a boat's HIN. Some manufacturers used the first few digits of the HIN Hull # to denote the boats length or model number, but many didn't. Some manufacturers added "something extra" after the HIN, but many didn't. Sometimes the only way to determine a boat's model number is to contact the manufacturer with the HIN, which can be problematic as sadly so many of them are no longer in business.
For more information about this app or our other projects, please visit as at www.HINSearchPlus.com .
We would appreciate your feedback! Please email us at [email protected] if you have any complaints, suggestions, or comments.
Would you like to know current and recent ocean conditions? Try NOAA Buoy Reports , our app that not only tells you current ocean buoy conditions, but past history up to 45 days!

Quickly get the latest observations, recent history, and forecasts for most of the rivers, streams, and waterways that NOAA actively monitors in the USA with Rivercast . Check out our great map interface and interactive graphs!

Are you wiring new systems or rewiring old on your boat, RV, or car? Try WireSizer , our ABYC conforming wire gauge and voltage drop calculator!
- Print This Page
- Text Size
- Scroll To Top

Product Details

Lightning Class Supporters
- Sail Care & Repair
- Sailing Gear
- Find A Loft
- Sail Finder
- Custom Sails
- One Design Sails
- Flying Sails
- New Sail Quote
- 3Di Technology
- Helix Technology
- Sail Design
- NPL RENEW Sustainable Sailcloth
- Sailcloth & Material Guide
- Polo Shirts
- Sweaters & Cardigans
- Sweatshirts & Hoodies
- Accessories
- Mid & Baselayers
- Deckwear & Footwear
- Luggage & Accessories
- Spring Summer '24
- Sailor Jackets
- Maserati X North Sails
- NS x Slowear
- T-shirts & Tops
- Sailor Jacket
- Sustainability
- North Sails Blog
- Sail Like A Girl
- Icon Sailor Jacket
- Our Locations
- Certified B Corporation
- North SUP Boards
- North Foils
- North Kiteboarding
- North Windsurfing
SAIL FINDER
SAILING GEAR
COLLECTIONS & COLLAB
COLLECTIONS
WE ARE NORTH SAILS
ACTION SPORTS
Popular Search Terms
Collections
Sorry, no results for ""
Subscription
Welcome aboard, welcome to north sails.
Stay up to date with the latest North Sails news.
Receive a 10% discount code for your first apparel order. Excludes sails and SUP’s. See our Terms and Conditions .
Yes, I agree to the terms of use and privacy policy.
LIGHTNING TUNING GUIDE
Proper boat speed depends mostly on constant and consistent adjustments to your rig and sails. The following measurements are those we have found to be the fastest settings for your new North Sails. We have included information on both the tuning of the M-5 and the Fisher design sails. The M-5 is a more backstay sensitive sail, which sails fastest when the blocks and the lower shrouds are adjusted corresponding to the change in conditions. The Fisher mainsail responds best to mainsheet tension with less emphasis on adjustment to the backstay, the blocks and the lower shrouds. Both tuning techniques have proven to be very fast and we’re confident that through following the basic numbers we offer in this tuning guide you’ll find top speed in all conditions. However, as always, your North Lightning team is anxious to help you any way we can. Feel free to call or e-mail us anytime! Good luck and good sailing! In our new tuning guide we have divided the Fisher and the M-5 tuning procedures. You will notice after we describe marking your headstay, placing the butt of your mast and setting the length of your headstay, that the M-5 Tuning System is listed step by step followed by the Fisher Tuning System. Note that the techniques used in setting both systems are quite different. Please check it over carefully! All of your North Lightning representatives are comfortable with the tuning for both techniques. Should you have any questions about either style, we urge you to call us. We are always happy to help you.
THE STEPS IN TUNING
The tools necessary for properly tuning your boat are a 50 foot tape measure, a small Loos tension gauge (the Model A pictured right or the newer PT-1) and a permanent marker.
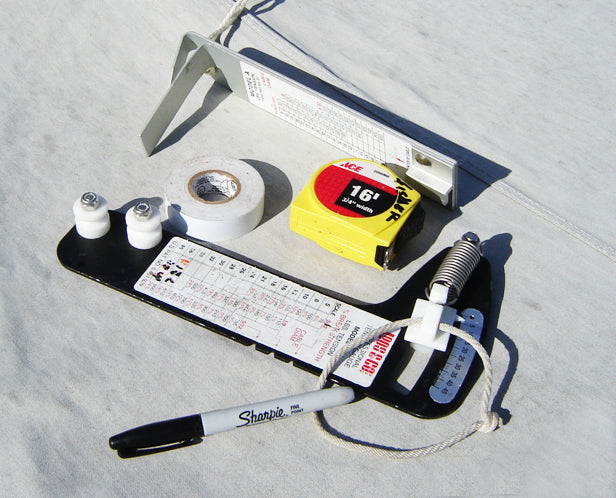
Note: While the newer PT-1 black spring- loaded Loos gauge is very consistent and works great for checking the shroud tension on your uppers and lowers, we have not yet been able to use it successfully for the tuning process.
M-5 Tuning System
It is important to be able to “zero” the forestay in order to set the proper lower tensions for the various conditions. However, with the Fisher Tuning System either gauge will work fine.
MARK YOUR HEADSTAY
Lay the forestay along the front of the mast and mark where it is even with the top of the mast band at the gooseneck. This can be accomplished with the mast on the ground or stepped with the uppers attached.

MAST STEP POSITION
For the M-5 Tuning System we suggest placing the butt of the mast at maximum forward (the aft edge of the butt of the mast should be 21 5/8” forward of the center of the centerboard pin). For the Fisher Tuning System and for Allen boats we suggest placing the butt at maximum forward. For the Nickels Boats (both the newer (after 15200) and older) we suggest moving the butt aft one hole in the channel. For any boat having difficulty developing the proper prebend (or with the upper shrouds further aft (such as the Carson or Lippincott) we suggest moving the butt of the mast aft as much as 3/8” to 5/8”. For the Carson and Lippincott hulls the butt measurement should be only 20 1/4” forward of the pin.
ADJUST THE HEAD-STAY LENGTH
Hook up your headstay and measure from your mark that was determined in Step 1 of the tuning guide to the intersection of the stem and the deck.

Measure from the top of the mark on your forestay to the joint of the bow and your deck to set your forestay length.
THE M-5 TUNING SYSTEM
Initial set-up.
- Allow your mast to lean fully back on the forestay with no shrouds attached or mast blocks in place. Mark your deck on both sides directly across from the front of the mast. This is your “0” datum point and the point that will determine your mast blocked position in light, medium and heavy winds.
- Attach your upper shrouds to the forward chain plates and tension them to the class maximum of 250 pounds. Do not attach the lowers or be sure that they are very loose. Note: It is important that the mast is straight in the boat and not leaning or bowing to either side. To verify this, hook a tape measure to the jib halyard. Measure to the chine below the upper chainplate on each of the boat. This measurement should be within 1/4” on each side and can be adjusted by adjusting the turnbuckles on either side.
- Attach the lower shrouds to the aft chainplates and tighten them until they are just barely hand tight. Check that the mast is still straight laterally by sighting up the back of the mast. This adjustment to the lower shrouds is just initial tuning and will be adjusted later once the blocks are placed at the partners.
M-5 LIGHT AIR SET UP (0 - 6 MPH)
- Place your mast blocks behind your mast until the forward edge of the mast is 1 1/4” forward of your “0” datum point for the Nickels and 1 1/2” for the Allen.
- Pull your backstay until the forestay just registers “0” (using the Model A Loos tension gauge).
- Adjust your lower shrouds equally until they are “0” on the Model A Loos gauge. (If you are sailing in wavy conditions where there is more chop than the wind should warrant, we suggest tensioning your lowers up to 5 or 6 for increased power.)
- With the backstay set as in step B, mark your backstay where it exits the deck at the transom. Ease the backstay tension off until this mark is 5” above the deck on the Nickels or 7” on the Allen. Mark this position. Use this mark (5” for the Nickels, 7” for the Allen) for your very light wind backstay setting when the mast is pre- blocked forward as in Step 1. Note: Without the proper backstay tension in light winds the mast will lean much too far forward and there will be too much headstay sag. An overabundance of jib luff sag will result in the jib leech hitting the spreader and the shroud no matter how it is trimmed. The backstay is just tensioned to remove enough sag to keep the jib leech off the spreader and the shroud when the upper batten is angling just at the end of the spreader.
M-5 MEDIUM WIND SET UP (7-15 MPH)
- Block your mast forward of the “0” datum point 1” for the Nickels and 1” for the Allen.
- Tension your backstay until the forestay just barely registers “0” with the Model A tension gauge.
- Set your lower shrouds equally at 10 for the Nickels and 18 for the Allen.
M-5 HEAVY WIND SET UP (16 + MPH)
- Block the mast 3/4” forward of the “0” datum point.
- Pull your backstay until the forestay just registers “0”.
- Set your lower shrouds equally at “14”.
- Use lots of backstay when you’re sailing to keep the boat flat!
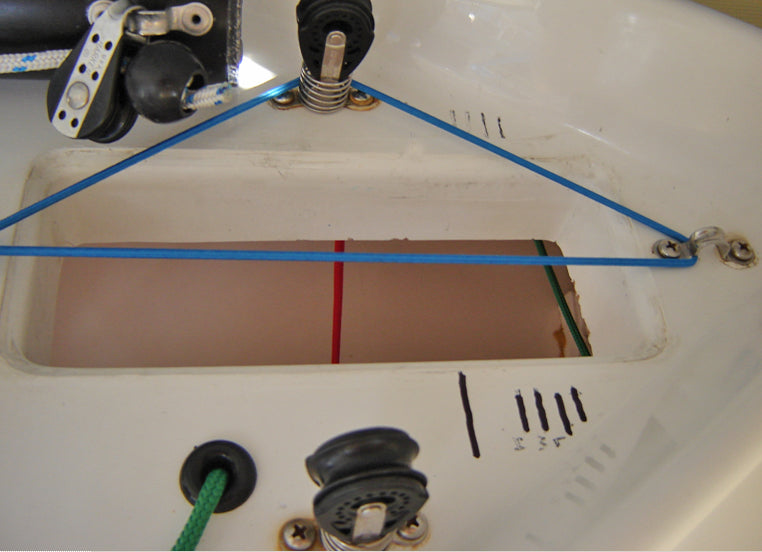
Mark your deck for your 0 datum point, light, medium and heavy wind mast block settings with the M-5 tuning system.
THE FISHER TUNING SYSTEM
Note: Important! This initial shroud setting with the Fisher tuning is different than the Lightning Class maximum shroud tension measurement. Be sure to set the uppers at 250 while the lowers are set at approximately 80lbs.

Usually a 1/2” block will be in place in front of the mast with the Fisher tuning with the New Allen and New Nickels boats.
Note: With the later model Nickels and Allen boats usually the proper prebend will be reached while a ½” block is placed in front of the mast at the deck. On the Allen and newer Nickels the lowers shrouds will read 300lbs when set properly to achieve the necessary prebend. For the older Nickels and boats with the upper shrouds aft the lowers will be tensioned to 250lbs.
Note: Important! Do not re-tighten the uppers above 190lbs. This reduced tension is necessary for proper mast bend and is indicative that you’ve developed proper prebend. It is important that the mast is straight in the boat and not leaning or bowing to either side. To verify this, hook a tape measure to the jib halyard. Measure to the chine below the upper chainplate on each of the boat. This measurement should be within 1/4” on each side and can be adjusted by adjusting the turnbuckles on either side.
Note: If your rake measurement is farther forward than the numbers listed above (more than l/2”), then consider pulling a small mast block ( ¼” increment) from behind the mast and re-tensioning the lowers to 250 pounds. Replace the block at the front of your mast and recheck that your prebend is the necessary 1 3/4”. Your mast should also have raked farther aft so that the rake number is smaller.
- Without applying tension on the tape measure ( as described above) record the measurement at the transom. Now grab the backstay and pull until the slop in the forestay is just barely eliminated (not when the Loos gauge reads “O”). The change in your rake from the backstay pulled on to the backstay relaxed should be 3” to 4”. If this measurement is more than 4”, pull a small block from behind the mast and retention the lowers to 250-300 pounds (as described above). If the “rake change number” is less than 3”, place another small block behind the mast and ease the lowers off until they read the proper tension. This will allow the entire mast to tilt (rake) slightly farther forward.
- Re-check your lower shroud tension side to side by sighting up the back of the mast to be sure the mast is perfectly straight laterally. Loosen and tighten the opposing sides until the mast is straight from the deck to the hounds, always maintaining the proper lower tension and prebend.
Once on the water double check your lateral straightness once again when sailing upwind in an 8 - 0 m.p.h. breeze. Note: In breeze above 10-12mph the upper sections of the mast above the spreader will fall off slightly sag to leeward. This is normal.
CONGRATULATIONS! You have completed all the tuning with the Fisher setup. You will never need to adjust your lower shrouds or blocks until you take your mast down. When re stepping simply place everything back where you had it last!
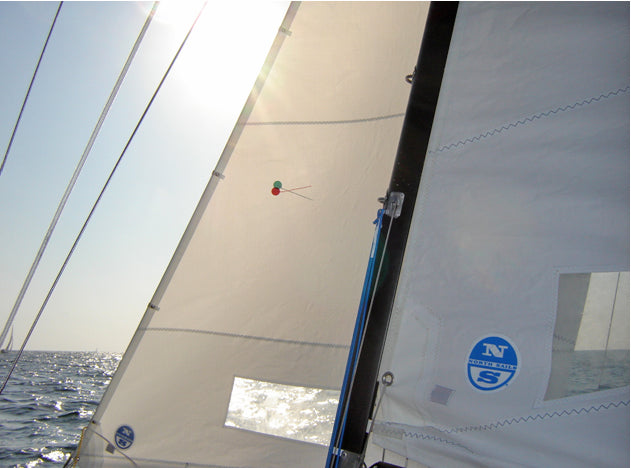
JIB HALYARD TENSION
Generally set your jib halyard tension so that the jib luff wire ( in the front of the jib) is just equal tension wise with the forestay when sailing upwind (There should be no sag in between the snaps.).
Fisher Tuning System
In all conditions set the jib halyard tension so that the luff wire is just slightly tighter than the forestay in all conditions. The forestay will actually show a slight “snake” between the snaps. From light to heavy winds this will mean an adjustment of nearly 2 1/2”. In very heavy winds jib halyard stretch will make it difficult to set the halyard tighter than the forestay. More tension on the halyard will be necessary.
JIB CLOTH TENSION
For both ( jf-2 and 5-a+).
In light winds the cloth tension will be set loose enough that there may be slight wrinkles along the luff. As the breeze increases, increase the cloth tension until all the wrinkles are barely removed in heavy wind. In very heavy winds pull the jib cloth tension a little tighter than just barely removing the wrinkles in order to flatten the sail and help open up the upper batten.
In breeze, set your jib cloth tensionso the luff is smooth.
Lashing at the Head of the Jib
Each North jib has the luff wire attached to the head of the jib with a light line lashing which allows the height of the jib to be adjusted on the luff wire. Depending on the type of tack fitting on your boat, you may want to adjust this lashing to raise or lower the jib to sit on the deck properly. If the skirt of the jib is not laying on the deck approximately 1 1/2” to 2” (or the jib tack is higher than 3 1/2” off the deck) you may want to loosen the lashing and allow the jib to slide down closer to the deck. Be sure to tie well, or even tape, the lashing when done to prevent the lashing from coming untied.
Don’t be afraid to adjust your jib head lashing so there is nearly 2” of jib skirt laying on the deck when sailing upwind.
JIB LEAD POSITION
Your North jibs are marked with a trim line near the clew drawn from the clew grommet toward the body of the sail. Your lead should be positioned so that the sheet is a direct extension of this trim line. This is more effective than a measurement from the stem to the lead position because of the variances in jib lead fittings and placement, rake, and jib wire height off the deck. Generally you should set the lead in this direct extension position unless the boat is overpowered when the lead may be moved aft as much as 2”.
Set your jib lead in most conditions so the sheet is an extension of the trim line drawn on the clew
JIB SHEET TENSION
Normal jib sheet trim for 8 - 12 m.p.h. and flat water for the 5-A+ and the Fisher jibs would be 2” - 3” inside the spreader tip. In winds below 8 m.p.h. or when trying to accelerate, leaving a tack, etc., the sheet will be progressively eased out until the top batten is angled even out past the end of the spreader for both jibs. In extremely light winds it is advantageous to actually hold the clew of the jib up so the upper batten angles 1” outboard of the tip of spreader. In heavy winds above 15, it may be necessary to ease the jib sheet to the point where the batten might be angled 1” or more past the end of the spreader. Some sailors, and especially those sailing the 5A+ jib, have had success trimming the sheet much harder. However, with any jib, in any condition, the best final check on jib sheet trim is that the jib leech telltale is flowing all the time. To aid in setting up the trim for your North jibs, we suggest placing rings of tape on your spreaders 1” and 2 1/2 “ in from the tips of the spreaders.
Mark your spreader for easier jib trim, BUT check that the telltale on the leech at the top batten is always streaming.
MAINSAIL TRIM
Mainsail outhaul.
Your North mainsail is constructed with a shelf foot. Judge the outhaul tension at the center of the boom . The seam which attaches the shelf foot to the sail, the bottom seam in the sail) gets closer to the boom when the outhaul is tensioned or further away from the boom when the outhaul is eased. At maximum outhaul tension this seam will lay next to the boom and the shelf foot is closed up. This is proper trim for heavy winds when the boat is overpowered. In light winds the center of this seam should be 1” to 2” from the boom. We do not feel it is advantageous to loosen the outhaul more than this when sailing upwind. Downwind loosen the outhaul to allow the shelf foot to open completely. This should place the clew of the main nearly 3” in from band at the end of the boom.
Use the shelf foot seam as a guide for outhaul tension.
CUNNINGHAM TENSION
In light winds the Fisher mainsail performs best with the Cunningham completely slack. There should be nearly 8” wrinkles perpendicular to the luff from head to tack. On the M-5, the cunningham will be tensioned so that wrinkles are only evident below the spreader window.
In medium winds the Cunningham should be tensioned on both mains so that wrinkles should be evident just in the bottom of the mainsail below the spreader window. In heavy winds, it is beneficial to pull in the Cunningham fairly aggressively. At the same time that the backstay is applied to de-power the main, the Cunningham should be pulled on to maintain the proper draft position.
Too much backstay tension will create over bend wrinkles above the spreader window. Ease the backstay until they just disappear.
The backstay controls mast bend and headstay sag. Pulling it harder flattens both the main and the jib. It also changes the main leech tension and the angle of upper batten of the main. In very light winds when the mast is blocked forward and pre-bent (see mast blocking) tension the backstay slightly to keep the headstay from sagging ( and bouncing) too much. In heavy air more backstay is necessary to flatten the main. If you pull the backstay too hard, the main will invert as evidenced by large diagonal wrinkles running from the upper area of the main above the spreaders down towards the clew. In medium to heavy winds, some inversion wrinkles below the spreader window are normal and actually desirable as they indicate that maximum mast bend has been achieved.
Ideally, over bend wrinkles will fall just below the spreader window and halfway back on the boom when proper prebend and mast bend is achieved.
As a basic guide, for the mainsail to take shape and the upper batten to be trimmed parallel to the boom (see mainsheet trim), the backstay should be applied to just barely remove the slop. Once all three crew are on the high side and beginning to hike, the backstay should be tensioned much more tightly. As the boat hits waves or sails into lulls, be sure to ease the backstay to power the rig back up. It is also important to remember that as you pull on more backstay you must also pull on a proportion-ate amount of both jib cloth and main Cunningham. These three controls working in harmony are the best way to keep your sails performing at their designed best shape.
THE MAIN BRIDLE TRAVELER
The bridle is considered a “rough” adjustment for setting the balance of your helm. The bridle is normally centered for light to medium winds, but as the boat starts to heel and becomes overpowered, and therefore develops more helm, the bridle should be eased to leeward. Do not ease the bridle to leeward until the outhaul is fully tensioned and moderate tension has been applied to the backstay. If you have a bridle that is adjustable in height, it is advantageous to raise the bridle for light winds so when the main is sheeted properly (upper batten parallel to the boom), the top of the bridle block should be fairly close to the block on the end of the boom. In medium winds above 6-8 mph, the bridle should be approximately 11” to 12” above the deck; in heavy winds, the bridle should only be 9” above the deck. If your bridle is not adjustable, set it at 11” off the deck. The goal in setting the bridle is to position the boom within 2-3” of center line in light winds while still maintaining the proper upper batten parallel to the boom position described below. Often, it pays to moderately depower with the backstay, outhaul and Cunningham before easing the bridle.
MAINSHEET TENSION
The general rule is to trim the mainsheet to maintain the top batten parallel to the boom. This is viewed by sighting directly underneath the boom up towards the upper batten. When power is necessary in light or choppy conditions or just after a tack it is important that the mainsheet is eased so that the upper batten is angled outboard (10 - 15°) from parallel to the boom.
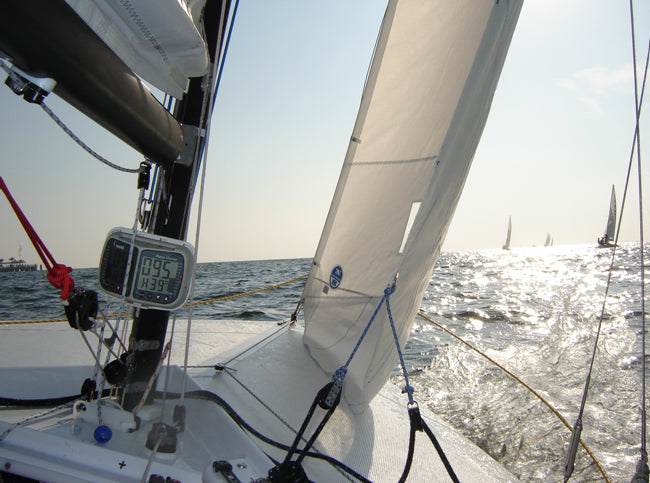
Once up to speed, re-trim the main to upper batten parallel. In heavy winds, when maximum backstay tension is applied and the main is fairly flat, the upper batten will angle slightly outboard in relation to the boom. In drifting conditions where the weight of the boom will hook the upper batten, ease the mainsheet until the upper batten is parallel to the center line of the boat. The boom will be positioned well to leeward of center line, as much as 18”. Be sure to recheck the top batten position whenever the backstay and Cunningham are adjusted. Consider the mainsheet your throttle. It definitely helps to keep the mainsheet in hand and play it to keep the boat moving. When it starts to feel slow ease the sheet and when it feels fast try trimming in tighter to increase pointing ability. In other words, as long as it feels good, pull! When it feels ugly, ease it out. Upwind in heavy air or very puffy conditions with Fisher Main, the boom vang is tensioned so the mainsheet can be played like a traveler. Tension the vang in these conditions so the upper batten is angled outboard 10°. With this proper necessary tension the boom may actually show a bit of bend. Play your mainsheet to keep the boat flat and the helm balanced! Be sure to ease your vang as you round the weather mark! With the M-5 Main, most of the main control is accomplished with careful balance between the mainsheet and traveler. However some sailors have had success tensioning the vang just to point where the boom will not raise up when the main sheet is eased. With any “style” of mainsheet trimming you choose to sail with upwind it is imperative that in puffs the boat remain flat, stable and the helm balanced. Quick and deliberate adjustments to the mainsheet, vang, backstay and traveler are important. Adjust quickly but re-trim just as quickly after sailing through the puff and the boat is back under control and balanced.
Ease the main so the upper batten is angled out slightly past parallel to the boom when power or acceleration is needed.
BOOM VANG TENSION DOWNWIND
The boom vang is used downwind to maintain the upper batten nearly parallel to the boom. Be conscious of not over- tensioning the vang, especially in light winds, as it can greatly slow the Lightning when sailing downwind. In puffs while reaching, when the boat becomes overpowered, try dumping the vang (completely eased) to keep the end of the boom from hitting the water and also allow the top of the main to luff, dumping extra power.
THE SPINNAKER

Trimming your North spinnaker is fairly easy as long as you follow a few guidelines. Always attempt to fly your spinnaker so there is nearly 6” of curl in luff. This is important so the spinnaker is not over trimmed and does not choke the slot between the spinnaker and the main. We suggest flying your spinnaker with the halyard eased approximately 6” off the mast to open the slot up high. Keep your clews even at all times through adjustment to your pole topping lift. When your leeward clew is hidden behind the main and you cannot see it, keep the center seam of the spinnaker parallel to the mast. In puffy conditions, especially in lighter winds, constant adjustment of the pole height along with the sheet and guy is important. Keep the pole nearly perpendicular to the wind.
The sun is one of your sail’s greatest enemies. Care should be taken to not leave an uncovered sail directly in UV light for long periods. Spinnakers are most susceptible to UV damage. However, your sail’s greatest enemy is prolonged luffing. Putting your sails up before you are ready to leave the dock and allowing them to flog unnecessarily, literally wastes valuable hours and days of the competitive life of your sails. Even before the start on a breezy day, try to spend as little time as possible with the jib up and luffing to save wear and tear. The jib especially takes a beating when luffing as it slams back and forth against the mast. This breaks down the resin in the weave of the cloth. When finished using your sails, even after just a couple races or in-between races, we strongly suggest talking the time to roll up your sail parallel to the battens (it is never necessary to remove the battens). Be careful not to set anything heavy that can crush a sail or to lash the main too tight on to the boom. Be sure to roll the sail parallel to the battens to avoid putting a permanent twist in your special tapered fiberglass battens. Fold your spinnaker to keep it smooth before storing. When sailing in saltwater, be sure to wash all your sails off completely with fresh water and dry completely before storing them. Check all your sails, especially at the front and back of batten pockets and around grommets for signs of wear. Check your spinnaker for tears, so they don’t get bigger and create big problems in the future. If Dacron sail tape is not available, duct tape will work just fine!
FEATURED STORIES
How sailors are helping to save the whales, north projects shine bright at the world superyacht awards, offshore sailing guide.
- Refresh page
Welcome to The Sailing Store | Your Premier Destination for Sailboat Racing
How to Find a Laser Sailboat Sail Number from Hull
Where is your sail number located.
- For Laser sailboats built after 2010 the sail number is located in the rear of the cockpit on a sticker
- For Laser Sailboats Built Prior to 2010 the sail number can be decoded from the Hull Identification Number Located on the stern or on very early lasers under the bow eye.
here’s how to determine your number from Hull Identification Number
- The first three characters are letters which denote where your laser was built
- The next 5 characters are your sail number
- The first of these characters is a letter which corresponds to: A=10; B=11; C=12; D=13; E=14; F=15; G=16; H=17; I=18; J=19
- The next 4 numbers are the rest of the sail number
For example: if characters 4 through 9 are H0997, your laser sail number is 170997
How Old is My laser Sailboat?
- The last four characters in your hull identification number indicate which month and year your laser sailboat was built
- the first character is a letter and this letter indicates the month of manufacture according to the builder: A=Aug, B=Sept, C=Oct, D=Nov, E=Dec, F=Jan, G=Feb, H=Mar, I=April, J=May, K=June, L=July.
- The next number indicates the year your laser was built
- the next two numbers indicate the model year for your laser sailboat
For example: if characters are B809, your laser was presumably built in September 2008 and model year 2009
Fun Fact: The first mass produced laser is #101
IMAGES
VIDEO
COMMENTS
Lightning Class (Int) Download Boat Record: ... the less power it takes to drive the boat to its nominal hull speed. less than 100 = Ultralight; 100-200 = Light; 200-275 = Moderate; ... reported" sail area, displacement and length at waterline. The higher the number the faster speed prediction for the boat. A cat with a number 0.6 is likely ...
What Do I Need to Know About the Boat? The Lightning was designed in 1938 as a wooden planing sloop. The boat saw very rapid growth until 1942, again in the early 1950's and then in the 1960's as sailors turned to fiberglass hulls. ... The ads are listed by hull/sail number. Next is the name of the manufacturer ( Allen, Nickels, Lippincott ...
Lightning is a 18 ′ 11 ″ / 5.8 m monohull sailboat designed by Sparkman & Stephens and built by Clark Boat Company, Lippincott Boat Works, Nickels Boat Works, Inc., Allen Boat Co., Helms - Jack A. Helms Co., J.J. Taylor and Sons Ltd., Lockley Newport Boats, Skaneateles Boat & Canoe Co., Mobjack Manufacturing Corp., Siddons & Sindle, Loftland Sail-craft Inc., and Eichenlaub Boat Co ...
LXGTA136D606. LXGTR107L314. LXGTX159G112. LXGTX185C414. LXGUB110E708. LXGWA113G203. LXGYB134B909. Lookup and Decode LIGHTNING BOATS VINs / Hull ID Numbers to get information on a boat you want to buy. Sample HINs and company contact information for LIGHTNING BOATS.
The Lightning is an American sailing dinghy that was designed by Olin Stephens of Sparkman & Stephens, as a one-design racer and first built in 1938.. An accepted World Sailing class, the boat is one of the most popular one-design sailing classes in the United States and is also raced in several other countries.. The design was developed into a smaller boat, as a trainer for the Lightning, the ...
consulted with each other on the construction of the boat that would become the Lightning. Hull #1 was launched in October 1938 at the Skaneateles Country Club and used as a test bed for the Lightning development program. In the winter of 1938, the Barnes' took Lightning #1 to the New York City boat show, and were rewarded with numerous orders.
1528 Big Bass Dr Tarpon Springs, FL 34689 Phone: 727-942-7969 Skype: ilcaoffice. The Lightning, a 19-foot trailerable centerboard sloop, was originally designed by Sparkman & Stephens as an affordable family day-sailor and racing boat. She has evolved into one of the most popular.
A boat hull identification number, which is commonly referred to as a HIN or hull ID, serves the same basic purpose as a vehicle serial number. It not only provides a unique vessel identifier, but facilitates tracking of manufacturer defects for recall purposes. The importance of showing this correctly on all registration and title documents ...
The International Lightning Class Association is one of the oldest and best organized class associations in sailboat racing. Its primary purpose is to serve its membership, preserve the integrity of the Lightning and provide high-quality competitive events. In addition, the Lightning Class publishes monthly e-blasts and a quarterly newsletter ...
The sail number that is assigned to the boat at the time of construction is the hull number. The use of numbers is subject to the By-Laws Racing Restriction and may not be arbitrary. All sail numbers are to be of a solid color contrasting with the sail material. (March 2005). 75.2 For mainsails built after 1 June 2017:
Hull Number Decoder. How to decode the meaning of a boat hull identification number. All boats manufactured for consumption within the United States after November 1, 1972 are required to have a twelve character hull identification number. Federal regulations specify that it must be formatted according to the elements shown below.
A typical hull identification number (HIN) consists of 12 letters and numbers, as in ABC12345D404. Here's what the letters and numbers mean: ABC: This is the U.S. Coast Guard-assigned manufacturer identification code (MIC). Go to the USCG Manufacturers Indentification page to access the Coast Guard's MIC database.
Lightning, a nineteen-foot trailerable centerboard sloop, was originally designed by Sparkman & Stephens as an affordable family day-sailor and racing boat. She has evolved into one of the most popular and competitive one-design racing classes in the world. Awarded ISAF International Class status, the Lightning is sailed in more than thirteen ...
For more information about the International Lightning or to arrange a test sail in your area, call or write:International Lightning Class Association1528 Big Bass DriveTarpon Springs, Florida 34689Phone: 727-942-7969Skype: [email protected].
Use the diagram below to reference Harken part numbers to appropriate application on your Lightning sailboat. Parts recommendations are offered as a guide for common applications. Adjustable Ball bearing Lead Car. Upgrading to an adjustable lead car system allows you to change your lead under sail without having to tack to unload the car.
The Lightning is an ultralight sailboat which is a very high performer. It is reasonably stable / stiff and has a low righting capability if capsized. ... Hull speed: 5.23 knots ... Number built: 15550 Other photos. Modal Title ×. The content of your modal. Close Save. Personalize your sailboat data sheet. Paste a link here: Give it a title ...
Lightning Class Sailboat and Trailer ... the less power it takes to drive the boat to its nominal hull speed. less than 100 = Ultralight; 100-200 = Light; 200-275 = Moderate; ... reported" sail area, displacement and length at waterline. The higher the number the faster speed prediction for the boat. A cat with a number 0.6 is likely to sail ...
Lightning 368 Class Association: ... the less power it takes to drive the boat to its nominal hull speed. less than 100 = Ultralight; 100-200 = Light; 200-275 = Moderate; 275-350 = Heavy; ... The higher the number the faster speed prediction for the boat. A cat with a number 0.6 is likely to sail 6kts in 10kts wind, a cat with a number of 0.7 ...
In salt water this needs a minimum area of 0.1m². In fresh water, European standards call for the grounding terminal to be up to 0.25m². A grounding terminal must be submerged under all operating conditions. An external lead or iron keel on monohull sailing boats can serve as a grounding terminal.
HIN Search User Guide for iOS, macOS, and Android. Thank you for using HIN Search, our Hull Identification Number decoder and Boat Manufacturer lookup tool!. HIN Search has compressed and optimized the entire US Coast Guard's database of over 16,000 boat companies, and over 30,000 brands to fit on your iOS or Android device, so you can have lightning fast results wherever you are, with NO ...
Complete plans for building a Lightning. Entitles you to build one Lightning boat and to have an official ILCA number assigned to your hull. Included is a copy of the Wooden Boat Magazine article and Hamlin & Smith supplement plans, as well as the original Sparkman & Stephens plans. Price: $100.00 — Boat Number. $ 50.00 — Plans.
For the Lippincott/Carson boats this number should be at 26' 3" to 26' 4". Note: If your rake measurement is farther forward than the numbers listed above (more than l/2"), then consider pulling a small mast block ( ¼" increment) from behind the mast and re-tensioning the lowers to 250 pounds.
here's how to determine your number from Hull Identification Number. The first three characters are letters which denote where your laser was built. The next 5 characters are your sail number. The first of these characters is a letter which corresponds to: A=10; B=11; C=12; D=13; E=14; F=15; G=16; H=17; I=18; J=19. The next 4 numbers are the ...