- Search for:
No products in the cart.
Return to shop
- 34′ x 12′ High Speed Catamaran, 36 Passengers
- 31′ x 12′ High-Speed Catamaran, 24 Passengers
- Sponge Docks Skiff 13
- Sponge Docks Skiff 16
- Sponge Docks Skiff 19
- F1430 Sit-On-Top Kayak
- F1830 Sit-On-Top Tandem Kayak
- MASH 24ft family cruiser
- OzonaX Nesting Pram
- 15′ RoG Micro-cruiser
- F1430 Sit-On-Top Kayak PDF Assembly Manual
- F1830 Sit-On-Top Kayak PDF Assembly Manual
- Ozona X Nesting Pram PDF Assembly Manual
- Sponge Docks Skiff 13 PDF Assembly Manual
- Sponge Docks Skiff 19 PDF Assembly Manual
- Ozona X Nesting Pram
- Okoume Marine BS1088
- Meranti Marine BS1088
- Ozona X Sail, 70 square feet
- Ozona X Spar kit
- Epoxy Resin, Laminating, FGCI 1 Gallon
- Epoxy Activator, 2:1, FGCI 1/2 Gallon
- Epoxy Activator, 2:1, FGCI 1 Gallon
- Wood Flour 5Qt (Premium Hardwood)
- Fumed silica 5QT
- Microballoons 5QT
- E-Glass cloth 4oz/sq.yd. 50″ wide
- E-Glass cloth 6oz/sq.yd. 60″ wide
- MASH, 24ft Cruiser
- 15′ RoG Micro-Cruiser
- F1430 Sit-On-Top
- F1830 Sit-On-Top Tandem
- Tooling and CNC
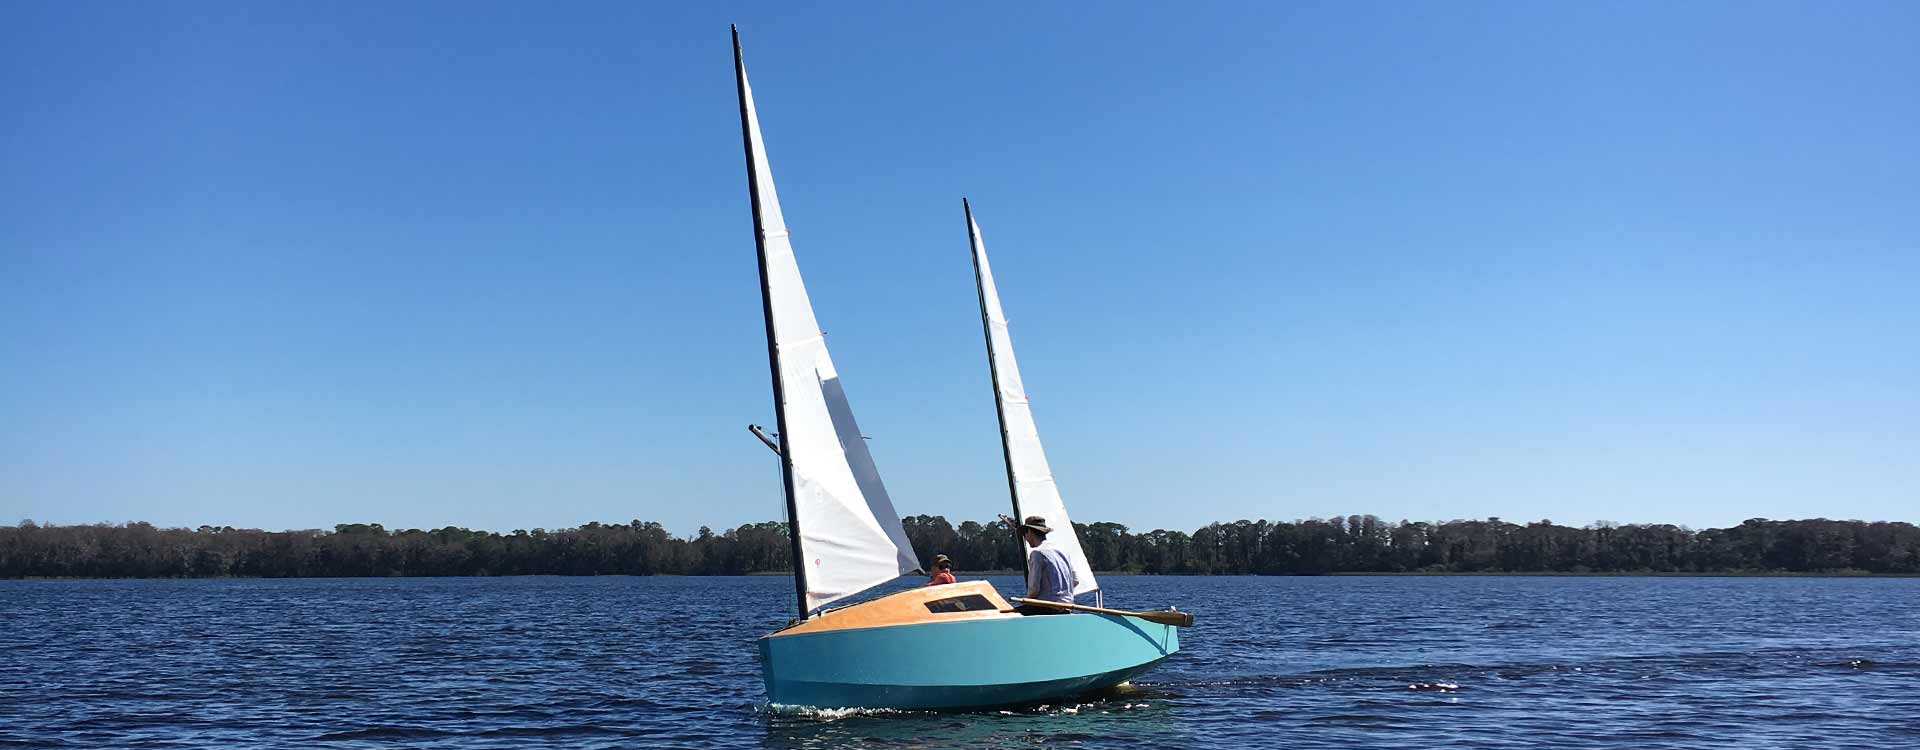
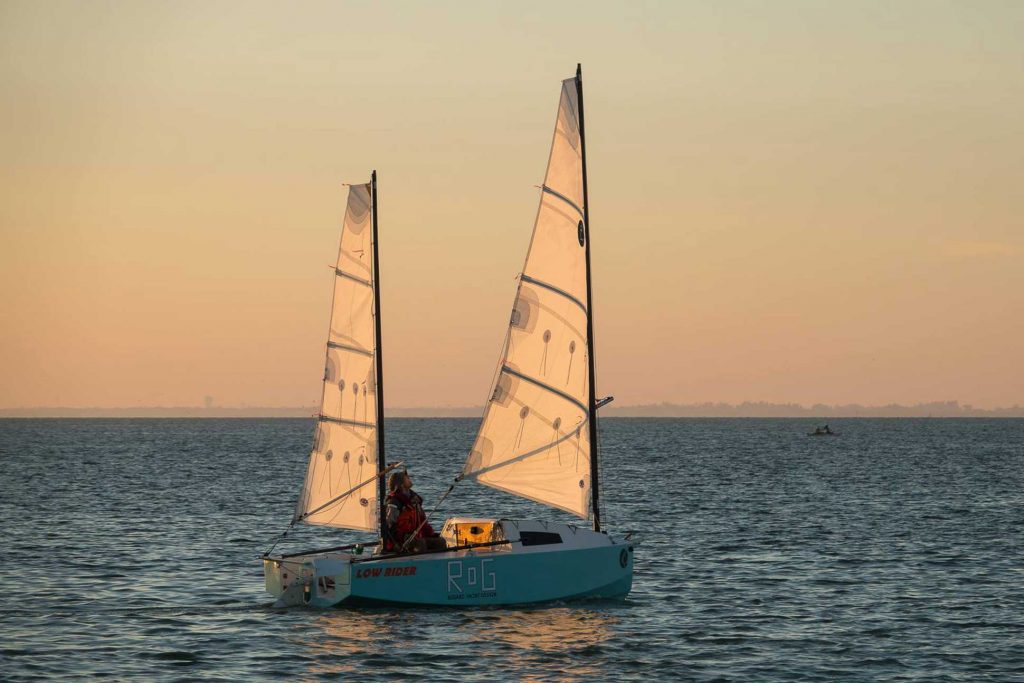
They say every design is a compromise. But we ask: If you can ride the edge, point and surf down waves like a dinghy, enjoy the safety and stability of a keelboat, gunk-hole in waters only kayakers can reach, sleep two comfortably and eat on a table that’s big enough for a full-size paper chart, where’s the compromise ? RoG, 15FT OF 1-OF-A-KIND.
I had this design in the back of my mind for a long time: An expedition micro that will accommodate 2 adults for a week-end or a single-hander for up to 5 days. Ability to take on some weather and deliver solid performance while doing so. For the crew: forgiving and predictable but fast & fun. Launch time should be kept to a minimum. As a RAID class boat, she must draw 8” or less, be rowing-friendly and launched from the beach unassisted; in other words, as small as possible.
The result is RoG(River of Grass), a 15ft micro expedition cruiser

RoG completed the 2019 Everglades Challenge and took First-in-Class . She also completed the 2018 and 2017 Challenges.
RoG was voted 2021 Trailerable sailboat of the year by Voile Magazine
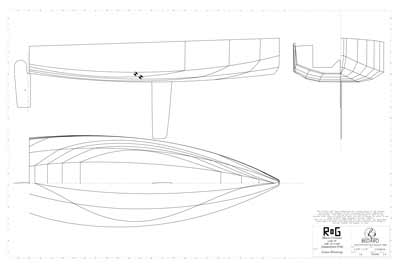
A given was that this would be chinned hull, built of developable panels. I spent a lot of time comparing various iterations and there is no way around the fact that bringing down that chine close to the waterline increases stability significantly, hence the slab sides. Ditto for the blunt nose; but it is a balancing act to achieve this while keeping the transom out of the water at all angles of heel and wetted surface to a minimum; as the latter is a strong indicator of light-air performance. So don’t be deceived by the boxy look, this is a powerful hull and can support a significant sail plan.
If there is one topic on which sailors love to argue, it is sail plan. Many aspects have to be juggled: center of effort, center of gravity, aspect ratio, versatility and simplicity (both to maneuver and rig) are but a few. I chose the cat ketch for a combination of these factors. Carbon spars, which have come down in price in recent years, make this rig quite attractive, and a breeze to set up on the trailer. 150sq.ft. will bring the Sail Area-to-Displacement ratio to 24, somewhere between the Wayfarer and GIS, promising a fine ride to the thrill seeker.
Stability and weight are two overarching concepts of this design: Together they strongly define safety and performance, but they are potentially conflicting so I took the approach of combining lead and water ballast. A 100lb swing keel provides ultimate stability while 80lb of water in either of two wing tanks adds versatility. The result is a range of positive stability in excess of 100° and the ability to accommodate various conditions: In light-air or windless conditions, empty tanks will lighten the boat and reduce wetted surface. For enhanced performance, the windward tank is filled, which will result in a significant increase in righting moment as well as ability to pound through chop. Finally, beanbag sailing will benefit from filling both tanks (which in effect means 160lb of water ballast, bringing the overall ballast to a respectable 260lb): the boat will now behave like a 25footer. Great for newbies, lazybones and exhausted raid-sailors.
Both the keel and rudder are high-aspect ratio foils that minimize wetted surface while providing performance to windward. The rudder is balanced so will be light and responsive.

Comfort & Convenience
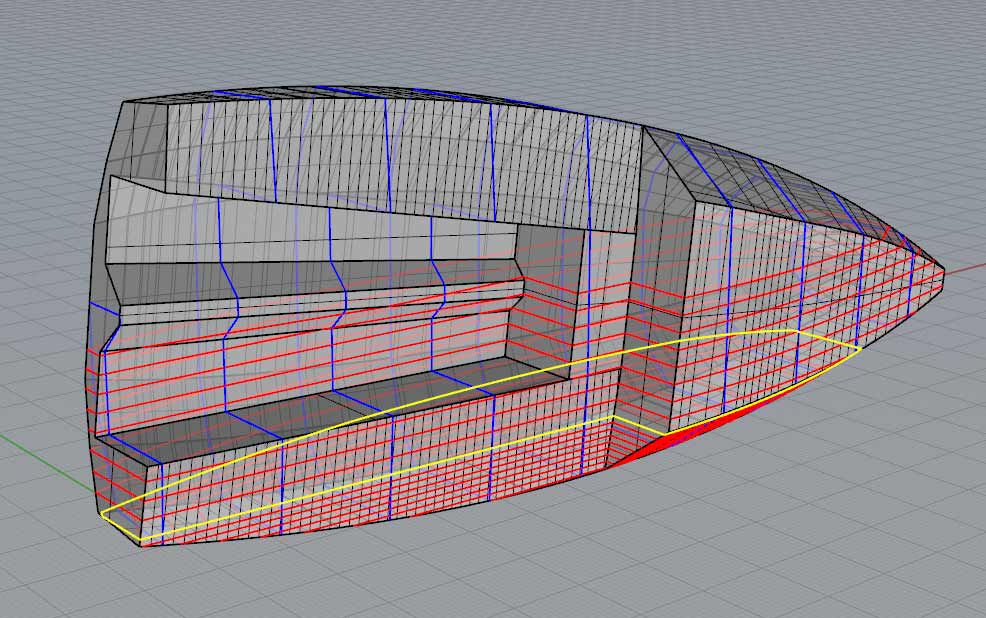
The devil is in the details and a lot of time went into this part of the design. There is sitting headroom in the cabin and a forward table can be lowered in two separate halves, to make bunks on either side. Two big self-bailing cubicles (and 4 cup holders!) in the cockpit, two watertight lazarettes and ABYC-compliant dedicated gas locker, for grill/outboard tanks adds comfort and safety. Full-length oars are stowed under deck and out of the way, accessible via a small watertight transom hatch. The companionway is a hybrid kayak-coaming/sailboat-companionway hatch: It is large enough that one can reach the bow anchor and main mast while standing in the cabin, yet can be covered with stretch canvas or wood panels for spray/rain/sun protection in various configurations. Completely open in fair weather the cabin is closer to a dodger than an oven.
The boat is ABYC unsinkable, thanks to the use of flotation foam. She is designed to recover dry from any but the most catastrophic capsize. Indeed downflood angle is 108°, so no bailing for a tired crew. Centerboard and rudder systems are accessible and repairable underway, including keel-lift mechanism and rudder bolts. Both appendages will kick up undamaged upon grounding.
LOA:15.3ft,4.65m
Beam: 5.75ft,1.74m
Draft board up: 6in,15cm
Draft board down: 46in,118cm
Displacement: 975lb,443kg
Light ship: 450lb,205kg
Sail area:150sq.ft.,14sq.m.
Pointing ability: Fine sailplan balance and precise appendage shape allows RoG to point above 45° to the wind
Materials and BOM
We strongly recommend the carbon spars, but the sails do not have to be full-battens, nor do they absolutely need 2 reef points so there can be some savings there. The BOM as below is comprehensive, with lines led aft, all the way to the hiking sticks. Beware comparing this to your barebones-run-of-the-mill equipment list on most new boats.
Download it HERE , current as of 3/26/2017
Wood Components
$ 2,999.99 Add to cart
Plans (paper)
$ 239.00 – $ 339.00 Select options
Plans (download)
$ 179.99 – $ 279.99 Select options
Username or email address *
Password *
Captcha *
Remember me Log in
Lost your password?
- Create an Account
- Boat Plans & Kits ::
- SCAMP Sailboat ::
SCAMP Mini Microcruiser Plans

S.C.A.M.P. (Small Craft Advisor Magazine Project) Original Designer: John Welsford Additional Development: Kees Prins Kit Adaptations: Turn Point Design
Our own youthful dreams often featured small boats in starring roles. Aboard these simple, stalwart little vessels we’d venture across nebulous bodies of water in search of distant wild shorelines or uncharted islands. We’d land, hike into the interior, and make camp. But always our boats offered refuge from any threat, including summer storms, which we’d wait out beneath our boom tents. At night we’d read sea stories by oil lantern and sleep under a blanket of stars.
Curiously, never once did these visions include negative images of wrestling with a heavy mast and complex rigging, fussing with a smelly, recalcitrant outboard, or being held off shore by our boat’s draft. And even when we pictured the afternoon breeze kicking up whitecaps, never once did the vision include a chilly capsize.
It was the dream of returning to those simple pleasures that inspired thoughts of SCAMP. That and a persistent desire to go over “there” —that place we often see but are unable to reach. It seems to happen on every cruise. Never mind that we’re usually sailing the smallest boat around for miles, we always come upon some ultra-shallow lagoon or serpentine tidal stream that disappears into the reeds, trees and rushes. To get in there—to really commune with nature—a boat needs to be light, shallow and easily propelled—and preferably flat-bottomed in case we decide to stay right though the ebb.
SCAMP features an offset centerboard, massive flotation from sealed seats and stowage cabin, a water ballast tank holding 173 pounds of water, an after cabin "veranda" that functions like a hard dodger, and a flat bottom and skegs for beaching.
PLANS: Complete plans now available on 7 24 x 36" sheets. 100-page "Building guide" with suggested steps included as PDF. Dozens of boats now under construction and documenting progress at the Small Craft Advisor message board and elsewhere online.
LOA - 11 ft 11 in Beam - 5 ft 4 in Draft (board up) - 7 in Water Balast - 173 lbs. Weight (including rig) - 420 lb s.
NOW AVAILABLE AS DIGITAL PLANS!!
The mini-cup plans are now available as a digital download.
We love this design and we're very happy to be able to offer a NEW Digital Version of our popular Mini-Cup plans!
For the time being, we're using Etsy to host our Digital Plans, and they are available for $14.95.
Just click on the link below to get the new plans!
Click Here to start exploring the photo galleries!
Copyright 2024 Stevenson Projects LLC
POPULAR SEARCHES:
- Raspberry Pi
- Woodworking
- 3D Printing
- Maker Faire

- All Stories
- Magazine Projects
- Board Guide
- Magazine Issues
Projects from Make: Magazine
Wooden mini yacht.
Build a Wooden Mini Yacht this weekend.
- Time Required: A weekend
- Print this Project

By Thomas Martin
Thomas martin.

When my son was 3 years old, I made a small bathtub boat with him, using scrap wood and a piece of dowel. It lasted much longer and got more of his attention than any dollar-store bath toy, and about six years later we decided to try building a larger boat for the pool and local ponds we fished.
Here’s the result of our experimentation: a simple and worthy pond sailer that’s rigged and scaled like a real yacht. You can build it in a weekend using readily available materials and tools.
Project Steps
Prepare the sailcloth..
It’s hard to find waterproof fabric that’s easy to cut and won’t fray. You can make your own by stretching ripstop nylon loosely over a frame or 2 hangers, and spraying it lightly (in a well-ventilated area) with polyurethane.
First spray up and down, and then back and forth, until the fabric is well coated but not saturated.
Let dry overnight.
Mark and cut the parts.
Download the project plan and print it at full size. Following the plan, measure and mark the mast, jib boom, and mainsail boom lengths on the ¼” dowel. Trace the hull from the printed pattern onto the top and 2 ends of the cedar block; cut templates or use carbon paper. Draw the keel and masthead crane patterns on the brass strips, and draw the bowser (rigging clip) pattern 8 times on the thin plastic.
Cut and drill all the parts. Any fine-tooth saw will cut the dowel, or you can roll it under an X-Acto blade and snap the score. Heavy-duty shears or a hacksaw will cut the brass; be sure to file away the sharp edges afterward. You can saw or file down the hull’s shape, then use a hobby knife or thin chisel to excavate the slot for the keel. Drill all holes, plus pilot holes for the screw eyes (in the hull, just poke pilot holes in by hand with a thumbtack).
Finally, file, sand, and smooth all parts. The more time you spend here, the better — especially if you plan to use a clear finish over the wood.
Mount the keel.
On the underside of the hull, mask both sides of the keel’s slot with tape. Wearing gloves, and in a well ventilated location, mix and spread some 5-minute epoxy into the slot using a scrap stick or wooden match.
Slide the keel into position and hold it there while the epoxy cures. You can square it up using a business card on each side.
Use a gloved finger to smooth the epoxy along the joint line, and fill any voids with more epoxy.
Finish the wood.
Finish the hull uniformly, or for a big-boat look, paint the outside of the hull and stain the deck.
Sand the hull with 100-grit paper over a sanding block, and again with 150-grit. Apply a first coat of paint or varnish, and re-sand with 180-grit before each subsequent coat.
For a stained deck, first paint the hull upside down, then re-sand the top perimeter to remove any overspray. Rub stain into the deck and edge, let dry, and coat with varnish or polyurethane.
For the mast and boom pieces, bevel the cut edges for a more finished look, then sand with fine grit to remove any fuzz. Stain if desired, and cover with at least 2 coats of varnish or polyurethane sealer, sanding lightly between coats.
Assemble the mast and booms.
Cut a slot in the top of the mast and glue in the masthead crane. Once that’s secure, follow the plan to install all screw eyes: 4 to the mast, 1 on the fore end of each boom, 1 more on the mainsail boom (for the boom vang), and 4 to the deck. Screw these in until the shank of the screw is completely into the wood.
Insert the brass brad down through the hole in the jib boom and bend it into a clew hook.
Use needle nose pliers to open the mainsail boom eye, hook it onto the eye on the mast, and close it. This forms the gooseneck, the joint that lets the boom swing from side to side (far left in the photo). Press the mast down into the hole in the deck with the masthead crane centered afterward, and tap it gently down into its hole with a hammer.
Add the sails.
After the sail material is dry, trace and cut it to the plan patterns. Lay the boat on its side on a hard surface with the masts and booms in place and fit the sails to the areas for rigging. For the grommets, cut a small X at each sail corner, insert a grommet up through the hole, press the cloth down around it, and tap the grommet flat with the eyelet tool until it firmly grips the cloth.
NOTE: It’s a good idea to practice setting grommets first with a couple of sailcloth scraps and extra grommets. It’s time for rigging. Knot and cut a short length of dacron line, thread it through a bowser, and string the boom vang. For these and all other knots, add a tiny drop of cyanoacrylate glue immediately after tying; the line is slippery and won’t hold knots otherwise.
Use 5″ lengths of line to tie each sail grommet to its corresponding screw eyelet or drilled hole with a square knot. You’ll need about 10″ for the top of the jib sail, which threads through 2 eyelets before tying off to the uphaul bowser.
Referring to the plans, tie the 4 lower connections on the booms first, and then add the upper lines for tension, so there are no wrinkles in the sails along the booms. Thread a bowser onto the jib uphaul as indicated: for their final tensions, you’ll adjust the jib using the uphaul at the top, and the mainsail using the boom vang.
For the backstay, tie in a long length of line at the masthead crane and install a bowser, routing the line through the eyelet at the stern.
Tighten the backstay and the sails so that they’re fairly tight but the mast is not bowed forward or aft. Finally, add the 2 lines called sheets. For these, cut two 15″ lines. Tie each one through the hole in the aft end of a boom, thread it through the sheet eyelet on the deck just underneath, then through 2 holes in a bowser, through the other sheet’s eyelet, and finally through the last hole in the bowser, doubleknotting the line.
NOTE: It’s important to tie the bowsers exactly as shown on the plan to make them work. The sheets let you adjust the angle (trim) of the sails — slack for downwind sailing or tight for crosswind — letting you cross a pond or pool in any direction that isn’t too close to directly upwind.
This project first appeared in MAKE Volume 20 , page 56.
From the Shed: New Arrivals

DIY Arcade Joystick Kit

Make: Arduino Electronics Starter Pack

Maker's Notebook - Hardcover 3rd Edition

Transistor Cat Kit

Our websites use cookies to improve your browsing experience. Some of these are essential for the basic functionalities of our websites. In addition, we use third-party cookies to help us analyze and understand usage. These will be stored in your browser only with your consent and you have the option to opt-out. Your choice here will be recorded for all Make.co Websites.

Escape to an island of imagination + innovation as Maker Faire Bay Area returns for its 15th iteration!
Buy tickets today save 15% and lock-in your preferred date(s)..
- THE PRINCESS PASSPORT
- Email Newsletter
- Yacht Walkthroughs
- Destinations
- Electronics
- Best Marine Electronics & Technology
- Boating Safety
14 Great Pocket Cruisers in 2023
- By Victor Tan
- Updated: July 20, 2023
Pocket cruisers and mini yachts are generally vessels under 50 feet in length overall, and can include express cruiser designs, flybridge yachts as well as either monohull or catamaran hull forms. They are cruising boats easily handled by a small, or even shorthanded, crew. Pocket cruisers generally have wave-taming hull designs and have the ability to take on sporty seas, offer comfortable accommodations belowdecks with one or two staterooms for extended voyages, “homelike amenities,” and the ability to cruise as slowly or as quickly as an owner desires with inboard- and outboard-power options. These pocket-cruising boats have the range for longer voyages , can pull up in skinny water at the sandbar thanks to shallow drafts, and head over the horizon where cruising adventure awaits. Pocket cruisers are true multitasking yachts. When it comes to family and couples cruising, it’s hard to beat a well-built and well-equipped and pocket cruiser.
Best Cruising Boats Under 50-Feet
The following 14 pocket cruisers and mini yachts are all vessels we’ve seen, been aboard, and tested. They are listed in no particular order.
- Hood 35 LM: high-tech, family-friendly pocket cruiser
- Galeon Yachts 375 GTO: mid-size boat with plenty of below-deck space
- Aquila 42: sleek power catamaran ready to entertain
- Azimut Verve 42 : small, yet mighty yacht ready for open water
- Hinckley Yachts 35: luxury picnic cruiser with range
- Beneteau Gran Turismo 45: sleek cruising yacht with all the amenities
- Solaris Power 48 Open: eye-catching power yacht with 360-degree views
- Cruisers Yachts 42 GLS: luxury cruiser yacht with powerful outboard options
- Back Cove 34O: modern outboard power combined with classic Downeast styling
- Picnic Boat 40: speedy and fuel-efficient vessel with great looks
- Aquila 36: comfortably seat up to 20 guests for fun on the salt
- Boston Whaler 350 Realm: multitasker built for fishing and entertaining
- MJM 35z: sporty, aesthetically pleasing, cruising-conscious features and elegant lines
- Greenline 39: sturdy-looking lines and environmentally-friendly power
When Android co-founder, Rich Miner, wanted a new family-friendly pocket cruiser , he turned to a custom-penned C.W. Hood design and a Lyman-Morse-built 35-footer, which has a timeless Down East profile matched to seriously modern technology under the hood.
This yacht looks like a traditional, cold-molded Down East dayboat, but actually, it has everything, from Hamilton HJX Series water-jet drives to a planned Sea Machines autonomous command-and-control system . Top speed: 40-plus knots.

Quick Specifications
Galeon yachts 375 gto.
Even the remnants of Hurricane Ian, couldn’t dissuade the Galeon Yacht 375 GTO from its cruising mission. The small yacht’s wave-splitting hull form is paired to torque-filled 600 hp Mercury Verado outboards , giving this fun-in-the-sun boat a 47-knot top hop.
The 375 GTO is a speedster, to be sure, but it’s also so much more. Just about every aspect of the main deck seating is transformable and multifunction, from the aft seating to the alfresco dining abaft the helm, and beyond. It also has a family-size and eminently cruise-worthy belowdecks space for four guests, all while providing a foredeck entertaining lounge too.
The Galeon Yachts 375 GTO ticks all the boxes for an easy-to-handle and sporty cruiser.

Aquila 42 Yacht Power Catamaran
Following the success of its 44-, 54- and 70-foot power catamaran models, Aquila has launched the stable-as-a-table, owner-operator-ready Aquila 42 Yacht Power Catamaran .
The Aquila 42 is the entry point into the builder’s yacht line and is noteworthy for its ability to accommodate anywhere from a two- to four-stateroom layout, depending on the owner’s cruising requirements. There are alfresco spaces to manage the sunset cruise with friends and family, including a foredeck lounge area that can be accessed via centerline steps from the flybridge. The Aquila 42 is available with several Volvo Penta diesel-engine options .

Azimut Verve 42
Want to cruise from Florida to Bimini in about an hour? The Azimut Yachts Verve 42 can do that thanks, in part, to triple 450 hp Mercury Racing outboards and a hull designed to dice-and-slice a seaway. Top hop: 45 knots. The Verve 42 also has style for miles with a fine entry, raked hardtop, and a razorlike sheerline accented by sweeping hull glass from bow to stern. It’s striking.
With accommodation for a family of four, the Verve 42 is also solid under the hull tokeep everyone safe on those passages. The Verve 42’s hull is built of fiberglass and uses vinylester resins for blister protection. The yacht’s deck and hardtop are comprised of carbon fiber for strength without added weight. This all means that the Azimut Verve 42 is built to CE Classification Type A , making it suitable for sea voyages where winds can exceed 45 mph and seas to 13 feet.

Hinckley Yachts 35
The Hinckley Yachts 35 takes everything that yachtsmen like about this pedigreed-brand’s classic profile and infuses today’s modern outboard power to create 40 knots of sheer fun wrapped in sheer luxury.
This 35-foot Hinckley is built on a Michael-Peters-penned hull form with a fine entry, wider-than-average chines and a moderate deadrise. While the boat is built to sprint when desired, it’s also a relatively economical cruiser. For instance, a comfortable 24-knot cruise the Hinckley Yachts 35 has a 276-nautical-mile range.
It also has a tech-build thanks to vacuum-infused carbon-fiber composites and epoxy resin. An integrated interior structure is infused with the hull adding rigidity. The hull is then post-cured in an 80-foot oven, further strengthening the structure.

Beneteau Gran Turismo 45
The Beneteau Gran Turismo is the flagship of the builder’s four-model GT series, which also includes 32-, 36- and 41-foot models.
The Gran Turismo 45 ’s cruise-centric layout includes two staterooms and two heads belowdecks, as well as a galley down. There is also a dinette for meals and a settee for rainy-day lounging. Entertaining guests and enjoying the sun is the primary mission of the main deck.

Solaris Power 48 Open
The Solaris Power 48 Open was the first powerboat from this longtime builder known for its sailing yachts, ranging from 40 to 110 feet length overall. The Solaris Power 48 Open is notable for its wave-slicing plumb-bow design, high freeboard forward and 32-knot-plus speed. Power is twin 480 hp Volvo Penta IPS650 diesels.
The high freeboard keeps the deck dry and help creates sizable volume belowdecks with an average 6-foot-6-inch headroom. This enables real estate for either one or two staterooms. With the single-stateroom setup, there is a forepeak master stateroom while an L-shaped settee converts to sleeping accommodations for family or occasional guests. Interior wood options are oak or walnut.

Cruisers Yachts 42 GLS
Outboard-power cruising aficionados will appreciate the triple-engine options for the Cruisers Yachts 42 GLS . The 42 GLS we got aboard had the triple 400 hp Mercury Verados , which produced a top hop of 45 knots, but triple 450 hp Verados are available. Triple 350 hp Mercury Verados are the standard engine option. No matter the power arrangement, this express cruiser can easily be used for wakeboarding and tube towing. The 42 GLS is designed to handle the rough stuff too, with a fine entry and 21-degree transom deadrise.
For cruising enthusiasts, the 42 GLS has a master stateroom with an athwartships and a nearly queen-size berth, and the lower salon’s U-shaped dinette converts to a queen-size berth for the kids.

Back Cove 34O
Combining modern outboard power with classic Downeast styling, the Back Cove 34O touts award-winning standards with cruising in mind. The 34O is equipped with twin 300 hp Yamaha outboards, engines that allow the Newport International Boat Show’s 2018 Best Powerboat Under 35 Feet winner to travel up to 214 nautical miles at 24 knots on a 250-gallon fuel tank.
Belowdecks, the 34O has an island double berth and a split-head arrangement with the toilet to port and a separate shower stall to starboard. On the main deck, a U-shape dinette to port accommodates four or more guests on the Back Cove Yachts vessel. The 34O’s galley is equipped with a Cuisinart microwave, a two-burner Kenyon electric cooktop and a Vitrifrigo fridge and freezer.

Picnic Boat 40
Hinckley Yachts unveiled its first Picnic Boat more than two decades ago. Now, after two previous, sub-40-foot models, the Maine-based boatbuilder has developed its largest and most advanced model to date: the Picnic Boat 40.
Twin 480 hp Cummins diesel engines paired to twin Hamilton 322 jet drives propel the yacht to a 30-knot cruising speed and 34 knots on the pins. With optional twin 550 hp Cummins diesels, cruise and top-end speeds jump to 35 and 38 knots, respectively.
There is an L-shaped settee with a table and a wet bar on the main deck to port. The helm station is forward and to starboard with a benchseat for two. There is also a companion seat across from the helm. Belowdecks, there is 6-foot-2-inch headroom, and the dinette table drops to form a California-king berth for overnights and weekending.

Aquila Power Catamarans started its line with 44- and 48-footers, and now the builder’s Aquila 36 takes the line into the midsize market.
The 36 features a single, main-living area from bow to stern, helped in part by the vessel’s 14-foot, 7-inch beam. The boat can comfortably seat up to 20 guests for fun on the salt. Several Mercury Verado engine options are available for the Aquila 36, including twin 250-, 300- and 350-hp four-strokes. With the 350s, the Aquila has a top-end speed of 37 knots.
Other notable features include a fiberglass hardtop, a dinette, a cooktop, a fridge, a sink and a smokeless grill. Belowdecks, there are two staterooms with nearly queen-size berths, en suite heads and 6-foot-6-inch headroom in each.

Boston Whaler 350 Realm
From fishing and entertaining guests to diving and overnight cruising, Boston Whaler ‘s 350 Realm is a multitasker. And it’s fast, too. It’s powered with either triple 300 hp or triple 350 hp Mercury Verados. The 350 Realm can reach a top speed of 46 knots.
At the helm, two Raymarine displays provide vital navigation data. The captain can take in the displays’ view from a doublewide helm seat. There’s a flip-down platform for standing when needed and a footrest when desired.
There is a V-shaped berth that converts into a double berth with a filler cushion. The separated head has a VacuFlush MSD and a hot-and-cold shower. Owners also have the option to add a microwave and a flat-screen TV.

The MJM 35z can reach a top speed of 44 knots and a cruising speed of 33 knots on its optional 350 hp Mercury Verado outboards; twin 300 hp outboards are standard on this MJM Yachts vessel. Additionally, the 35z can travel up to 304 nautical miles on its 250-gallon fuel tank.
The 35z has a flush-deck layout and to port is space for an electric grill, a baitwell, a sink, an ice maker and a fridge. There are two Stidd helm seats—one for the helmsman and the other for a copilot—that rotate to face the rest of the seating aft. In the cabin is V-shaped seating forward that can be converted to a berth.
Owners also have the option of adding a Seakeeper 3 gyrostabilizer and a full-length Bimini top to shade the cockpit.

Greenline 39
Greenline Yachts ‘ vessels are aptly named for their environmentally friendly means of moving about; the Greenline 39 is no different. The Slovenian yacht manufacturer produces two types of this model: hybrid and solar.
If owners opt for the latter, the 39’s four solar panels atop the salon power all of the vessel’s systems for three hours. With the power of the sun, the 39 can achieve a max speed of 6.5 knots and a cruising speed of 4 knots. The hybrid type uses those same panels to help power a 220 hp Volvo Penta D3 with a Mahle electric-drive system. Owners have the option of replacing the standard engine with a 370 hp Yanmar 8LV diesel.
Belowdecks, scissor berths provide accommodations for long weekends.

- More: Center Consoles , Express and Flybridge Cruisers , Tenders , Yachts
- More Yachts

New Flagship for Bering Yachts: The B165

Power Catamaran Popularity Rising

“Energy Observer” Zero-Emission Boat Showcases Sustainability

Princess Yachts’ Y95: A Flagship Flybridge

For Sale: Sunseeker Predator 68

For Sale: CL Yachts CLB 72

10 Yachts Under $500,000 You Can Have Today

How to Swing a Compass on a Boat
- Digital Edition
- Customer Service
- Privacy Policy
- Email Newsletters
- Cruising World
- Sailing World
- Salt Water Sportsman
- Sport Fishing
- Wakeboarding

- BOATBUILDING SUPPLIES
- Aluminum & Steel Powerboats
- Aluminum & Steel Work Boats
- Classic Dinghy - Cedar Strip
- Classic Mahogany Runabouts
- Classic Runabouts
- Hydroplanes - Inboard
- Hydroplanes - Outboard
- Kayaks - Fabric Covered
- Kayaks - Plywood
- Powerboats 10'-16'
- Powerboats 18'-26'
- Sailboats - Monohull
- Sailboats - Multihull
- Sport Runabouts
- Tunnelhulls
- Vanquish 65
- Mini Maniac
- RG65 Appendages
- Maniac MK II
- IOM Appendages
- Marblehead Class
- Marblehead Appendages
- RT65 Ragnarok
- RT65R Armageddon
- RC65 Adrenaline
- ST65 Sowelu
- Mini40 / F48 Class
- Nightmare X
- Nightmare MK VIII
- MultiOne Class
- FireDragon 1000
- DIY Sail Winch
- Rig Building

Click the pictures to expand

Browse the pictures using the slider, click the center picture to expand

Browse the pictures using the slider, click the center picture to view the video clip.
- Tokyo Express
- Small Boats
- Geelong Model 850
- Plans (all)
- Noosa Plans
- Tewantin Plans
- Geelong Plans
- Daggerboard Plans
- Daggerboards
- Consulting / Drafting
- Terms & Conditions
- Privacy Policy
Select Page
Life’s simple pleasures
Creating in your shed….
Small boats are fun to make, and even more fun when you are finished. A few basic tools and a small amount of room, a single-car garage will do just fine. Turn heads when you head to the water, with something you created yourself.
Plans – Noosa
3.4m (11′) long – small enough to build in your garage and narrow enough to walk to the water.
Simple to build, with 6 mm (1/4in) plywood, she gets up and planes with a 3.3hp motor. Click on the picture to learn more. Recommended motor size 3.3—5hp.

Plans – Tewantin
3.4m (11′) long – a high-speed runabout you can make in your garage. This boat flies. Light enough to load on top of your car.
Max motor size is 15hp, recommended is 6-10hp. 62 pages of detailed technical drawings, magazine-style notes and more, to help you build Tewantin.

Plans – Geelong
4.7m (15.4′) long – but narrow enough to walk to the water. Another boat you can build in your garage.
Choose how you rig her. Cat rigged as in the photos (very simple), or try a Gaff rig for more sail area with the same size mast.

Plans – Geelong Model 850
0.85m (33″) long – small enough to build on your kitchen table but large enough to go sailing.
This boat is a replica of the full-size Geelong. If you don’t have room to build a full-size boat, you can still have fun building this boat (and take it sailing).

Tim Weston Boats
2022©timwestonboats.com
[email protected]
Privacy Overview

Introduction: Mini Boat

Have you ever wanted to build a boat? How about a really ( really ) small one?
If so, you may be interested in building this 6-foot mini boat.
Here are the highlights:
- Super darn cute and a joy to ride.
- 100% electric propulsion from an outboard trolling motor.
- Made from precision laser cut components.
- Interlocking assembly means no jigs required.
- Simple and quick cable-tie and epoxy construction.
- Interior bulkhead design keeps it floating even when flooded.
- Steers with a beefy plexiglass steering wheel.
- Low and comfortable seating position.
- Surprisingly stable flat-bottom hull design.
- Reliable and accurate steering geometry.
- Convenient cubby storage (above dash).
- Additional behind-seat storage.
- Designed to fit a 6'2" tall rider 200lbs or less.
I was inspired to build my own mini boat after seeing a few others, most notably Paul Elkin's 8-foot "Little Miss Sally". Be sure to check it out.
I wanted mine to be a 6-foot boat so that I could say: Neener-neener Paul, my boat is smaller!
For more fancy product-shots, videos, and info on my mini boat, please visit my website: https://rapidwhale.com/mini-boat.php
Thanks, and enjoy. -Josh!
Step 1: Design (or Purchase) Your Boat Parts.

You can design your own boat referencing this workflow, or you can buy a DIY Kit or Plans from my website .
As with most of my projects, I spent more time designing than actually building. Here's what my design workflow looked like for this project:
- Sketch a desired shape.
My concept sketch started on a sticky-note (don't they all?). That sticky-note sat in front of my desk for a few months as motivation to actually start such a daunting project. The sketches that followed were drawn with more realistic proportions in order to actually fit myself into the boat.
- Model it in CAD.
I imported my favorite profile sketch into Solidworks and designed around it. I simulated the material and water-displacement in order to determine my vessel's center of gravity and center of buoyancy. The relationship between center of gravity, center of buoyancy, and hull shape is critical for determining (or estimating in my case) boat stability. I wasn't keen on designing an unstable boat, so I began tweaking my design as I went in order to make it more stable.
- Build and test a scale model.
I laser cut a 1:2.2 scale model to test in my friends hot tub (hot tub jets make for an awesome choppy-water simulation by the way). I loaded up the scale model with weights to match. The scale model floated, but it wasn't quite as stable as I was hoping for.
- Adjust the CAD model.
I took what I learned from the scale model and adjusted my CAD model accordingly. I needed to move the center of gravity forward, and I needed to slightly modify the hull-shape. Sounds simple, but that meant 40+ more hours of design edits. Ouch.
- Cut / Print the Full Scale Boat Parts! To build the full-scale parts meant a lot of laser-cutting and 3D printing. I actually cut / printed enough DIY Kits for 3 boats. My Dad and a friend of mine also wanted to build their own.
Step 2: Gather Your Supplies

In addition to the custom components that you created (or purchased as a DIY Kit) you will need to purchase a variety of off-the-shelf components. This will cost you an additional $500 - $1,100 depending on how crafty or fancy you are.
Here is a link to the complete Bill of Materials .
And here is a part list overview:
- Trolling Motor
- Motor Connector Plug
- 12V Battery
- Battery Straps
- Quick-Cleats
- Stir Sticks
- Chemical Foam
- PFD (life vest)
- Emergency Paddle
- Dean's Connector
- Dead Mans Cable
- Fillet Tools
- Fiberglass Tape
- SS Hardware
- Vinyl Tubing
- Hook and Loop
Step 3: Build Sub-Assemblies

- Glue the top and bottom of the seat base together and let dry under weights.
- File any excess dried glue out of the pockets.
- Glue in the rest of the seat base assembly.
- Clean up the glue before it dries.
Steering Wheel:
- Glue the center of the steering wheel assembly together. Take note of which side is routered. You can use Acrylic Cement, CA Glue (Super Glue), or Epoxy.
- Glue on the front and rear pieces of the steering assembly. Take note of which side is routered.
- Sand it to a nice uniform matte finish. This helps hide any unsightly gluing jobs.
Steering Drum:
- Glue the matching sets of the sub-assembly together.
- Let them dry under clamps and weights. Binder-clips work best!
- Sand any excess glue off the surfaces.
- Stack and glue the drum sets and let dry under weights.
- Scrape off any excess glue.
- Cut the motor shaft to length such that the total exposed shaft length is exactly 22.35". Use a metal conduit rod (as pictured) to ensure you do not cut (or drill) through the wires. You can also use that small motor-shaft sleeve as a guide for cutting. Rest a hack-saw blade on it, as we will not be using this sleeve in the final assembly. Remove the sleeve and leave only the motor mount on the shaft after you are done cutting.
- Use the 3D printed hub as a guide for drilling the holes. Obviously don't drill through the metal conduit that is protecting your wires. That means you will need to drill 4 total holes. Align the hub before your start drilling to ensure your steering drum will be facing the correct direction when mounted. Look at the propeller mounting location when determining alignment.
- Remove the protective metal sleeve that was protecting the wires.
- Ensure the only loose item on the motor shaft is the motor-mount itself. No other loose items should remain on the motor shaft. That sleeve should not remain.
- Epoxy the steering drum hub to the wooden spokes. You will want to dry-fit the spokes first to ensure they seat properly before applying epoxy.
- Quickly epoxy the Hub/Spoke assembly into the drum assembly. You may want to use a little hammer-force to ensure it all goes together smoothly.
- Drill an access hole (likely 1/2") into the assembly so that you can fit the bottom bolt. Grab one of the 2.5" long 1/4-20 bolts and test-fit to ensure you drilled out enough.
- Press-fit the delrin thrust bearing into the 3D printed steering drum hub. I have already inserted in in some kits, in which case just make sure it is there.
- Attach the steering drum to the motor shaft. It's very tricky to feed the hardware through the motor shaft without pinching the internal wires. You will want to use a smooth, rod (perhaps one with a cone-tip) to feed through first, in front of the hardware to more easily separate the internal wires, then drive the bolt in right behind it. Alternatively, one customer decided to thread in QTY: 4 smaller bolts from all sides that do not pass all the way through the wire area of the shaft. That customer used QTY: 4 of 3/4" length bolts instead of QTY: 2 of the 2.5" bolts.
Step 4: Prep for Assembly

Epoxy the Puzzle Joints:
For the sake of shipping (and manufacturing) some of the larger plywood pieces are split into multiple pieces. You must therefore epoxy together all of the puzzle joints in order to create the larger pieces of the boat. These puzzle joints end up being just as strong, if not stronger, than the rest of the plywood. So fear not, your puzzle joints are rock-solid.
- Run a small amount of 5-minute epoxy (or marine epoxy) along both edges of the puzzle joint.
- Use a flat board as a press. Wax paper can be used to keep the epoxy off the flat board.
- Stomp on the board to ensure a flush press-fit of the puzzle joint.
- The press fit should be tight enough that you do not need to use any serious clamps. Just use binder clips on the corners as pictured.
- Repeat for all puzzle joints.
- CRITICAL : When gluing the nose pieces (of the hull-sides), triple check that they will be glued such that the bottom of the boat is FLAT (not curved). This is a FLAT-BOTTOM boat. It is easy to make this mistake.
Glue Motor Mount to Transom:
This is where the removable trolling motor will tighten-down onto your boat. So it will need to be re-enforced as follows.
- Apply liberal amounts of wood glue and stack the pieces accordingly. Be sure the cable-tie slots are all aligned. You may want to avoid excess glue in these areas or you will need to scrap it out to fit the cable-ties through later.
- The piece with the two holes (pictured) is the top-most piece to be stacked. Put it on last.
- Be sure they are all perfectly aligned and let them dry under weights. Your battery makes a very good weight.
Sand Puzzle Joints Flush:
- Sand the puzzle joints after the epoxy has cured. Don't go too crazy with the sanding, you are just trying to remove the excess epoxy from the visible surface. You don't need to do much sanding at all to the non-visible side.
Trace and Cut Fiberglass:
- Use the newly formed pieces to trace and cut the fiberglass accordingly. Cut the fiberglass right on the line because you will not want this fiberglass to wrap around any edges (that's what the 3" fiberglass tape is for).
- You will be fiberglassing: The entire hull (including the transom), the deck (optional), and the floor of the cabin (where you sit). The floor of the cabin is not able to be traced since the shape is not obvious, you can cut that piece after assembly of the plywood or you can try to guess as to the shape by tracing and cutting a second bottom-hull piece and trimming off where the inner bulkheads will go.
Step 5: Assemble the Boat

Begin Cable Tie Assembly:
- Knock out the large circle in the bulkheads. You will be using this opening to fit an arm into the bulkhead in order to apply the necessary epoxy fillets.
- Attach the bulkhead plywood to the base of the hull first. Ensure the cable ties are oriented such that the heads are visible after assembly.
- Attach the sides of the hull, and the transom next. Leave the cable ties loose for now, such that adjustments can still be made.
- Carefully form the hull shape by bending the plywood and attaching cable ties accordingly. If you bend too quickly, or unevenly, then you may crack the plywood near the kerf-cuts. You can repair any cracks with epoxy later. To ease bending, consider a poor-man's steaming technique utilized by applying water and running a clothes-iron to force steam into the wood.
- Attach the dashboard. You will also want to glue the two small pieces to the dashboard, and possibly cut the profile of the dead-man's Dean's Connector before assembly. Reference the pictures.
- Attach the piece (that is similar in shape to the dashboard) to the bottom of the deck.
- Attach the deck.
- Attach the small pulley block pieces connecting the dashboard to the similar shaped piece.
- Begin cinching down all of the cable ties. The wood pieced inter-lock, and you are left with an edge as pictured if you are doing it right.
- Snip the dangly-bits off most of the cable ties. So that they don't get in the way as you begin the next step. At this point your entire boat should be assembled, minus the plywood windshield piece which will go on later.
Epoxy Fillet Hard to Reach Corners:
- Mix epoxy and Wood Flour until you get a peanut-butter consistency. It takes a good deal of Wood Flour, and it's better to error on the side of too stiff than too runny.
- Use the Icing Bags to apply the newly mixed peanut-butter-like epoxy. Cable-tie the back so that there is no chance of a leak from the wrong end.
- Channel your inner contortionist as you try desperately to fillet all of the corners INSIDE the bulkhead. This is by far the most challenging part of the construction. You will have to apply the fillets blind because unfortunately there isn't enough room to get a head AND arm into the bulkheads. Use a phone to take a picture of what your progress looks like, and repair the fillets accordingly. Use the wooden fillet tools if that is helpful.
- Apply fillets to the inside of the transom. (back of boat) Run a wooden fillet tool over the fillets to make the them perfect. Do that for as many fillets as you can.
- Apply fillets to the inside of the nose. (front of boat)
- Apply fillets up under the inside of the deck. At this point nearly every cable-tie and corner on the inside of the boat should be covered in an epoxy fillet. The only exception being the base of the floor of the cabin (where you sit). That spot will have its cable-ties trimmed and fillets applied after pouring foam.
Fill Bulkheads with Foam:
The bulkheads should be air-tight once construction is completed. The foam is just there to ensure that even with a leak, the bulkheads will still displace water. The purpose of the bulkheads is to provide flotation to a flooded boat. You can pack the bulkheads with pool noodles or just leave them empty if you don't want the redundency and professionalism that two-part foam offers.
- 5-Minute Epoxy the small wooden tabs into the back of the bulkhead hole. You will use these tabs to...
- 5-Minute Epoxy the large wooden knock-out panel back into the bulkhead. Align the grain if you want to be fancy, and ensure the small hole is punched out beforehand.
- Ensure you epoxy all around the knock-out panel. Otherwise the foam may push it out as it starts to expand.
- Quickly mix the foam.
- CRITICAL : Only mix as much foam as you need. (Assuming 2 lb density: You need 1/4 gallon of A + 1/4 gallon of B mixed well and then poured into each bulkhead). Follow the directions on the label. Confirm volumes. Do not pour too much or you risk injury, death, and blowing up your boat. I'm not exaggerating: Pour-foam can create a LOT of pressure.
- Pour the foam. It will quickly start to expand, so rock the boat such that the still-liquid foam gets evenly distributed throughout the bulkhead. That way as it expands, it fills the entire cavity evenly. The foam gives off a good amount of heat and creates a good amount of pressure. If you do everything right, most of the bulkhead plywood should be warm, and the foam should exit out the small hole opening. Wait for the foam to cure.
- Seal the bulkhead by carving out excess foam and gluing in the small plywood circle. Align the grain if you want to be fancy.
Continue Assembly:
- Snip the cable-tie heads off the floor of the cabin (where you sit). The now-cured epoxy fillet that you laid along the inside of the bulkhead will hold this piece in place.You are snipping these cable-tie heads off so that you can more easily run a fillet bead.
- Apply a fillet along the base of the floor of the cabin (where you just cut the cable-tie heads). As usual, clean it up with a fillet tool. At this point every single corner inside the boat should be covered in a nice looking epoxy fillet.
- Cable-tie the plywood windshield together. Keep them fairly loose for now and ensure the cable ties are oriented such that the heads are visible (outside) after assembly.
- Attach the windshield to the deck w/ cable-ties. It is easiest if these cable ties are already fed through the slots in the deck before placing the windshield (as pictured previously).
- Cinch down all the cable-ties. It helps to use needle-nose pliers.
- Epoxy fillet all inside corners of the windshield area, even those inside corners where the windshield meets the deck. This ensures a permanent bond to the rest of the boat. Let the epoxy cure.
Step 6: Admire Your Work Thus Far.

You just turned a pile of wood into a shape that resembles a boat! Yeah, we built three of them.
Step 7: Waterproof the Boat

Prep the Interior:
- Sand off any excess epoxy and ensure the wood is clean and even.
- Vacuum the entire interior.
Waterproof the Interior:
- Cut and layout a sheet of fiberglass all along the floor.
- Wet-out the fiberglass with epoxy. It doesn't have to be pretty since it's just the floor, which will eventually be covered with carpet, but try and keep air-bubbles to a minimum.
- Epoxy coat the entire interior, starting with the harder to reach spots like the nose, transom, and inside the windshield piece. I would suggest putting the epoxy on heavy in the hard to reach areas since no one will be seeing those areas. Let the epoxy cure overnight.
- Pro Tip: If you wash the recently cured epoxy with soapy water, you can remove a residue layer that clogs sandpaper. Otherwise your sand paper gets immediately clogged whenever you sand fresh epoxy layers.
- Lightly sand all of the visible epoxy and re-coat the interior with another coat of epoxy.
- Epoxy coat the seat base and the steering drum while you are finishing up. No need to have multiple layers of epoxy on these parts.
Prep the Exterior:
- Snip all of the cable-ties flush with the plywood.
- Epoxy fillet all of the exterior corners. Reminder: Fillets should be created with epoxy that is made to be a peanut-butter consistency with wood flour. Be sure to get enough epoxy in those corners such that you can later sand them into a round-over.
- Jam that same thickened epoxy into all of the kerf-cuts on the nose of the boat.
- Jam that same thickened epoxy into all of the small gaps/voids all around the exterior. If you can fit a fingernail in it, fill it. This is to ensure you don't get air bubbles when you lay out and wet your fiberglass.
- Sand all of the epoxy corners to make them rounded.
- Sand the nose and the rest of the exterior to remove excess epoxy.
- Fill-in any nooks or bubbles that didn't get filled with epoxy the first time. Sand flush after curing.
- Vacuum the entire exterior and then rub it down with Denatured Alcohol to ensure it is as clean as possible and ready for waterproofing.
Waterproof the Exterior:
- Cut, layout, and wet-out strips of fiberglass tape all along the corners of the hull. Try and keep air-bubbles to a minimum and wet the entire thing out from edge to edge. It tends to stay put once wet, but keep an eye on it to make sure it doesn't wonder. be sure to cover all of the edges of the hull, and then let cure.
- Lightly sand all of the edges to get them somewhat flush with the hull panels. Don't sand the rounded corners at all, as it's too easy to accidentally sand through the fiberglass at this point. Hit them with a handheld sanding pad if need be. Just light sanding is all that is required, knocking down any obvious problem areas.
- Layout and wet-out the pre-cut sheets of fiberglass for each hull section one by one. Repeat until the entire hull is covered in glass and epoxy is cured. If you did it right, there will be no air-bubbles and look like shiny wood.
- Lightly sand the entire hull. Avoid sanding the rounded edges, just focus on the surfaces for now.
- Clean the hull w/ a vacuum and Denatured Alcohol.
- Coat the entire hull in epoxy, lightly sand / clean / and repeat.
- Ultimately you should have 1 layer of wet-out glass, and 2-3 coats of epoxy on top of that.
Now we are going to do those same steps to the top of the boat:
- Flip the boat over and begin working on the deck. I stained my deck, but I wouldn't advise putting a dark stain like mine under a layer of fiberglass/epoxy because as you can see it showed all sorts of epoxy errors. I'll later go on to paint over this deck, so it didn't end up mattering in the end. I'm still glad I stained my wooden windshield piece though.
- Layout and wet-out the pre-cut deck sheet of fiberglass. If you decide not to glass the deck, then skip this step.
- Cut, layout, and wet-out strips of fiberglass tape along all of the corners of the deck. You can also do this when you are working on the corners of the hull, the order is not critical.
- Coat the wooden windshield piece in epoxy while you are at it. This piece does not need fiberglass.
- Lightly sand the entire top side of the boat. Avoid sanding the rounded edges, just focus on the surfaces for now.
- Drill and clean up any areas in the fiberglass that are meant to be openings.
- Clean and wipe down the boat.
- Coat again in epoxy, lightly sand, clean, and repeat.
- Ultimately you should have 1 (optional) layer of wet-out glass on the deck, and 2-3 coats of epoxy on top of that. At this point your entire boat is waterproof and every square inch is covered in epoxy.
Step 8: Paint (optional)

Prep for Paint:
- Ensure the surface is smooth. Sand with 220 grit sandpaper to knock down any imperfections. It doesn't have to be absolutely perfect since marine paint calls for at least 3 coats.
- Wipe the surface clean. Denatured alcohol is your friend.
- Tape the area to be painted. I'm not a fan of blue painters tape, so I tend to use thin green automotive tape anywhere paint will touch tape. I use the blue stuff to block off large areas.
- Follow the directions on your paint can.
- Paint on your first base-coat. Move fairly quickly and in an orderly fashion to ensure newly applied paint always hits wet paint.
- Sand, clean, and re-paint as many times as desired. Typically marine paint will call for 3 coats minimum. I did 3 coats.
- Peel off the tape!
Step 9: Varnish

Varnish is a necessity evil in order to protect your exposed epoxy from harmful UV rays.
- Prep the surface for varnish by cleaning it and wiping with denatured alcohol. If you painted part of your boat already like I did, you are going to want to tape off the paint to protect it from the varnish. You only want the varnish going over epoxy, not paint. And you don't want paint going over varnish, so if you plan on painting your boat tape off that paint area.
- Follow the directions on your varnish can! It is absolutely critical that you stir the varnish thoroughly before and during use. If you don't, then you run the risk of applying varnish that will never cure (ask me how I know). And not all varnishes are created equal. I tested two and put the better one in the bill of materials.
- Apply your varnish with a brush to all surfaces that will be exposed to the sun. I found that using the cheap disposable brushes was fine if your application technique is adequate. I would avoid applying it to any surface that is not exposed to the sun. I had issues with it not curing fully when I put it where the sun don't shine.
- Most varnishes will require you to sand w/ 220 grit after waiting at least 24 hours between coats for a minimum of 3 coats. I did 3 coats. The varnish I link to in the bill of materials allows for a wicked-fast application process than allows you to knock-out all varnish coats in a single day.
- Varnish your steering drum while you are finishing up.
Step 10: Final Assembly and Wiring

Begin Assembly:
- Bolt on the rear pulleys. The 3D printed spacers keep the pulleys level when mounted on the curved deck, and the smaller spacer goes under the deck (not visible) to keep the nuts level. The cover is held on with the one inner-most bolt, so tighten that bolt up last, after you place the cover. There are mirrored pieces for port and starboard sides, so no two pieces are identical. Pay attention to how your are assembling them and don't mix up the covers.
- Bolt on the front pulleys. Bolt them on staggered. Meaning: If you bolt one closer to you (as pictured) bolt the other one (on the other side) further from you. You need the pulleys to be staggered so that the rope runs through them and around the steering shaft smoothly. Use the fender washers on all spots where washers touch wood.
- Bolt on the Quick-Cleats to the steering drum.
- Bolt on the Delrin steering shaft bearings. Float the steering shaft in them as you tighten down. That way you can rest assured the two shaft bearings are concentric to the shaft after tightening.
- Drill holes in your steering shaft according to the note.
- Bolt the 3D printed steering hub onto the shaft and bolt the steering wheel onto the hub.
- Install the steering shaft into the boat and bolt on the final 3D printed steering shaft piece to hold it all in.
- Press-fit the motor controller. It goes in from behind the dash, and you may need to spend some time filing excess epoxy to get it to fit perfectly.
- Press-fit the 3D printed motor controller knob onto the motor controller shaft. That holds the motor controller in place.
- Attach the straps, seat, and hook-n-loop strips to the seat base. Be sure to thoroughly clean the seat base where you plan on attaching the peel-n-stick adhesive.
- Review the schematic.
- Wire the motor. Its never a good idea to use smaller wire than stock, and this motor comes with 10 AWG wire, so I would suggest sticking with that, and even transitioning to 8 AWG wire for the wire harness inside the boat.
- Run the motor wires through tubing (1/2" ID, 5/8" OD was the ideal size).
- Connect the motor wires to the trailer hitch connector. I didn't need to solder directly to this connector, I was able to tin the wires then file 'em down to fit inside the holes. If you strip a bolt, or can't get the wires to fit, then I wouldn't hesitate to just solder direct.
- Create your Dead Man's Switch. Use a proper Dean's Connector, which is rated for something like 60 amps, which is fine for the trolling motor which calls for peak current of 40 amps.
- Begin creating the wiring harness. You will want to measure, perhaps with a string, and cut your wires accordingly.
- Drill your own volt-meter and light-switch holes in the dash if you plan on having those features. I would suggest clamping on a sacrificial piece of wood to reduce the change of splintering the back side.
- Install the light. Use a gasket.
- Install the main wiring harness you created. I ran the wires through a large diameter tube and hot-glued the ends in an attempt to waterproof them. It's not necessary though, you could just run cable-ties every 6 inches.
- Wire in the fuse. It should be as close to the battery terminal connection as possible. I mounted mine up under the deck where the trailer connector is located (see pic).
- Connect the wires to the in-dash motor controller (reference wiring diagram).
- Cable-tie the wiring harness out of the way. Alternatively, you could drill a hole in the further wooden piece to run the wires through that. Try and coat the edges of any hole you drill with epoxy (5-minute epoxy is fine) in an attempt to maintain waterproofing of the wood. The wiring harness should look clean and tidy if you did a good job with cable-management.
Continued Assembly:
- Install the seat. Make sure to clean the floor of the boat to ensure the peel-n-stick adhesive on the hook-and-loop tape will stick. I would suggest doing a test-fit before adhering to the boat. I installed my seat such that in the fully open position, it was just barely touching the wood behind it. I had read that these seats do not like a lot of weight reclining on them, so I think it is a good idea to have it butt up against the wood support as I did. Mark the perfect location so that you can place it there again with adhesive. You will not get a second shot at this, and the industrial grade hook-and-loop is pretty much a permanent mounting solution.
- Run the rope. It is critical that you run the rope as pictured. If you deviate from this, then you will either limit your steering ability, or have backwards steering.
Step 11: Document and Enjoy.

Be sure to check out the other info, pictures, and videos on my website: https://rapidwhale.com/mini-boat.php
Thanks. -Josh!

Runner Up in the Epilog Challenge 9
Recommendations

Green Future Student Design Challenge

Make it Resilient

Engineering in the Kitchen - Autodesk Design & Make - Student Contest

LIST of WOODEN BOAT PLANS – By Michael Storer
Plywood boat plans and wooden canoe plans. sailing dinghy . power . row . paddle . overnight, a boat building course in a book.
Click on an image for more information about our inexpensive, highly detailed boat plans and wooden canoe plans
Viola 14 Sailing Canoe Boat Plan
A sailing canoe to make dinghy sailors happy – 75lbs and for a simple boat, beautiful beyond belief – visit page.
Viola 14 Sailing Canoe is fun and exciting. But easier than a sailing dinghy to transport and store.
Canoe performance and Dinghy stability. 14ft – 75 pounds (34kg)
Viola is extremely stable allowing the crew to stand up and step and unstep the lug rig mast while on the water. Try that in a symmetric paddling canoe hullform! If righted correctly she is almost dry after capsize.
Three Sailing rigs with two piece masts 4.7 and 6.0sqm full batten rigs. 6.3m balance lug with three reefs for distance sailing. 75lb hull. Four sheets 4mm plywood.
More about the Viola 14 Sailing Canoe Plan here
Kits For Viola 14 Canoe Europe – Viola 14 Sailing Canoe Precut Plywood and Timber Kits Americas – Viola 14 Saling Canoe Precut Plywood and Timber Kits
16ft Kombi Sail and Paddle Canoe Plan
A 50/50 Sail and Paddle Canoe for one or two with more stabililty for sailing – visit page
The Kombi Canoe is a development of our recent sailing canoes to bring paddling ability up equal to the sailing ability.
Great for families as it can be used as a pure paddling canoe, but also sail well with one or two adults aboard.
More about the Kombi Sail and Paddle Canoe here.
NEW Plan – Mini Outriggers for Adding stability to sailing canoes and small dinghies
The Mini Outriggers are to add stability to a sailing canoe or small dinghy and aid stability to reduce the risk of capsize on other relatively slender boats.
They are set above the water to allow a sailing canoe or narrow dinghy to be sailed normally .
More about the Mini Outriggers here.
Taal Stand Up Paddleboard in Plywood
Both speed and stability at the same time.
A beautiful plywood Stand Up Paddleboard designed for distance paddling.
The user feels the stability, the water thinks it is a low drag pintail. 12ft
We created a board that hits the numbers for a good canoe or rowboat. Less wetted surface with a stable midsection and excellent weight carrying.
12ft and Stable for beginners but with the low drag of a kayak/pintail type hull (see the stern photos).
More about the Taal Touring Stand Up Paddleboard Plan here
Goat Island Skiff Sail Boat Plan
Simple, modern performance and famous worldwide.
Justifiably famous.
Simple to build but light, fast, pretty. Fast with 1 to 4 adults
Rows and Motors and will sail rings around other character boats. 15.8ft
More information about the Goat Island Skiff Plan Facebook Group for asking questions about the Goat Island Skiff
Quick Canoe 155 – build in 2 weekends
Very simple plywood canoe that handles well and looks right.
Quick DIY wooden canoe that works better than most flat-bottomed canoes and many fibreglass ones.
Even looks good on the beach. 15.5ft
First one took the builder 4 1/2 hours to get on the water – but most take 2 weekends. Half the weight of many fibreglass canoes. Lighter than most plastic. 55lbs from big store plywood. Another took 5 1/2 hours .
It has been designed to be as easy to build as possible while keeping most of the qualities of a nice paddling wooden canoe.
In particular the ability to track – excellent first boat plan. Click here for a comparison between our fast and our classic paddling canoe plans
More Information about the plywood Quick Canoe Plan
Eureka Canoe – Classic Plywood Canoe Plan
Light and lovely to paddle. simple plywood boat plan.
Light on the land, Prettiest Plywood or wooden Canoes anywhere. 15.5ft
Excellent distance touring boats.
15’6″, simple construction for a wooden canoe. 32 – 45lbs (15 to 20kg)
Click here for a comparison between our paddling canoe plans.
Click here for more information about the Eureka Plywood Canoe
Quick Canoe Electric Cargo Canoe Plan
Wooden cargo canoe for electric trolling motor 34lbs thrust.
5 to 6mph using a 34lb thrust Minn Kota or other electric trolling motors. DIY plywood canoe for fishing and roof racking.
Keeps the simplicity and low materials cost of the Quick Canoe Family. 15.5ft
Cartop transport. Very detailed Wooden Canoe Plans.
Click here for more information about the Plywood Quick Canoe Electric
Oz Goose Light Family and Club Sail Boat Plan
Low-cost family sailing dinghy, regattas and club training and learn to sail.
The Oz Goose is a small boat that is super easy to build.
Cruising or teaching with three adults or excellent club racing performance sailing with 1 or 2 in the boat. 12ft
The famous line is we can build 10 of these in the Philippines for the price of importing a single Laser sailboat. Boat speeds are very matched for excellent tactical racing when not heading off for a family picnic with two adults and a bunch of kids aboard
For training, the goose will carry an instructor and two adults to sail with good sensitivity and speed. In stronger winds, we commonly see downwind speeds of 10 to 13knots and sometimes much more.
Also, visit the Oz Goose Group on Facebook More information about the Plywood Oz Goose – see the website
“BETH” Sailing Canoe – Elegant plywood boat plan
Simple, brilliant performance – one person cartop – sailing canoe portability.
A touch of the 1870s but fast about as much fun as is possible on a plywood boat.
Yawl Rig with speed – a wooden canoe that can scare the Lasers at your local club .
Racing dinghy experience recommended!
A small boat for amateur boat building that is light enough for one person to roofrack 70lbs plywood canoe hull. Sailing Canoe boat plan
Click here for more about the plywood BETH Sailing Canoe Plan
Drop-in sail Rig Plan for Canoes and Kayaks
Convert a canoe or dinghy into a serious sailboat.
Convert most Kayaks or Canoes into an INSTANT SAILBOAT.
Everything removes as one unit except for the mast step
Also fits some rowing dinghies that are small or narrow.
Very cheap beginners plan.
Read more about the Drop-In Sailing Rig Boat Plan
Drop in Outrigger Canoe conversion Plan
Convert canoe, kayak or dinghy to a fast sailboat trimaran with amas..
Create a paddle or sailing outrigger canoe from a fibreglass or wooden Canoe or Kayak.
Even an elderly Grumman!
Convert your old canoe into an awesome sailing machine or fishing or diving platform.
Each component is under 10 pounds and everything removes cleanly from the boat apart from 4 small fittings and a mast step.
These Amas and crossbeams work for fibreglass and wooden canoes and dinghies, Fibreglass, Aluminium and some plastic canoes.
Performance sailing (see the video on the plan page ) or as a stable fishing platform or to make a super quick sailing multihull.
If you buy the plywood boat plan for the outriggers there is a free supplement available to set it up for sailing. Very cheap plan for a big boost in performance.
Find out how to convert your canoe, kayak or dinghy to a fast sailing outrigger canoe
Handy Punt – simple fishing punt Boat plan
Light cartop load, simple to build and stable – ideal first plywood boat plan.
Outboard motored Punts are the simplest plywood boats.
Good performance, easy construction, stable fishing platforms.
And lightweight for cartopping on roof racks.
An easy first boat plan for first-time boatbuilders.
6 to 8hp – 10 in some regions
Click here to find out more Outboard Punt Boat Plan
Russki Wave Ski, Surf Ski, Sit Down Paddleboard Boat Plan
Easy to build sit down paddleboard from two sheets ply.
Simple plywood waveski or paddleboard from two sheets of plywood.
Paint it and keep it on the car roof ready for use after work.
Small light boats usually are used more frequently than complicated and expensive boats.
Find out more about the Russki Plywood Wave Ski Plan
15 1/2 ft Storer Rowing Skiff Plan
Easy pretty plywood rowing skiff plan for oar.
Simple lightweight rowing skiff for one person and maybe a passenger based on the Goat Island Skiff.
Or Adult and a couple of kids.
Pretty and quick rowing boat on the water.
Simple lightweight rowing skiff for one person and maybe a passenger or a couple of kids. Based on the Goat Island Skiff. I used to get enquiries about using the Goat Island Skiff sailboat hull for rowing. It does row well but blows around too much.
This is much, much better. Pretty and quick rowing boat on the water.
Find out more about the plywood Rowboat Plan
Dayboat/Launches Boat Plan Bundle 23 plus 27ft (7/8.4m) Venezia
Boat plans for two simple prefabricated cruisers for low power outboard in one package – 23 and 27ft.
Picnic boat, party boat, river-cruiser, camp aboard, mini home-away-from-home.
Cuts through river and lake chop with zero bouncing and pitching.
Pack includes 23 and 27ft Dayboat versions in one plan pack includes Venezia below.
Simple plywood construction. 10 or 15hp 4-stroke for 8 to 10 knots. Venezia and Dayboat Launch Boat Plan Package
More about the 23ft Plywood Dayboat/Launch Boat Plan
“Venezia” 27ft trailerable canal boat
Stretched version of 23ft – both included in the plan above.
An 8.2m (27ft) boat for gentle cruising in rivers and canals.
Great appearance, sleeping accom., separate toilet – your layout.
10 to 15hp 4-stroke. 2 wooden cruising motor boat plans for the price of one – Venezia and Dayboat Launch Boat Plan Package
Read more about the 27ft Venezia cruiser canal boat plan
TC35 Riverboat – Prefab, Economical Liveaboard for Two
Minimal liveaboard plywood boat 35ft.
Very economical, near wakeless cruising motorboat.
Light on the gas and light on building materials.
Revised wooden boat plan for an extremely economical, efficient low horsepower riverboat.
35ft. 1 x 15hp or 2 x 10/15hp. Simple Prefab Plywood Construction.
Find out more about the TC35 River Cruiser Plywood boat plan.
OZ RACER – 8ft Sailing Dinghies.
Smaller versions of the 12ft oz goose sailing dinghy – 8ft for easier storage..
12ft Oz Goose for Capacity and Performance
- Same easy construction
- Same Sail and Foils
- Much higher performance
- Much larger capacity
OzRacer RV 8ft – General purpose version
OzRacer RV is the same small boat hull but with more space in the cockpit and is a slightly simpler build.
4 sheets plywood.
These Boat plans are a modern boatbuilding course in a book. Capacity 1 adult and one child or maybe 2 adults
Find out more about the OzRacer RV
OZ RACER Mk2 8ft – Race Version
OzRacer Mk 2 has a centreboard for more performance but a bit less room for extra crew.
Three sheets plywood. Simple Plywood Boat Plans. Capacity 1 adult and one child or maybe 2 adults
Find out more
Free plans Oars and Single Paddle & Double paddles.
Simplified paddles and oars based on classic designs – free plan.
- Free Plans for Wooden Oars
- Single Paddles
- Double Paddles.
I didn’t want to charge extra for nice paddles to go with our nice wooden Canoe plans
Download Free Oar and Paddle Plans from this page.
Tips and Tricks for Boatbuilding, Woodwork, Use of epoxy.
CLICK HERE for many helpful articles about the selection of materials, boatbuilding and boat repair techniques. All to help home boatbuilders.
The Master list of Articles we have written to explain and help out home boatbuilders
Blog Articles about a whole range of design, building, sailing technique articles.
- Plans & Kits

- Qty in Cart

West Mersea Duck Punt PDF Free Plans

Making Hand Screw Clamps Free Instructions

Tape & Glue Process Free Instructions
Lisa b good - free plans.

Folding Mast & Boom Free Plans PDF

Slipper PDF

Drifter 12L Free Plans
Wanigan (free plans).

1 Sheet Wedge Plans PDF

Drifter 12 Free Plans

Mouse Free Plans
Little bretton free plans.
- Total: items /
- Add all to cart
Adding your products to cart

- Basic Kayaking Knowledge , Learn
15 Free Boat Plans You Can Build This Week (with PDFs)
Boatbuilding is one of the most ancient forms of craftsmanship still alive today. As long as our ancestors have had a curiosity about exploring open waters, they have been practicing and honing their boatbuilding skills.
To be honest, however, building a boat is no small task. It will require a lot of work and patience to ultimately create a finished product that you are happy with and that is actually seaworthy.
Of course, we have also included a few free boat plans. You can keep in your back pocket for the next time you are asked to build a cardboard boat as part of a contest or lakefront teambuilding adventure.
We hope that these resources help you in your journey to build your own boat!

Photo by SeventyFour via Shutterstock
Free Boat Plans
Why build your own boat, 1. the wanigan, 2. the mouse, 3. the slipper, 4. the handy andy, 5. the junior, 6. the jolly roger, 7. the cork, 8. the hobby kat, 9. the tern, 10. the falcon, 11. the white duck, 12. the sea midge, 13. the zephyr, 14. the gypsy, 15. the crazy cardboard boat, 15 free boat plans you can build this week (with pdfs) – final thoughts, share on pinterest.
- The Wanigan
- The Slipper
The Handy Andy
- The Jolly Roger
- The Hobby Kat
The White Duck
- The Sea Midge
The Crazy Cardboard Boat

Photo by Halsey via Shutterstock
There are a lot of reasons why you should explore building your own boat versus buying a pre-made model. Here is a quick breakdown of the most obvious benefits:
- You will know the ins and outs of your finished boat better than anyone
- It can be a great project to work on with your teenage or even adult children
- You will gain valuable skills molding and shaping wood and other materials
- You can design your boat for your specific needs
- You don’t have to trust the sometimes-questionable manufacturing of mass-produced boats
- You can create a boat that functions as your second home on the water
- You can save money if you source materials mindfully
Of course, most first-time boatbuilders still experience some level of trial-and-error. With patience and perseverance, however, you can craft a one-of-a-kind vessel that has no equal anywhere in the world.
Free Boat Plans You Can Build This Week (with PDFs)
PC Duckworks Boat Builders Supply
The Wanigan boat began as a garvey design, which is one of the older boat plans known to the Americas. Traditionally, these boats were built as work scows and were very popular among American summer camps.
The design itself is very simple, but these boats can carry heavy loads. It can also handle a trolling motor being mounted to the stern so you can cover more ground if you want to use it as a fishing boat.
The creator of this boat plan became aware of some of the downsides of the garvey design, such as the heavier weight that made it less efficient than some other designs. So he combined elements of dory and wanigan designs to create a hybrid.
The main changes include an enlarged beam, tilted lathes to provide a stiffer hull, and knocking off the top strakes to reduce the boat’s overall weight.
The Wanigan text
These additional The Wanigan drawings  may also prove useful for your build process!

The Mouse is one of the most compact and nimble boat plans we have found for this list. It is an easy build and also a great boat for two kids or a single teenage paddler.
The original builder began with a one-sheet boat design in an effort to create the lightest and most affordable boat possible. This means it is only suited for calm waters and should not be used in high winds or wavy conditions.
That said, it was built in roughly 12 to 24 hours of work time and doesn’t require a full workshop to construct. The main material that is required for building this boat is quarter-inch plywood. But the builder recommends using one-inch by half-inch pine or something a little sturdier.
The plywood and pine components are held together using a method called ”˜stitch and glue’. This method requires choosing one of the best glues for kayak outfitting , which are typically made of epoxy and glass tape rather than something cheaper like polyurethane.
The Mouse Instructions
Also, here are a few extra useful The Mouse Notes for builders

The Slipper is the first of many sailboat plans on our list and it is faster, easier, and cheaper to build than most. It also features a deeper cockpit than many other sailboat designs, which makes it safer for intermediate sailors.
This sailboat plan features dual steering stations so that you can sail from inside or outside of the helm. It also includes a centerboard trunk that hardly intrudes into the cabin at all. So that, it is easier to work around while you are in the cockpit.
The exterior hull and cabin of this sailboat feature a modified dory design using two sheets of plywood ripped to three feet wide before being joined together. The resulting hull is a modified V-shape that reduces drag.
The centerboard of this boat can also be winched up to the level of the top of the cabin or lowered down to alter the draft. This allows you to customize the boat design for a stiffer and more weather-worthy vessel if you need it.
The Slipper was also intentionally designed with an aft cabin that naturally helps to keep the bow pointed into the wind whether you are underway or the boat is anchored in the port.
The Building Slipper

PC DIY Wood Boat
The Handy Andy is a great little 10-foot portable rowboat for hunting, camping, fishing, and other recreational uses. It is actually the only folding boat design on our list, which makes it best for folks that need the most portable boat plan possible.
This boat features a 42-inch beam and a depth of about 15 inches at the mid-section. It also weighs roughly 80 pounds when assembled and can handle up to three average-sized human passengers.
The design boasts a flat bottom with canvas-bound edges and the primary material used for construction is ⅜-inch marine-grade plywood. Despite its lightweight nature, this rowboat can handle trolling motors or even outboard motors with a maximum of five horsepower.
Once finished, the hull can be folded or unfolded in less than a minute’s time.
This design makes it one of the only boats on this list that can be stored in a truck bed or easily carried by two people to be launched at more remote locations.

If you are looking for an all-purpose dinghy that can handle almost any use you might imagine, look no further than The Junior free boat plan. It can carry three or four average-sized adults and is much easier to row than a traditional dinghy.
It is also durable enough to be equipped with a small outboard motor. You could even set it up with sailing equipment if you want to use it as a sailing vessel. As we said, this is truly an all-around boat design!
This boat plan requires constructing three frames that will provide the majority of the load-bearing support. The builder recommends using ¾-inch framing with ⅜-inch plywood as the exterior material for this boat build.
Resin glue and flathead screws are also required to hold this boat together. But there is a full list of materials included in the plans we have linked to below. Sticking to that plan should also give you enough leftover materials to construct two six-foot oars for rowing this boat until you install a trolling motor or outboard motor down the line!

Channel your inner Captain Morgan when you are following these plans to build your very own Jolly Roger boat. This flat bottom boat design is designed for pond fishing . It can also be a useful yacht dinghy for getting from your dock to a larger vessel anchored offshore.
The plan follows conventional dinghy construction methods but also includes a few modifications that will save you time and energy. The wide design is super stable for boaters of all ages.
The keel, frame, chines, and risers are all cut from ¾-inch oak, ash, or any other trusted hardwood you can get your hands on. For the smaller components, the builder recommends using cedar, cypress, fir, or white or yellow pine.
Because this boat plan is also sturdy enough to handle a small motor, it includes important points for protecting the wooden hull from spark plug damage.
Be careful to follow these guidelines to build the safest boat possible if you imagine installing a motor down the line.
The Jollyroger

The Cork is another simple rowboat design. This one trends away from the flat bottom plans that we have included thus far. Instead, it features a deeper, V-shaped hull that makes it better suited to more efficient rowing and easier maneuverability.
It can be rowed easily from either seating position and is durable enough to handle up to three average-sized adult passengers. The ends of the boat are identical, which allows for multi-directional rowing.
The list of materials required for this boat plan should cost you between $30 and $50, depending on your location and hardware costs there. The resulting build is lightweight enough for two people to be carried and also to be transported on top of a vehicle .
Inside the boat, the builders use aluminum tubing to secure the struts that hold the seats. This material choice keeps the overall weight of the boat down while still adding the necessary rigidity across the beam of the boat.

The Hobie Cat is one of the most iconic and recognizable small sailing vessels ever made. This Hobby Kat plan is your answer to building your own iconic sailboat without spending thousands of dollars.
Your finished boat will be able to handle speeds of up to 20 miles per hour. It will be a super fun vessel for windy days on the lake or bay. The builder was able to construct the hulls, decking, and rudder for this boat while spending little more than $200.
From there, they purchased and installed the mast, boom, sail, and rigging, which brought the total amount spent to roughly $650 (still much less than a name-brand Hobie!). Without the mast and sail, this boat weighs roughly 165 pounds and is constructed using primarily 3/16-inch marine plywood.
You can also elect to build your own mast, boom, and sail if you have the time and skills to do so.
Those elements are not included in this boat plan, but they do offer some recommendations for where to buy these components!
The HobbyKat

Named after the common seabird found around the world, the Tern is a lightweight and nimble sailboat with a 72 square foot base design. She is made for inland sailing and planes very well in moderate breezes.
The hull design also provides minimal water resistance and the small floor plan makes this boat easier for intermediate sailors to handle. Even though it offers a small footprint, this boat is sturdy enough to handle up to four adult passengers.
One of the best things about this boat plan is that it can be built almost entirely by using only common hand tools.
Of course, you can speed things up if you have power tools and you are skilled enough to use them correctly.
The Tern boat plan includes a 20-foot mast, but you can shorten that length if you desire. The plan includes a complete list of materials and step-by-step instructions on how to plane and assemble each element.

As you might expect from its name alone, the Falcon is an incredibly speedy sailboat for its size. It boasts a 14-foot centerboard and can handle two to four passengers, depending on its size and weight.
In tests of the original build, the creators claim that this boat out-distanced many Snipe and Comet sailing vessels as well as pacing evenly alongside longer 18-foot sailboats. When finished, your boat will have a six-foot beam and a total weight of roughly 475 pounds.
For the main framing components, they recommend using white oak and plywood will be the main material used in the hull construction. The hull features a V-shaped that was inspired by larger schooners.
The Falcon is best suited to sailing on bays, lakes, and wide rivers. It is also a boat plan with just under 120 square feet of deck space and it is a great build for amateur craftsmen and sailors.

The White Duck is a flat-bottomed rowboat with a total length of 13’6” and a four-foot beam. The cockpit is approximately 15 inches deep all the way around and this boat can handle up to five passengers while maintaining buoyancy and stability.
When fully constructed, it will weigh roughly 200 pounds, but the final weight will depend on the type of lumber you choose for your build. This boat plan features plywood planking over solid wooden frames.
The White Duck is built with a pointed bow that cuts nicely through the water. The flat stern of this boat design will make it easy to attach a small outboard motor with a maximum of six horsepower.
As you might expect from its name, this rowboat is a great option for duck hunting trips. That being said, it is a highly versatile craft that can also be used for pond fishing or casual rowing on your nearby lake.

The Sea Midge is one of the smallest rowboats on our list and it is ideally suited for one average-sized rower or two small paddlers. It is only about 8 feet in length and offers a 52-inch beam at its widest point.
The Midge’s small dimensions make her ideal for navigating narrower creeks and streams. With an approximate weight of 62 pounds, she is easy to maneuver on the water and can also be much more easily transported than some of the larger boat plans on our list
The Seamidge

The Zephyr is a compact and speedy dinghy sailboat that measures roughly 14 feet long and approximately five feet across. This boat style was originally developed for safely crossing the English Channel. This means it can stand up well in rough waters.
When finished, it is also light enough to be transported on a small trailer or on top of a larger vehicle.
The boat plan calls for using hemlock or fir for the framing and oak or Douglas fir for the keel and chines.

The Gypsy is a small cruising sailboat that is meant to be equipped with an outboard motor for powered locomotion. The original design resulted in an incredibly seaworthy vessel that logged more than 6,000 nautical miles in her lifetime.
It includes a comfortable cabin that makes it well-suited for multi-day sailing adventures. This boat plan includes improvements on the original design that will help you build an extremely durable and long-lasting sailboat.
The Gypsy boat design will help you construct a vessel that can handle a motor up to 25 horsepower so that you can enjoy cruising speeds of up to nine miles per hour.
While it may require a bit more of an investment in time and money, it will also help you produce one of the best boats you can build with a free boat plan!

PC Saint Dominic Catholic School
Finally, let’s talk about a crazy cardboard boat plan that you can build in less than a day. This is a great boat plan to bookmark for your next teambuilding project so that you can earn bragging rights with your coworkers.
The plan calls for using 1.5 sheets of cardboard. But you can use the remaining half sheet to build your own boat paddle if you want to get creative.
Triple-thick cardboard is best for this boat plan. But you can always double up thinner sheets if that is all you can find.
These plans include an easy-to-follow diagram for marking, cutting, and folding the cardboard sheets to create the hull of your boat. From there, it calls for using contact cement and construction adhesive to seal the edges and corners.
If you are looking to save a little money on this build you could also use duct tape and then wrap the entire design in plastic sheeting to provide waterproof qualities.
Overall, this build is one of the cheapest and easiest on our list. It is also a great project for hot summer camp days on the lake or river!

Photo by Alexandra Soloviova via Shutterstock
We hope that you now have a couple of free boat plans to inspire you to begin your own construction project.
Don’t hesitate to check out YouTube for some useful boat-building videos when you are getting into the nitty-gritty of these build processes!
Enjoyed 15 Free Boat Plans You Can Build This Week (with PDFs)? Share it with your friends so they too can follow the Kayakhelp journey.

Peter Salisbury
Pete is the Owner of KayakHelp.com. Born and raised in Cleveland, Ohio, he grew up kayaking, fishing, sailing, and partaking in outdoor adventures around the Great Lakes. When he’s not out on the water, you can find him skiing in the mountains, reading his favorite books, and spending time with his family.


- Create New Wish List
- Description
- Materials and Notes
An 18'6" tug for work or pleasure
For a PDF study plan download, click HERE
CATEGORY: Tug yachts CONSTRUCTION: Sheet plywood/wood framing, or welded aluminum or steel
This Mini-Tug is a step up in size with the result being more space in the cabin and cockpit. The deckhouse shows a seat or galley cabinet partially concealing the motor, but is only a suggestion. You can lay out the area to suit. Or if you wish, you can extend the deckhouse a foot or two for even more interior space, if at some decrease in cockpit length. It's an easy alteration most can carry out so the details are not a part of the plans.
A private double stateroom is located forward. The berths are 6' 3" long with sitting headroom above the berth tops and space below forward for a portable head. Plenty of windows, ports, and a trunk cabin hatch assure generous ventilation and light. Storage is below the berths as well as along the house sides below the side decks, and in any cabinets you might provide in the deckhouse.
Looking much like any other steel boat in progress, the novel SHRINK-WRAP techniques make construction quicker and more accurate. These amateur-proven methods assure super-smooth, fair surfaces virtually free of distortion. Fairing and filling compounds are virtually unnecessary. The final boat is so fair it might be confused with one molded in fiberglass.
About Our Tugs:
All the world is enamored by tugs. So imagine the pride and satisfaction you’ll get piloting and owning one of these authentic scaled-down replicas. Conceived by Al Sorenson and refined and detailed for amateur construction by Ken Hankinson, these are serious vessels meant for work or pleasure. They feature deep-draft, heavy-displacement hulls for the motion and feel of little ships. With their oversize props, big rudders, and deep keels, these boats can turn on a dime and punch through seas that would stop or flail about less-able "flyweights" of similar length.
Other big boat features include self-bailing cockpits, fantail sterns, walk-around decks, raised bulwarks, 6'3"+ pilothouse headroom, and the reliability and economy of a real inboard motor (gas or diesel). Internal ballast is used for stability and to bring the boats to their lines. Yet all models except the 26-footer can be trailered without special permits.
Construction is robust, yet these boats are well within most do-it-yourselfer’s abilities, and not expensive. Ordinary materials and building methods are detailed that most anyone can handle. The accompanying photos show how it’s done in the case of metal construction. But sheet plywood/wood construction is optional. In either case, FULL SIZE PATTERNS for frames and stem eliminate lofting, and the plans come with material lists for making cost estimates. Study Plan Paks are also available for each model.
ABOUT TUGBOAT ACCOMMODATIONS...
SWEET 16 has a convertible double berth under the aft trunk and 2 or 3 can stand in the pilothouse. A portable head can be stowed below the foredeck. You can omit the trunk for more cockpit space. Nominal crew weight is 600 lbs max. Layouts on GOLIATH and TITAN are similar. Each has a v-berth for two forward with portable head under, and spacious pilothouse where a galley can be worked in. TITAN can be lengthened to 21'6". On day trips, GOLIATH can handle a nominal crew weight up to 800 lbs, while TITAN can handle up to 900 lbs. FRED MURPHY has a large cabin forward with v-berth for two, space under for a portable head, and lockers both sides. The pilothouse has room for a galley and dinette/settee to suit; the house can be extended aft for more interior space if desired.
Steel/Aluminum Materials PDF Plywood Materials PDF
Related Products

Goliath Fiberglass Kit

Trailer 5000/6000 Plans - PDF

Goliath Study Plans-PDF Version
- Cardboard Ties
- RC Wall Mount

A mini (but still full-sized) 6 foot electric boat.
This boat is ridiculously small and a blast to ride. It's also simple to build with its cable-tie and epoxy construction.
It's designed to last a lifetime. It's made from marine-grade plywood and incorporates internal bulkheads that provide floatation even when flooded.
It's small enough to store in a closet, squeeze through a door, and slide into a hatchback. When it's on the water, it steals attention from the largest boats.
Interested in building your own?
Bare-Hull Kits:
+ shipping ($150 to USA 48)
I offer these kits on a made-to-order basis. If you would like one, contact me.
Bare-Hull Kits will include:
The custom components involved in making this boat:
- Laser cut marine-grade plywood
- Various 3D printed components
- Steering wheel
- Steering-shaft bearings
- Various gaskets
Additional expenses:
You will be in charge of sourcing all of the off-the-shelf components, which will be an additonal $500 to $1,250 depending on how crafty or fancy you are.
- Bill of Materials
Build Instructions:
The build process has been well documented and published for free on Instructables.
- Complete Build Instructions
Digital Plans:
+$20 per additional boat
If you would rather purchase plans than a bare-hull kit, contact me.
Digital Plans will include:
All the files necessary to make this boat:
- Design linework in PDF format (for printing)
- Design linework in DXF format (for CNC)
- STL files for the 3D printed components
- Precision laser cut components
- Interlocking assembly (no jigs)
- Simple cable-tie and epoxy construction
- Interior bulkhead design for flood floatation
- Thick plexiglass steering wheel
- Electric trolling motor propulsion
- Low and comfortable seating position
- Stable flat bottom hull design
- Reliable steering geometry
- Convenient cubby storage (above dash)
- Additional behind-seat storage
- Okoume BS1088 (marine plywood)
- Plexiglass (steering wheel)
- ABS plastic (3D printed parts)
- Delrin (steering shaft bearings)
- Cork (gaskets)
- Length: 6' (180cm)
- Width: 31" (80cm)
- Height: 24" (60cm)
- Boat: 67lb (30kg)
- Motor: 17lb (8kg)
- Batteries: 21lb (10kg) ea.
- 18" (45cm) w/ 170lb rider
- 6'2" (188cm) rider height
- 200lb (91kg) rider weight
- 3.5 knots (4 mph / 6.4 kph)
Inspiration:
- Paul Elkin's 8ft "Little Miss Sally" boat.
- American Boathead's 8ft "Model C" boat
- Artistic Brit's boat building videos
- Corbin Dunn's CLC Kayak build
- Chesapeake Light Craft (CLC) build instructions
- First Launch
- Stability Testing
- Boat Party 2 (my favorite)
- TESTED w/ Norman Chan
- Sea Trials 2
- Fun at Ventura Harbor
- Fun at Berkeley Pier
- Fun at Richmond Shipwreck
- Fun in Portland
- Fun at Lacamas Lake (latest)
Customer Videos:
- Matthieu's build and launch
- Jonathan's First Launch
- Rudiger's Glassing and Paint
- Rudiger's CNC Router Cutting
- Chelsea's Tinytanic
- Matthias' Custom-XL in Worth
- Matthias' Custom-XL First Launch
- Thomas' CNC Router Build and Launch
- Jonathan's Walkthrough
- Jonathan's GPS Speed Test
- Nikita's "Betty the Boat"
- Lesley Out Fishing
- Drez20001's Build Diary
- Drez20001's First Launch
Customer Photos:
- Photo Album

© 2015-2022 Rapid Whale
IMAGES
VIDEO
COMMENTS
Long distance sailing for 1 person. Drawing/Design Package. 9 x A1 drawings + 8 x A4 instruction sheets. Additions and alterations included with the plans. Bilge keel arrangement. Marconi rig. Sliding hatch. Micro 8 - Mini Yacht Plans.
Sweet 16 by Don Aguanno, Fair Haven, Michigan. Built in wood/ply. Power is a 12HP 2 cylinder Westerbeke with 2:1 reduction gear. Says Don, "This is the 3rd boat that I have built and I must say it's been the most enjoyable and a great learning experience." Sweet 16 Boat Design Plans.
As a RAID class boat, she must draw 8" or less, be rowing-friendly and launched from the beach unassisted; in other words, as small as possible. The result is RoG (River of Grass), a 15ft micro expedition cruiser. RoG completed the 2019 Everglades Challenge and took First-in-Class . She also completed the 2018 and 2017 Challenges.
Marjorie 26' Barge. Two sleeping cabins, a head, galley, and a pilothouse. Catalogue of all small boat plans and custom small boat designs by Tad Roberts. Plans for plywood, lapstrake, plank-on-frame, cold-molded, sheath-stripped, and aluminum construction. Free plans for Tern, 24' gaff ketch.
PLANS: Complete plans now available on 7 24 x 36" sheets. 100-page "Building guide" with suggested steps included as PDF. Dozens of boats now under construction and documenting progress at the Small Craft Advisor message board and elsewhere online. LOA - 11 ft 11 in Beam - 5 ft 4 in Draft (board up) - 7 in Water Balast - 173 lbs.
the Mini-Cup Materials List. L.O.A.: 12'. BEAM: 4'. HULL WEIGHT: 125LBS. SAIL AREA: 75 SQ.FT. CREW: ONE TO TWO. Click Here or on the image above to see the Mini-Cup's building sequence. The Mini-Cup is such a fun boat to build and sail, it's no wonder people send us shots from around the world! Take a look at the photos of some of the great ...
Assemble the mast and booms. Cut a slot in the top of the mast and glue in the masthead crane. Once that's secure, follow the plan to install all screw eyes: 4 to the mast, 1 on the fore end of each boom, 1 more on the mainsail boom (for the boom vang), and 4 to the deck. Screw these in until the shank of the screw is completely into the wood.
Low budget performer. In the 10 years that we have offered plans for the Didi Mini, we have sold plans for 90 boats. Apart from a redesign of the aft deck and a continual expansion of build options, it has remained the same basic boat sold as the Didi Mini Mk2. Now we introduce a major redesign, as the Didi Mini Mk3.
Galeon Yachts 375 GTO. Even the remnants of Hurricane Ian, couldn't dissuade the Galeon Yacht 375 GTO from its cruising mission. The small yacht's wave-splitting hull form is paired to torque-filled 600 hp Mercury Verado outboards, giving this fun-in-the-sun boat a 47-knot top hop.. The 375 GTO is a speedster, to be sure, but it's also so much more.
an 8' mini-runabout. The PEE WEE is small in size, small in cost, but BIG in fun. While not intended for hulking 200 pounders, it's great for the younger set or featherweight adults. A tiny outboard motor will really make it scoot, and yet it's safe when used within its capabilities. The PEE WEE is inexpensive to build.
Boat Plans, Patterns and Supplies For the Amateur Boat Builder! Every year, thousands of amateurs much like yourself build their own boats the proven Glen-L way. Many builders save 50% or more over the price of a factory-built boat. It's easier than you might think, and it can be a rewarding experience. ...
A mini yacht is a popular type of vessel for boat owners across the world. If you are considering purchasing a boat, a mini yacht has all the amenities of a larger vessel but in a smaller size. Read our mini yacht FAQs and browse new and used boats for sale on YATCO. Banner image source: 2023 ABSOLUTE 48′ 11″ 48 COUPE.
Our plans include large format full-size paper patterns, ready to use, no need to print them and no lofting required. DIGITAL PLANS - We also offer digital plans, sent by email, as an option. Digital plans, sometimes referred to as PDF plans, will need to be printed using a large format (36" wide) printer. Clark Craft offers hundreds of boat ...
The Nightmare is designed to be able to sail on one float, it is a stable design which is not pitch poling easily. Look the pictures and the video clips of our boats. Free plans for the MK VII and the MK VIII can be downloaded here. Boat Data: - hull lenght 1200mm without front fender - beam 1210mm - epoxy-fiber glass floats , weight about 475g ...
Plans - Geelong Model 850. 0.85m (33″) long - small enough to build on your kitchen table but large enough to go sailing. This boat is a replica of the full-size Geelong. If you don't have room to build a full-size boat, you can still have fun building this boat (and take it sailing).
Apply fillets to the inside of the transom. (back of boat) Run a wooden fillet tool over the fillets to make the them perfect. Do that for as many fillets as you can. Apply fillets to the inside of the nose. (front of boat) Apply fillets up under the inside of the deck.
Major plywood requirements for hull. 16 x 6mm sheets. 6 x 9mm sheets. Guidance Use. Inland, estuary and coastal for 2 adults. Drawing/Design Package. 6 x A1 drawings + 7 x A4 instruction sheets. Additions and alterations included with the plans. 4M Mini Yacht Plans.
Buy Canoe Plan - $75. Light and lovely to paddle. Simple Plywood Boat Plan. Light on the land, Prettiest Plywood or wooden Canoes anywhere. 15.5ft. Excellent distance touring boats. 15'6″, simple construction for a wooden canoe. 32 - 45lbs (15 to 20kg) Click here for a comparison between our paddling canoe plans.
To download plans click HERE The idea for the 1 Wedge1 Sheet Wedge came from my desire for a simple, low cost, yet useful small portable hull design. ... that is, an exercise to develop the smallest, cheapest possible boat. As a result, it's not a boat to which you can safely trust your life in any sort of waves - as... Qty in Cart: 0. Price ...
Because this boat plan is also sturdy enough to handle a small motor, it includes important points for protecting the wooden hull from spark plug damage. Be careful to follow these guidelines to build the safest boat possible if you imagine installing a motor down the line. The Jollyroger. 7. The Cork.
For a PDF study plan download, click HERE. CATEGORY: Tug yachts CONSTRUCTION: Sheet plywood/wood framing, or welded aluminum or steel. This Mini-Tug is a step up in size with the result being more space in the cabin and cockpit. The deckhouse shows a seat or galley cabinet partially concealing the motor, but is only a suggestion.
Rascal Mini Airboat - Construction Plans. Benjamin King Version 1.0, Revised 5-16-18. The Rascal is a small airboat designed around the Predator 22 hp engine from Harbor Freight, although it can easily be adapted to other similar engines. Designed for 1 - 2 persons, the front of the engine stand can accommodate side-by-side seating with a ...
A 6-foot electric mini boat by Rapid Whale. A very simple mini boat to build and a blast to ride. Plans and kits are available to purchase. Free assembly instructions and bill of materials. ... +$20 per additional boat. If you would rather purchase plans than a bare-hull kit, contact me. Digital Plans will include: All the files necessary to ...