
What is Sailboat Refit? (A Comprehensive Guide)

Sailboat refit is an important part of boat ownership, and yet it is often an intimidating process for many boat owners.
Whether you are a new or experienced boat owner, understanding what is involved in a sailboat refit is key to making sure you get the most out of your boat.
In this comprehensive guide, you will learn what sailboat refit is, the benefits, different types, costs, steps, best practices and challenges involved in the process.
So, if youre ready to make sure your sailboat is properly refitted and ready for the open seas, lets dive in and explore the ins and outs of sailboat refit!
Table of Contents
Short Answer
Sailboat refit is the process of upgrading or renovating an existing sailboat.
This can include replacing parts, installing new equipment, repairing structural damage, and painting or varnishing the interior and exterior.
Refitting a sailboat can be a major undertaking, requiring specialized skills and tools, and can take anywhere from a few days to several months, depending on the scope of the project.
What is a Sailboat Refit?
A sailboat refit is the process of renovating an existing sailboat to make it look and perform better.
This may involve repairs, upgrades, and modifications to the boat’s interior, exterior, and systems.
Refits are a popular way to extend the life of an existing sailboat and ensure it can keep up with the latest technology.
Refitting a sailboat involves more than just making cosmetic changes.
It includes replacing worn out or damaged parts, rewiring electrical systems, updating navigation systems, and adding additional amenities and equipment.
Depending on the age and condition of the sailboat, a refit can be a simple job or an extensive project that requires professional help.
Refitting a sailboat can be a cost-effective alternative to buying a new boat.
It can also be a great way to customize a boat to suit individual tastes and preferences.
Refits can range from minor projects like replacing a few hardware items or a new coat of paint to more extensive projects that involve structural changes and the addition of new systems.
In addition to improving the look and performance of a sailboat, a refit can also improve its safety and value.
By replacing worn and damaged parts and updating navigation systems, a refit can help make a sailboat more reliable and seaworthy.
This not only increases the value of the boat, but also helps to ensure a safe and enjoyable sailing experience.
No matter what type of sailboat refit is desired, it is important to find a qualified professional to ensure the job is done correctly.
An experienced professional can help to ensure the job is completed to the highest standards and that the boat meets all safety standards.
What Are the Benefits of Refitting a Sailboat?

Refitting a sailboat can be a great way to extend the life of your boat and ensure it can keep up with the latest technology. Refits can range from minor cosmetic changes to a complete overhaul, depending on the goals of the owner. In addition to increased performance, refitting a sailboat can provide a number of benefits, including:
1. Improved Safety: One of the most important benefits of refitting a sailboat is improved safety. Refitting your boat can help ensure that it is up to date with the latest safety regulations and standards, so you can enjoy worry-free sailing. Refitting can also help reduce the risk of mechanical and structural failures due to wear and tear, which can be especially beneficial for boats that are more than a few years old.
2. Increased Comfort: Refitting a sailboat can also provide increased comfort while sailing. This can involve replacing worn out cushions, updating the cabinetry, and installing air conditioning. By making your boat more comfortable, youll be able to enjoy your sailing trips even more.
3. Increased Performance: Refitting your sailboat can also help improve its performance. This can involve upgrading the boats electronics, installing new sails, and replacing the engine. Improving the performance of your boat can help you sail faster and more efficiently.
4. Increased Value: Refitting your sailboat can also help increase its value. This can be especially beneficial if you are looking to sell your boat in the future. Refitting your boat can make it more attractive to potential buyers and can help you get a higher price.
Overall, refitting a sailboat can be a great way to extend the life of your boat and improve its performance and value.
Whether youre looking for minor cosmetic changes or a complete overhaul, refitting your sailboat can help you get the most out of your sailing experience.
What Are the Different Types of Sailboat Refits?
When it comes to sailboat refits, there are several different types of projects that can be undertaken.
Depending on the condition of the boat, the owners goals, budget, and other factors, the scope of the project can range from minor cosmetic changes to a complete overhaul.
One type of sailboat refit is a cosmetic refit.
This type of project focuses on the aesthetics of the boat, such as cleaning and waxing the exterior, replacing hardware and fixtures, and refreshing the interior.
The goal of this type of refit is to improve the aesthetics of the boat while also helping to protect it from the elements.
Another type of sailboat refit is a performance refit.
This type of project focuses on improving the performance of the boat by upgrading and replacing components such as the sails, rigging, and engine.
The goal of this type of refit is to make the boat faster and more efficient.
A third type of sailboat refit is a structural refit.
This type of project focuses on the structural elements of the boat, such as replacing rotten wood, repairing or replacing the hull, and strengthening the frames and bulkheads.
The goal of this type of refit is to make the boat stronger and more reliable.
Finally, a complete refit is a project that combines all of the above types of refits.
This type of project combines the aesthetics, performance, and structural elements of the boat to make it look and perform better.
The goal of this type of refit is to make the boat look and perform like new.
No matter what type of sailboat refit is undertaken, its important to have a clear plan and budget in mind before beginning.
A professional refit can be expensive, so its important to make sure that the project is planned out and that the budget is realistic.
Additionally, its important to make sure that the project is completed properly, as a poorly done refit can cause more harm than good.
What Are the Costs of a Sailboat Refit?

When it comes to sailboat refits, one of the most important considerations is the cost.
Depending on the scope of the project, refits can range from a few hundred dollars to tens of thousands of dollars, and the costs of a refit can vary widely depending on the boats size, condition, and the owners goals.
For a minor refit, the costs could include a few hundred dollars for a new coat of paint, new canvas, and new lines.
For a more extensive refit, the costs could easily climb into the thousands of dollars and include repairs to the hull, repainting the exterior, installing a new mast and rigging, upgrading the interior, and replacing the sails and electronics.
Its also important to consider the cost of labor when budgeting for a refit.
Professional services can cost thousands of dollars, depending on the complexity of the project.
If you plan on tackling the project yourself, you should consider the cost of tools, supplies, and time to complete the work.
Finally, its important to factor in the long-term cost of maintenance and upkeep for the boat.
Refits can extend a sailboats life, but its important to ensure that the boat is well-maintained to get the most out of the refit.
Regular maintenance and repairs can add up over time, so its important to factor in the cost of upkeep when budgeting for a refit.
Overall, the costs of a sailboat refit can vary widely depending on the boats size and condition, the owners goals, and the complexity of the project.
By researching the costs of materials, supplies, and labor, as well as the long-term costs of maintenance and upkeep, you can create a budget for your refit that will ensure your sailboat is looking and performing its best for years to come.
What Are the Steps Involved in a Sailboat Refit?
When it comes to a sailboat refit, it is important to understand the process and the steps involved.
Every refit is unique and will vary depending on the goals and scope of the project, but there are some common steps to consider.
The first step in any refit is to assess the boat and create a plan.
This will involve inspecting the boat for necessary repairs, upgrades, and modifications.
This is the time to decide what needs to be done and to create a budget.
The next step is to start the actual refit.
This will involve stripping the boat down to its bare bones and repairing any existing damage.
This includes replacing any unusable components and making any necessary repairs.
Once the repairs are complete, the boat is ready to be upgraded.
Upgrades can include new equipment such as sails, rigging, electronics, and other features that will improve performance and look.
Modifications to the interior and exterior can also be made to make the boat more comfortable or to give it a new look.
The final step in the refit is to launch the boat.
This involves putting the boat in the water, testing it out, and ensuring it is ready for use.
This is also the time to make any final adjustments or tweaks that may be needed.
A sailboat refit is a great way to extend the life of an existing sailboat and make sure it is up-to-date with the latest technology.
By understanding the process and the steps involved, you can ensure your refit project is a success.
What Are the Best Practices for Refitting a Sailboat?

Refitting a sailboat is a big undertaking, and its important to plan ahead and take the necessary precautions to ensure the job is done safely and correctly. The following are some of the best practices for refitting a sailboat:
1. Make sure you have the right tools and supplies. Youll need a variety of specialized tools and materials for any refit, including saws, drills, sanders, caulking, sealants, and marine paints. Make sure you have the right materials and tools for the job.
2. Get professional help. If youre not familiar with boatbuilding and repair, its best to hire a professional to help with the refit. Hiring a professional means you get the job done right the first time, and it will save you time and money in the long run.
3. Take safety precautions. Boats can be dangerous places to work, so make sure you take the proper safety precautions. Wear protective gear such as goggles, gloves, and ear protection. Make sure youre familiar with any hazardous materials, such as paint or fiberglass, and that youre taking the necessary steps to avoid harm.
4. Make a plan. Before you start the refit, make sure you have a plan. This should include a timeline, budget, and list of materials and tools youll need. Having a plan will help you stay organized and on track.
5. Focus on one task at a time. Refitting a sailboat is a complex process with many different tasks. To avoid getting overwhelmed, its best to focus on one task at a time and make sure its done correctly before moving on to the next task.
By following these best practices, you can ensure that your refit goes as smoothly as possible.
With the right tools, materials, and professional help, you can make sure your sailboat is safe, efficient, and reliable for years to come.
What Are the Challenges of Refitting a Sailboat?
Refitting a sailboat is no easy task.
It involves a significant amount of time, effort, and money.
Before embarking on such a project, it is important to consider all the potential challenges and determine if the benefits of the refit outweigh the costs.
One of the biggest challenges of a sailboat refit is the cost.
Depending on the type of refit and the desired outcome, the cost can range from a few hundred dollars for minor cosmetic changes to tens of thousands of dollars for a complete overhaul.
Other expenses may include tools, materials, and labor.
Another challenge is the complexity of the work.
Sailboat refits can involve a variety of tasks, from welding and carpentry to electrical work and plumbing.
Unless you are experienced in these areas, you may need to hire an expert to help with the refit.
Additionally, some refit projects may require specialized tools or parts that may not be available locally.
Finally, it is important to consider the amount of time involved in the refit.
Depending on the scope of the project, it can take anywhere from a few days to several weeks or even months to complete.
If you undertake a large refit project, you may need to factor in the cost of a marina stay while the project is in progress.
Refitting a sailboat can be a rewarding experience, but it is important to be aware of the challenges involved.
With a realistic budget, the right tools and materials, and a realistic timeline, you can make sure your sailboat refit project is a success.
Final Thoughts
A sailboat refit can be an exciting and rewarding experience.
By understanding the different types of refits available, the costs involved, and the steps and best practices to follow, owners can ensure their sailboat is up to date and ready to take on any adventure.
With a little bit of planning and the right guidance, a sailboat refit can be the perfect way to extend the life of your boat and make sure youre ready to hit the open waters.
James Frami
At the age of 15, he and four other friends from his neighborhood constructed their first boat. He has been sailing for almost 30 years and has a wealth of knowledge that he wants to share with others.
Recent Posts
When Was Banana Boat Song Released? (HISTORICAL INSIGHTS)
The "Banana Boat Song" was released in 1956 by Harry Belafonte. This calypso-style song, also known as "Day-O," became a huge hit and remains popular to this day for its catchy tune and upbeat...
How to Make Banana Boat Smoothie King? (DELICIOUS RECIPE REVEALED)
To make a Banana Boat Smoothie King smoothie at home, start by gathering the ingredients: a ripe banana, peanut butter, chocolate protein powder, almond milk, and ice. Blend the banana, a scoop of...
- Skip to content
Knowledge for Sailors
My Bluewater Sailboat’s 40 Year Refit
Cruising Sailboat Costs / October 7, 2021 by TJ / 3 Comments
If you’re looking at buying a 40 year old fiberglass cruising sailboat you’re probably wondering what kind of refit you’ll be looking at and how much that refit will cost.
In this article I am going to break down the refit I had done on S/V Counterpoint, my Bristol 45.5. Per my pre-purchase survey :
The Bristol 45.5’s are a well-built and sturdy vessel. Attention to the larger issues will assure a long life ahead. These issues are common to any older vessel.
Now, of course, the boat you’re looking at might have had some of these refit items addressed already. The boat’s pre-purchase survey is your best resource for figuring out what projects her refit will entail.
Every sailboat is different. That’s even more true about 40 year old boats than it is about modern production sailboats. Counterpoint’s 40 year refit is not a template; it is merely one example.
I knew buying a 40 year old boat that the refit would be substantial. I could have searched for a boat where much of this work was already done but I preferred the opportunity to have the work done to my standards. If you’re looking at a 40 year old boat you may be better served by finding one where the seller has kept up with some or all of these refit items.
I wasn’t trying to buy a project. I set out to buy a sailboat that I could sail and eventually live aboard. With a substantial refit I expected having the refit done professionally so that I could enjoy the boat instead of spending all my time working on it. I was shopping for a yard to do the refit at the same time as I was shopping for Counterpoint herself.
40 Year Sailboat Refit Costs:
Let’s jump right in. Here is how I spent $94,000 on S/V Counterpoint’s refit:

Later in this article I will go through each of these projects but first I’d like to discuss a few headlines before diving into the details.
Time vs. Money
I spent $53,000 on 883 hours of labor for this refit. $53k is a lot of money no matter how you slice it. $53k is 70% of Counterpoint’s purchase price.
I’m sure I’ll hear from plenty of people about how much money I could have saved if I had done the work myself. I would certainly have spent less money on the refit, but what would it have cost me?
Let’s assume I worked 8 hour days every Saturday and Sunday since the day after my first sail aboard Counterpoint: July 5th, 2019.
I’m also going to give myself the benefit of the doubt and figure my labor is half as efficient as professional labor on these projects. Even though I don’t have a yard full of tools and parts handy. In spite of the fact that I’ve never before attempted jobs like these (except the bottom paint and additional bilge pump install). That I’d be working solo on some jobs that would best be done with two or more people. That I don’t have existing relationships with the sub-contractors necessary for these jobs.
This is an alternative story of my life since buying Counterpoint, in table form:
The last completion date is a project completion date projection assuming I missed two weekends in 2019, two weekends in 2020 and two weekends in 2021.
So $53,000 bought me just over two years of weekends back; not just two seasons but two entire years of weekends. Bought me back sailing during the 2019, 2020 and 2021 sailing seasons.
Time and Money aren’t the only trade offs. If I had spent nearly 2000 hours working on Counterpoint I think I would be well on my way to an entry level boat yard laborer; I still own Counterpoint so the knowledge and skills would not go to waste. I would also have accumulated a substantial workshop worth of tools.
I’d also probably be a very bitter boat owner barely having the chance to sail my boat during the first 3 seasons owning it.
Am I ecstatic about having spent $53k to have a yard refit Counterpoint? Not really. But I am very happy with the results of the refit. Even in hindsight if I had the chance for a do-over I’d approach the refit the same way.
Estimate vs. Actual Cost
I did not get estimates for every part of S/V Counterpoint’s refit. But I spent a lot of time and effort getting estimates and evaluating boat yards for the most expensive projects in the refit .
With everything that the tank project would open up aboard Counterpoint I figured even if I got an estimate for fixing all the projects I knew about more work would come up. My hope was that all of the work choosing the right yard for the big projects meant good quality and fair prices for the smaller, un-estimated ones.
Here I break down the $93k I spent on the refit to calculate how the estimates lined up with the actual cost:

Overall Johanson Boatworks came in under 113% of what they estimated. I was satisfied with that level of accuracy.
I was also pleasantly surprised that the additional work came out to under $20k.
Refit Projects
I went into great detail of how I chose the right yard for the replacement of my diesel and water tanks in the bilge here . All that’s left to discuss is the numbers.
The tank replacement project came in 14% more than estimated which I was OK with.
The tank project was 54% labor. The largest expenses for the project were the tanks themselves; they were custom fabricated on site using the original tanks as templates. This way the only fuel and water capacity I lost was due to the additional thickness of the newer tanks.
Thru Hulls & Seacocks
The seacocks on S/V Counterpoint were in rough condition when I bought her. Some of the newer plastic ones seeped seawater when they were closed and the bronze seacocks were as corroded as any seacocks I had ever seen (they did all work though).
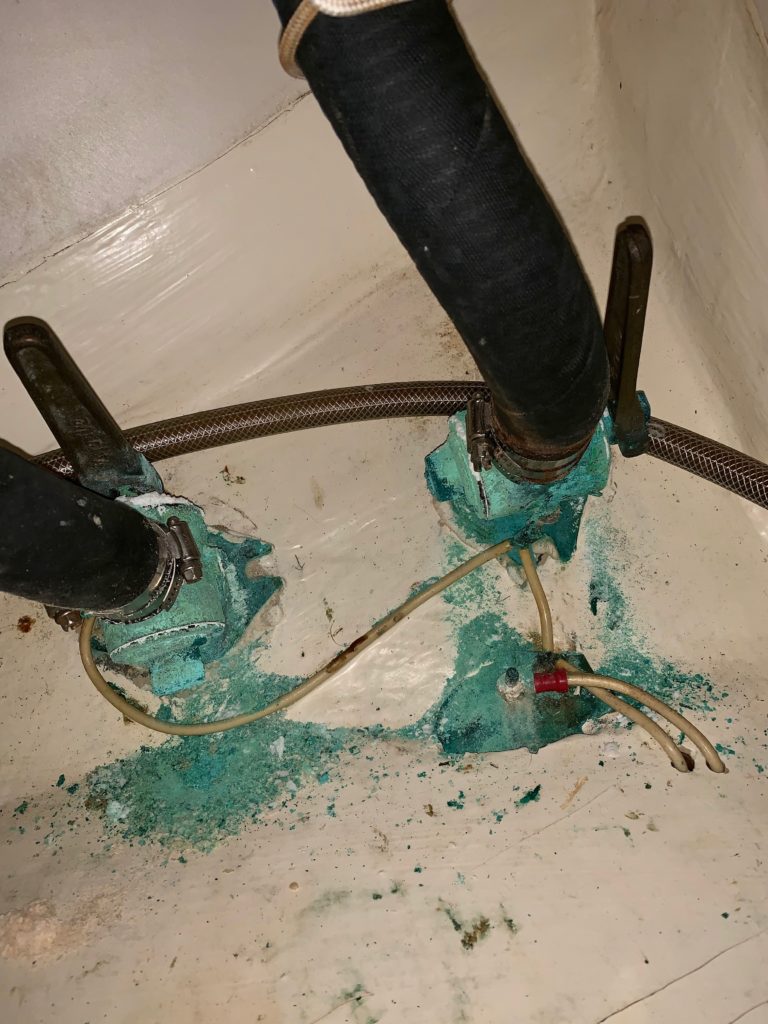
I had all 15 of them replaced. Johanson and I did not spend nearly as much on that part of the estimate as we did on the tank projects. I erroneously told them there were only 12 seacocks to replace so I counted the $2,617 for the additional three as additional work. So for the 12 seacocks quoted the quote was exceeded by 10%.
I opted for bronze seacocks, not fancy plastic. The bronze seacocks are bombproof and the originals had lasted almost 40 years which worked for me.
I opted for the top of the line Groco BV seacocks because (1) I wanted them to last the full 40 years and (2) the thru-hulls and seacocks seemed like the absolute worst place to try to save money. The seacocks and thru hulls themselves were the most expensive part of this project; parts were 54% of the cost of this project.
Chainplates
Chainplates were a survey item:
Before any long voyage, suggest removal, inspection and re-bedding of the port and stbd fwd lower shroud chainplates.
I figured getting them all inspected and re-bedded while the mast was down was a good thing to have checked.
This project was all labor and it cost less than half of what Johanson estimated.
This is my heading for the canvas work I had done. None of this was on the survey nor on my radar really but Johanson noted some canvas work that should be done.
The jib was not going to last but the main sail, mainsail cover and dodger will probably last years if I take good care of them. So I opted to have that work done.
Transmission
This was the biggest surprise. I had the diesel inspected by a diesel mechanic and he did not notice any problems. I had always felt the transmission shifted roughly but I figured it was merely showing its age.
Getting Counterpoint from the dock I dropped her off at into their hangar Max from Johanson also noticed the rough shifting and brought it up on our first call after they got the boat. He found it concerning and wanted to pull the transmission and send it out to be serviced. I didn’t want to run the chance of losing power maneuvering between million dollar yachts in a marina someday so I signed off on the work.
It turned out that the transmission needed a significant rebuild. Johanson Boatworks also found that the shifting was so rough that several of the bolts connecting the transmission to the flywheel had sheared off. The flywheel had to be pulled out of the engine to get everything put back together correctly.
Max Prop Service & Shaft Seal
These were both survey items. The existing dripless shaft seal was corroding to the zinc used as a backup collar to keep it from leaking. The Max Prop was working but the surveyor noticed it had enough play in its operation to justify servicing it.
Johanson installed a dripless stuffing box; I wasn’t even aware this was an option but given that the existing Dripless Shaft Seal was already setup to circulate engine cooling water it made sense. A proper stainless steel collar was installed as a safety measure.
The Max Prop service was described by the max prop invoice as “routine”.
While the mast was down I had Johanson replace some of the wires and remove the old TV antenna.
The survey noted I should inspect the base of the mast where it sits in the mast boot when it was next down. It was in great shape. Just to be safe the bottom of the mast that goes into the boot was painted to prevent corrosion.
Inspecting the base of the mast on a keel stepped mast is a very common note on surveys; it’s always suspect and unless the mast is out of the boat it’s impossible to truly inspect.
I did ask Johanson to fix the anchor light but they were unable to complete that project before Counterpoint left for the sailing season. It’s some difficult to diagonse wiring problem that I still haven’t gotten to the bottom of 🙁
Paint Bottom
Johanson added a coat of ablative bottom paint to Counterpoint. She was quicker early in the season due to this improvement in the bottom paint
During the season I had noted one of the deadlights and the centerboard block on deck were the most significant leaks. I had Johanson rebed these while Counterpoint was being refit. Not a drip since.
The deadlight could have been done whenever but the centerboard block was best done while she was on the hard and the centerboard supported.
Backup Bilge Pump
The survey indicated that the bilge pump would need to be replaced:
Recommend repairs to the automatic bilge pump.
It wasn’t actually broken though; it was just wired unusually. The bilge pump has to be switched on at the breaker panel in order to work automatically. Then there is a second switch to engage the bilge pump in manual mode.
I got it working the first day I stepped aboard. The previous owner saw this recommendation and bought a replacement bilge pump and left it aboard; meaning Counterpoint came with a spare electric bilge pump.
While Johanson was comissioning the boat they noted that the bilge pump should be wired directly to the batteries and they wanted to fix it for me. Instead I had them install a second bilge pump in the deep bilge above the existing “primary” bilge pump. The secondary bilge pump is wired directly to the battery. That way if the primary bilge pump fails the secondary bilge pump will kick in. And if one pump of the two is working and can keep up with the water ingress the flooding will be limited to the deep bilge.
Miscellaneous
Johanson went over every system as a part of commissioning. They found and fixed lots of little things. The “full service boat yard” service was reassuring, like an additional post refit survey where they fixed all the little things (and a few medium things) they found.
They fixed a handful of small problems. A new sump pump for the aft shower. New strainers everywhere. Replacing a shower head. Other assorted bits. But mostly this item was the time taken verifying each system and giving S/V Counterpoint a deep clean after her very dusty refit.
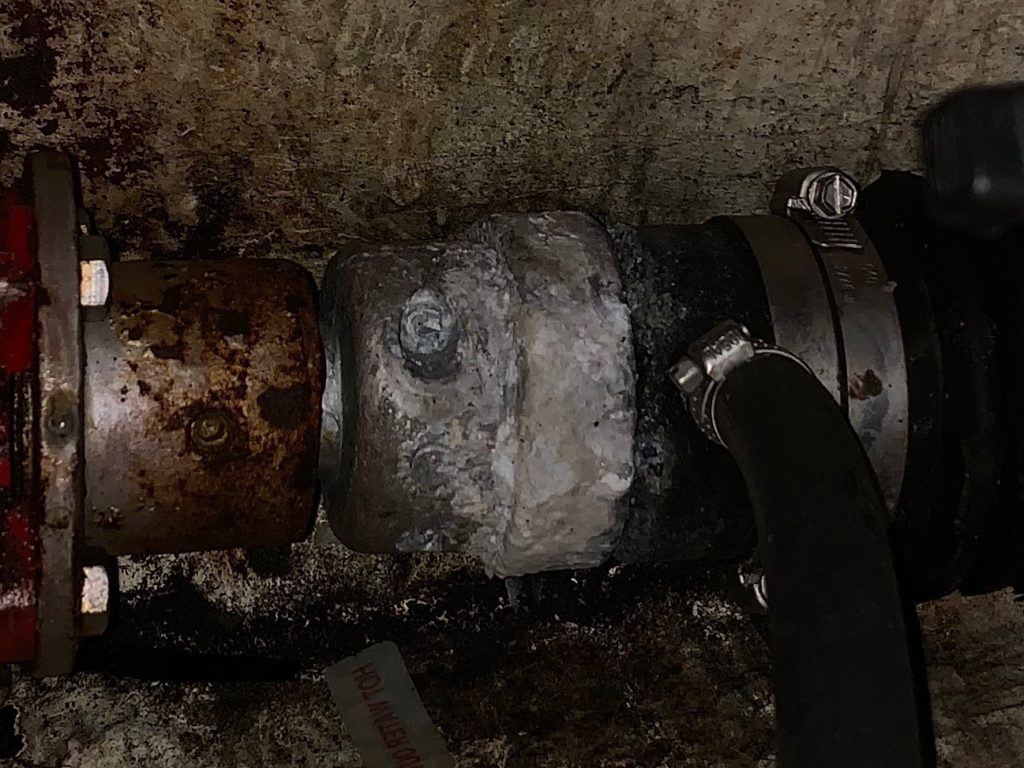
Diesel Leak
Unfortunately one problem snuck under the radar. About an hour and a half into our delivery from Penobscot Bay to Boston Harbor I went below to look over the diesel and noticed a diesel leak in the fuel return system. It looked to be an old problem that the previous owner had fixed with JBWeld but the repair had failed and diesel was spurting out.
The leak a seep at all at idle speeds but as the RPMs went up diesel was spurting out:
We could have completed the delivery under sail just using the diesel for maneuvering into the docks at low RPMs. Unfortunately some internet sleuthing while underway indicated the part necessary was no longer available from Westerbeke so some custom fabricating or tricky repair would probably be necessary.
I decided to turn around, pass on a diesel shower to kick off the season and let the professionals take care of this final repair.
Johanson repaired the fuel return line and Counterpoint was ready to go again by the following weekend. I SAY AGAIN: Johanson repaired the fuel return line and Counterpoint was ready to go again by the following weekend! Somehow they managed to get Counterpoint ready in less than a week during the busiest part of their year. If you’ve ever tried to get ahold of a boat yard during that time of year you’ll understand how impressive that is.
Conclusions
Maybe what you take away from this article is don’t buy a project boat. That’s a good lesson to learn with somebody else’s money. Congratulations!
As I said above, knowing what I know about the refit and having lived with the results for two seasons I would do it the same way for the most part.
What Would I Have Done Differently?
If I had known that the transmission work would wind up costing $4k and that there was a diesel fuel leak on the engine that cost $1k to repair I probably would have had Counterpoint’s diesel replaced. The back of the napkin numbers I’ve gotten for re-powering Counterpoint were all around $25k; the $5k of surprise diesel work was 20% of a re-power that I’ll probably want done during the next 5 years.
A re-power would have saved me getting a quick diesel shower from the leak, aborting my first delivery to Counterpoint’s summer slip (which was my most expensive cab ride ever on top of the 5k) and the adventure of sailing back onto the mooring after the sun had gone down.
I would have made the problem with the anchor light known to Johanson earlier so that it could have been remedied while the mast was down.
I can’t think of anything else. There were no issues with the boat that kept me from enjoying the 2020 sailing season or living aboard for two months during that season.
S/V Counterpoint Article Series
If you care to read more about my journey buying Counterpoint checkout the additional articles below:
- How I chose my Bluewater Sailboat
- Bluewater Sailboat Purchase Process
- Fuel Tank and Water Tank Replacement Project
- My Bristol 45.5’s 40 Year Refit (this article)
- 45’ Blue Water Boat Cost of Ownership
- S/V Counterpoint: Bluewater Sailboat Video Tour
Share this:
- Click to share on Facebook (Opens in new window)
- Click to share on Twitter (Opens in new window)
- Click to share on Reddit (Opens in new window)
- Click to share on Pinterest (Opens in new window)
- Click to share on Pocket (Opens in new window)
- Click to print (Opens in new window)
Reader Interactions

May 24, 2022 at 12:28 pm
Did you quit blogging? I was looking forward to the rest of the story.

May 26, 2022 at 10:03 pm
Nope, just took the winter off sailing and blogging too. Season starts this weekend though 🙂

January 15, 2024 at 2:05 pm
Thanks for sharing your story! It really helps to get a feeling for all the costs and adventures on the technical side 🙂
Leave a Reply Cancel reply
Your email address will not be published. Required fields are marked *
Notify me of follow-up comments by email.
Notify me of new posts by email.
Learn More About

Refit guide: Sailboat refit done right
Published April 7, 2023 · Updated April 7, 2023
If you’re planning a sailboat refit, you know it can be a daunting task. Whether you’re preparing for an offshore voyage, upgrading your vessel, or simply maintaining your boat’s systems, a comprehensive refit guide can be an invaluable resource. In this post, we’ll provide a detailed checklist for every sailboat refit, including tips and tricks to help ensure a successful outcome.
Introduction
A refit is the process of upgrading or restoring a boat to improve its functionality, safety, and overall appearance. This may involve anything from replacing outdated equipment and upgrading systems to overhauling the interior and exterior of the vessel.
Regular refits are essential for maintaining the safety and performance of a sailboat. Neglecting a vessel’s maintenance can result in costly repairs, decreased value, and even endangering the crew’s lives. A refit is a comprehensive maintenance plan that involves assessing the boat’s condition, identifying areas for improvement, and performing necessary repairs and upgrades.
Without regular refits, small issues can turn into major problems. This could include a deteriorating hull, failing rigging, or outdated electronics, which can put the boat at risk in heavy weather conditions. In addition, regular refits can help to maintain a boat’s value, and even increase it, as a well-maintained vessel is more appealing to potential buyers. A refit can also ensure that a boat is equipped with the latest technology, making it more efficient and easier to handle. Overall, regular refits are essential for keeping a sailboat in top condition and ensuring safe and enjoyable sailing experiences.
Pre-Refit Planning
Setting a budget:.
Before embarking on a refit project, it’s essential to read our refit guide and set a budget. It’s important to have a realistic idea of how much the project will cost, and to allocate funds accordingly. When setting a budget, consider the cost of materials, labor, and any unforeseen expenses that may arise. It’s also important to factor in any upgrades or improvements that may be necessary to meet safety standards or legal requirements.
Assessing the boat’s condition:
Assessing the boat’s condition is a critical step in the refit process. Before beginning any work, it’s important to thoroughly inspect the vessel to identify any areas of concern. This may include checking the hull, deck, rigging, and mechanical systems. Identifying any deficiencies or weaknesses early on can help prevent more significant issues down the road.
Identifying areas for improvement:
Once the boat’s condition has been assessed, it’s time to identify areas for improvement. This may include anything from upgrading outdated equipment to modernizing the interior or exterior of the vessel. Consider your goals for the refit and prioritize improvements based on their importance and feasibility.
Choosing the right time for a refit:
Timing is an important consideration when planning a refit. Many boaters choose to undertake a refit during the offseason, when the boat is not in use. This can help minimize the impact on the boater’s ability to sail or use the boat. It’s also important to consider the time required for the refit and ensure that it fits within your schedule and budget.
Developing a refit plan:
Developing a comprehensive refit plan is crucial to the success of the project. The plan should outline the scope of the work, budget, timeline, and any necessary permits or approvals. It’s also important to consider the skills and expertise required to complete the work and ensure that all necessary resources are in place.

Refit Guide: To-Do List
As part of our refit guide, we want to give you an example of interesting areas to cover in a refit. A refit plan usually brings up a to-do list. A generalized to-do list could look like this:
Hull and Deck
- Inspecting the hull and deck for damage
- Repairing any damage found
- Cleaning and painting the hull and deck
- Upgrading hardware and fittings
- Replacing lifelines and stanchions
Rigging and Sails
- Inspecting the rigging for damage
- Replacing any worn or damaged rigging components
- Upgrading to high-performance rigging
- Replacing worn or damaged sails
- Choosing the right sails for your sailing style
Electrical and Electronics
- Inspecting the electrical system for damage or wear
- Upgrading to a modern electrical system
- Installing new electronics, such as a chartplotter or autopilot
- Replacing old batteries
- Adding a battery monitoring system
Plumbing and Sanitation
- Inspecting the plumbing system for leaks or damage
- Replacing worn or damaged hoses and fittings
- Upgrading to a modern sanitation system
- Adding a watermaker or water filtration system
- Installing a holding tank for sewage
Interior and Comfort
- Inspecting the interior for damage or wear
- Upgrading to more comfortable cushions and bedding
- Installing heating or air conditioning
- Upgrading the galley appliances
Safety Equipment
- Inspecting all safety equipment, such as life jackets and fire extinguishers
- Replacing any expired or damaged equipment
- Installing additional safety features, such as a man overboard system
- Upgrading to a modern EPIRB and PLB
Deck and Cockpit Upgrades
The deck and cockpit of your sailboat are where you’ll spend most of your time, so it’s important to make sure they’re comfortable and functional. Consider adding or upgrading features such as a bimini top, cockpit cushions, or a swim platform.
Add or upgrade deck hardware such as winches, clutches, or tracks.
Paint and Cosmetic Upgrades
A refit can also provide an opportunity to improve the appearance of your boat.
Consider repainting the hull or topsides, or adding new graphics or logos. You can really go creative here.
A sailboat refit can be a daunting task, but with a comprehensive refit guide and checklist, you can ensure a successful outcome. By carefully planning your refit, addressing the hull and deck, upgrading electrical and plumbing systems, improving the interior, and enhancing safety and navigation, you’ll be well on your way to enjoying a safer, more comfortable, and more reliable sailing experience.
Tags: Guide technique
You may also like...

The youtube refit of “Duracell”
April 6, 2023
by Christof Thierry · Published April 6, 2023 · Last modified April 5, 2023
Leave a Reply Cancel reply
Your email address will not be published. Required fields are marked *
Save my name, email, and website in this browser for the next time I comment.
- Next story Bilge heaters: worth it or not?
- Previous story Heaving to: A best practice in heavy wheater sailing
Recent Posts
- How to take care for your Boat’s Diesel Engine
- The best bluewater boat
- The best charter sailboat
- Sailboat Hulls: Fiberglass or steel?
- How to anchor a sailboat
Recent Comments

Sailing Techniques: How to Trim Your Sails for Optimal Performance
April 4, 2023
- Destinations
- Maneuvering
hi sailor It’s nice to meet you.
Sign up to receive awesome content in your inbox, every month.
Check your inbox or spam folder to confirm your subscription.
You are using an outdated browser. Please upgrade your browser or activate Google Chrome Frame to improve your experience.
- We Are Hiring
- Naval Architecture
- Installations
- Seakeeper Extended Warranties
- Naval Architecture, Engineering & Construction

- All Speed 24VDC Fins Pricing
- Interceptor Pricing
- All-Speed Fin Stabilizer
- Custom-Shaped
- Jetboats Stabilization
- Stabilization
- Marine Electronic Innovations
- Yacht Management
- Antifouling Coatings
- Air Conditioning & Refrigeration
- Fiberglass, Gelcoat, & Paint
- Mechanical & Electrical Services & Repairs
- Haul Out & Dry Dock Services
- Schedule Demo Boat Ride
- Starboard Yacht Interactive Assessment
- Marine Electronics
- Seakeeper 1
- Seakeeper 2
- Seakeeper 3
- Seakeeper 5
- Seakeeper 6
- Seakeeper 9
- Seakeeper 16
- Seakeeper 18
- Seakeeper 26
- Seakeeper 35
- Fins & Interceptors

Behind the Scenes: The Refit Process from Start to Finish
Cruising the seas is an irresistible realm of luxury and adventure, where the opulent vessels of today embark on journeys that traverse endless horizons. Yet, concealed from the casual observer, lies a remarkable transformational process at the heart of these maritime icons — the refit process. This process is nothing short of an art form, rejuvenating boats, and elevating them to new heights in performance, aesthetics, and functionality.
Boat refits are the silent symphonies of transformation, where vessels are reborn and their stories are rewritten. Behind the scenes, hidden from the prying eyes of onlookers, skilled artisans, naval architects, engineers, and visionary owners come together to breathe new life into these nautical beauties. With meticulous planning and craftsmanship, they ensure that every vessel, from the gracefully sleek to the imposingly grand, remains at the zenith of maritime excellence.
In this comprehensive exploration, we embark on a journey through the captivating world of refits, where every phase of the process is a testament to human ingenuity and dedication. From the initial spark of inspiration to the final unveiling of a rejuvenated vessel, we uncover the intricacies, craftsmanship, and sheer artistry that transform aging boats into modern masterpieces. Join us as we lift the curtain on the fascinating journey that turns dreams into reality upon the azure canvas of the open sea.
1. The Vision and Planning Stage
A boat refit commences with a vision, often stemming from the owner’s desires and needs. Owners collaborate closely with experienced refit specialists, sharing their goals for the vessel. During this stage, a comprehensive plan is laid out, covering everything from technical enhancements to interior design changes. Every detail is meticulously considered, ensuring the refit aligns with the owner’s vision.
2. The Inspection and Assessment
Before any work begins, the boat undergoes a thorough inspection and assessment. This step is akin to a health check for the vessel. Engineers, naval architects, and marine technicians meticulously examine the boat’s structure, systems, and components. They identify areas that require attention, from mechanical systems and engines to the integrity of the hull. This assessment serves as the foundation upon which the entire refit project is built.
3. The Design and Conceptualization
Following the assessment, the design phase takes center stage. Interior designers, naval architects, and engineers collaborate to bring the owner’s vision to life. Innovative design concepts, materials, and technologies are explored to optimize both aesthetics and functionality. Detailed plans are developed, covering every aspect of the refit, from cabin layouts to exterior styling.

4. The Deconstruction and Stripping
With design plans in hand, the vessel enters the deconstruction phase. This stage involves carefully stripping the vessel down to its core. Old components and materials are removed with precision, making way for the new enhancements. This phase is akin to a meticulous surgical operation, requiring skill and care.
5. Technical and Mechanical Upgrades
At the heart of the refit lies technical and mechanical upgrades. Engines are overhauled or replaced with more efficient models, propulsion systems are modernized with the help of Seakeeper, and navigation equipment is updated. The vessel is equipped with state-of-the-art technology to ensure it operates at peak performance. This phase involves precise engineering and a commitment to enhancing the boat’s capabilities.
6. Interior Refurbishment
Simultaneously, the interior spaces undergo a transformative refurbishment. Every detail, from luxurious staterooms and salons to galleys and entertainment areas, is meticulously attended to. The goal is to create an environment that balances comfort, functionality, and aesthetics. Skilled craftsmen and designers work tirelessly to bring the owner’s interior design dreams to fruition.

7. Exterior Enhancements
The vessel’s exterior is not overlooked. Paint and coatings are refreshed to restore the vessel’s gleaming appearance. Hulls are polished to perfection. Exterior spaces such as decks and lounges are redesigned to maximize usability and visual appeal. This phase ensures that the boat’s exterior matches the renewed elegance of its interior.
8. Rigorous Testing
Before the boat returns to the water, it undergoes rigorous testing. Every system is tested exhaustively, engines are run extensively, and every component is checked for proper functionality. Safety and performance are paramount during this phase, ensuring that the boat operates seamlessly upon completion.
9. Sea Trials
Sea trials provide the ultimate assessment of a refit’s success. The boat embarks on test voyages to ensure that all systems perform flawlessly. Owners and refit specialists closely monitor the vessel’s performance, making necessary adjustments as needed. These trials guarantee that the boat not only meets but exceeds the owner’s expectations in real-world conditions.

10. Final Touches and Delivery
Once sea trials are successfully completed, the final touches are added. Every detail is meticulously inspected to ensure perfection and also detailed immaculately. The boat is then delivered to its owner, marking the culmination of months of hard work and dedication. This final phase is the realization of the owner’s vision, and the boat is ready to grace the seas once more in renewed splendor.
The refit process is a harmonious symphony of vision, precision, and innovation. Behind the scenes, skilled professionals collaborate to breathe new life into vessels, ensuring they continue to grace the seas with beauty, performance, and luxury. Whether you’re embarking on your own refit journey or simply admiring these magnificent vessels from afar, understanding the meticulous process behind the scenes is a testament to human ingenuity and the enduring allure of the open waters.
At Starboard Yacht Group, we specialize in orchestrating these transformative journeys, and we invite you to explore the possibilities of refits with us.
Take the first step toward elevating your boating experience.
Let’s embark on the remarkable voyage of transforming your boat together. your dream boat awaits, and we have the expertise to make it a reality., contact starboard yacht group today, thank you your message has been sent., thank you your application has been received., privacy overview.
- Practical Boat Owner
- Digital edition

How to buy an old boat as a project – DIY yacht restoration advice
- October 31, 2019
Yacht broker and part-time boat restorer Will Higgs shares his passion for buying old boats and making them as good as new

Firebird is a Mirage 28 restored then sold on
Growing up sailing on the East Coast it’s fair to say that I caught the bug pretty early on. Family sailing on my father’s yachts and starting in dinghies from the age of five, it was clear from the outset that boats were going to play a central role in my life in one form or another.

My first project boat was a dinghy which my dad brought home when I was around four years old. She was 7ft 6in length overall and far too wide to sail well, but she had a gunter rig, foils that needed varnishing, rubbing strakes to replace and a hull that needed painting. Her name was Jake and she was going to be my boat. I was hooked.
Through my teens the boats grew until at 18 I purchased my first yacht – a Hurley 20. I couldn’t have been prouder, she needed new windows and a complete repaint right through but she was mine and I poured every spare minute and penny I had into her for six months before she was ready for sea.
As time has gone on, the boats have got bigger, but the principle remains the same: buy a green one and polish the love into it. A Hunter 701, a Seamaster 23, a Mirage 28 and now a 32ft Barbary Ketch – all made possible by adding a little more value to each boat as I went along.
Now my family and I can cruise the West Country in relative comfort and have clocked up some respectable sea miles, not to mention a few stamps in the passport. But it all started from bailing out the cabin of that first Hurley and wondering where to start.

My first project boat: “She was 7ft 6in length overall and far too wide to sail well, but she had a gunter rig, foils that needed varnishing, rubbing strakes to replace and a hull that needed painting.”
Why refit a boat?
For some, the pleasure of bringing an old boat back to life is the driving force; for others it’s a means of getting afloat on a tight budget. Whatever the motivation, all boat restorers share a love of the sturdily built and seaworthy lines of craft designed, in many cases, over half a century ago.
Indeed it is the robust construction of these old hulls that has led to the wide availability of potential projects which can be found in the damp, dark corners of almost every boatyard in the country and I dare say the world over.
These are boats that were designed in the days when a family of four would have bravely put to sea in a 20-footer for their summer holiday and that are still robust enough to earn their keep not only as a vintage item to be varnished and polished, but also as originally intended – fully functional cruising yachts.
So what are the benefits? It’s clearly a major undertaking, a modest refit project could easily see you through six months’ worth of evenings and weekends – not to mention the expense. Why do so many start and fail to finish?
Firstly, a refit is an excellent way to get to know a boat. For the DIY boat owner it makes perfect sense to go through her with a fine-tooth comb and address any issues along the way. It’s an excellent way of stretching the budget: real value can be added to a project boat, so whether the plan is to keep it long term or trade up, the minimum result to aim for should be a newly refurbished boat for a similar cost to a tired one on the open market.
Those who undertake boat projects for the simple pleasure of returning something sore and neglected to its former glory can be seen standing back at the end of each day of work with the sun setting behind them and a satisfied smile on their face. The sweat and occasionally blood poured into their pride and joy barely registers against the surging pride at every inch closer the boat gets to touching down in the water.

Before and after images: This Dufour 2800 required a £3,500 restoration budget and 50 hours’ skilled labour
How much will a yacht restoration cost? Even if you can commit £1,500 and 1-2 days per week for three months, you should still only be considering project boats under 26ft long. · The skill level, budget and timescale requirements increase exponentially with the size of the boat so careful planning and a couple of attempts with smaller craft first would be well advised. · As a case in point this Dufour 2800 (above) required a budget of close to £3,500 as well as 50 hours’ skilled labour. Keep control of the costs on a project – it really is possible to keep spending if you are not careful.
Key considerations when choosing a boat for a restoration project
Selecting the right project boat carries many of the same criteria as any yacht purchase might, with a few specific additions. Scope of use and budget are fairly standard considerations as is the availability of a suitable mooring. However, it is easy to forget about these important points when looking at a boat that may be months or even years away from her launch date.
How will the boat be used?
Picking a boat that’ll meet your requirements when she’s ready for sea is critical to a successful refit. There will be times when walking away will seem like the easiest option. On the days when the paint won’t wash off, the splinters won’t come out and the head is sore from banging it repeatedly against the bank balance, even the most ardent enthusiasts need a vision of the finished article to remind themselves why they started down this road. There are plenty of tough moments restoring old boats, but for me, thinking about launch day sees me through every challenge.
What is my budget? What is my skill level? How much time can I commit?
It may sound obvious but blowing the entire budget on buying a boat that will require significant additional repairs is a recipe for failure. At best it will result in extensive and unnecessary storage fees that will further eat into the budget and add to the overall costs. There’s a certain principle of frugality at the heart of restoring boats and perhaps hand in hand with budget comes time. For these reasons it’s important to consider how big the boat really needs to be. A large project will incur far higher overheads and take much longer to complete. It is also more likely to require a higher level of expertise to tackle the more complex systems and structural issues.
Will it fit on my mooring?
It is advisable to have somewhere lined up to keep the boat before choosing one: the size and type of mooring available can play a part in the selection.
Pitfalls to avoid
The following hints and tips apply to beginner/intermediate standard DIYers on the majority of yachts. Ignore for boats with a high end value, or if you consider yourself to have a high skill level:
· Boats that are just a shell with no salvageable equipment. The cost of replacing gear can snowball very quickly so it’s important to factor this in before getting started
· Boats with faulty keelbolts can be expensive to put right and tackling it properly on a DIY basis is not for the faint-hearted.
· Avoid boats that are going to cost far more than their end value to put right. There’s nothing more soul destroying; check the market first!
· Boats that have major structural defects. There are plenty of boats out there that only need TLC.
· Boats that are too big for your budget and timescale will sap resources and demoralise. There are occasions where a refit could be programmed over months or even years, but as far as shoestring projects go, every week in the yard is added cost to be avoided.
Restoring a Leisure 20 for a client
A few months ago I decided that I wanted to take my lifelong passion to the next level, so I set up a brokerage through Imperial Yachtbrokers ( www.imperial-yachtbrokers.com ) and started refurbishing yachts in a local yard where I have some history of carrying out boat projects for myself.
So far we have refitted a Sadler 29 , a Dufour 28, and are in progress with a Westerly Centaur and a Westerly Griffin.
I was also approached by a lady at a local yacht club who wanted a daysailer/weekender to keep on a swinging mooring. We chatted about her requirements and settled on a Leisure 20 for its sailing characteristics and ease of handling while still providing overnight accommodation and somewhere to make a cup of tea!
She struggled to find a good example, so I had a look around and located one in a nearby yard that was in a sorry state but could be bought for £300 on condition we move it straight away. We sourced an engine, had her dropped in and motored her around to our base at the Lynher Boatyard in Torpoint to do the work, starting with emptying her of gear and cleaning her from end to end.

Leisure 20 as found in need of TLC – but was only £300 to buy

Hull was grubby but basically sound

Deck’s non-slip paint was looking worse for wear

Interior needed a good clean and a retrim to modernise
The brief with this boat was to keep her simple, set up for day sailing and with a minimum of potential failure points. One of our first jobs was to remove and glass in all of the through hull fittings as these would not be required.
We spent some time carrying out the usual sanding of woodwork and polishing of the hull. New vinyl decals were added to draw the eye and the deck paint was re-applied in a more modern looking light grey.
We also repaired the redundant screw holes in the mouldings and retrimmed the interior to make it functional and attractive.
Externally, we cleaned and applied silicone grease to all the fittings’ moving parts and replaced any fittings and lines that were broken or worn out. We then raised the mast, dressed it with sails and relaunched the boat ready for a shakedown en route to her new mooring.
There are few more satisfying moments than raising the sails for the first time on a resurrected boat.

Cleaned, polished and varnished – what a difference!

Launch day! There are few prouder moments…

Restored. Afloat. A Leisure 20 ready for new sailing adventures

Key figures
Initial purchase: £300 Yard costs: £330 Engine: £275 Misc parts: £400 Total : £1,305 Time commitment: 50 hours’ labour over four weeks
We had to allow for around 50 hours of labour as well as the costs of various parts and yard storage costs, but what is very clear from the figures is that refurbishing a modest yacht is an affordable undertaking.
DIY boating on a budget
With determination and a basic skill level, anyone can get on the water without going bankrupt. It’s simply a case of being sensible: pay attention to boat selection, programming and budgeting the project then stay focussed and work hard.
Rearranging the interior of a boat is often enough to make it more comfortable and welcoming. If you have just bought a used boat , these tips can help! Decorate the interior of a boat and match design, comfort and functionality. This article will give you some ideas for an easy renovation without spending a lot of money.
1 – Refitting your boat by optimising storage space 2 – Customise and revamp the interior of your boat with a little paint 3 – Decorating the interior of a secondhand boat: fabrics
1. Refitting your boat by optimising storage space
For certain secondary boat interior refits you don’t always need to call in the professionals. You can in fact do some cheap renovations yourself with a little ingenuity and a few good tips. Roll up your sleeves and get out your toolbox… let’s go!

Without committing yourself to a total overhaul, you may want to start by renovating a few things inside your boat. Opting for furniture with rounded corners, making fittings as functional as possible or adding shelves and drawers to every nook and cranny to cut down on lost space are just some of the arrangements that will make your life easier once at sea.
- A fridge with drawers enables you to compartmentalise storage and keep things cooler.
- Wooden, melamine or metal tableware will prevent breakages once on the water.
- To store fruit and vegetables and prevent them from spoiling prematurely, you can use nets that you can hang up in the kitchen.
Become a boat owner
Discover now the latest boats for sale ads!
2. Customise and revamp the interior of your boat with a little paint
Just like the interior of an apartment or house, when it comes to decoration, it’s worth considering repainting certain surfaces. You don’t have to of course, if the existing colours and materials suit you as they are. But in some cases, a lick of paint can give your boat’s interior a new look, enabling you to personalise it . Giving one or two wooden surfaces just a simple coat of varnish will bring a touch of charm and authenticity to certain spaces.
However, repainting surfaces using white or pastel tones will make them brighter because even when there are a lot of portholes, they are often narrow. Light-coloured walls or ceilings will also help to optimise the light sources
To keep things looking warm and cosy, why not repaint a section of the boat in the colour of your choice? Adding touches of paint here and there will harmonise and brighten up the whole interior. Cupboard frames, finishing strips, handrails, fold-out tables, handles or even shelves are all elements that you can opt to repaint.

Want to renovate a sailboat?
Discover our ads of sailboats to renovate
3.Decorating the interior of a secondhand boat: fabrics
Curtains, bed linings and cushion covers are all opportunities to refurbish the interior of a secondhand boat and customise it more to your own liking.
Les éléments en tissus
- Mattresses and benches
First step: measure the benches and bunks so you get the right size of mattress. This is a good way of making your secondhand boat more comfortable as well as a good option for replacing parts that are sometimes worn out by the weather. Once all your foam mattresses are ready, give them zipped protective covers made of waterproof fabric (this makes newly purchased items last longer).
Then choose sheets and fabrics in a soft and durable material (linen or cotton) that you can cut to the right size to cover the mattresses and benches. You can select either bright, neutral or pastel colours that match the colours you’ve used on the rest of the boat interior. Then opt for the bedlinen of your choice.You can make a cabin with dark wooden walls brighter using light-coloured bedlinen. On the other hand, if your walls are white, why not go for warm or dark coloured sheets to make the space more welcoming? Just like at home, you are advised to keep a spare set of bedlinen, so that you can rotate it while you wash the others.

Cushions are another decor option you should capitalise on! As backrests or to frame a bench, they are both useful and decorative. Again, you should give them waterproof, zipped covers. You can then choose a fabric in the colours and patterns of your choice and sew it to the right size. Extra tip: get two sets of covers, so that you can wash them regularly
For curtains, start with some porthole-sized cords, which you can attach with small open hooks for when you want to “”pull the curtains””. Depending on your preferences, you can then choose fabric of varying degrees of opaqueness, based on how much light you want to pass through, if any. As for colours and patterns, go wild! Be careful though not to overload the whole design scheme and to try and keep a sense of consistency with the rest of the decor you’ve chosen.
And why not a few frames!
The last little touch to decorate the interior of your boat and make it look like this: add a frame or two! Choose an illustration, a nice photo or why not a poster of a nautical event you attended. Choose a lightweight frame with Plexiglas glass and fix it securely to avoid a disaster during a turbulent navigation.

We hope you find these tips useful.
Feel free to leave a comment with your best ideas for a boat interior.
You might like these articles:

- BOAT OF THE YEAR
- Newsletters
- Sailboat Reviews
- Boating Safety
- Sailing Totem
- Charter Resources
- Destinations
- Galley Recipes
- Living Aboard
- Sails and Rigging
- Maintenance
A Refit Reality Check
- By Nigel Calder
- Updated: August 7, 2002
Makeover368
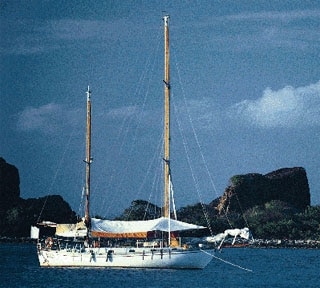
In 1979, when Terrie and I began building our 39-foot William Atkin-designed double-ended ketch, Nada, we started with a bare hull — no deck, no ballast, no interior, no nothing; just a big, plastic outdoor bathtub! By launch time in 1982, all the systems were in place and functioning — not that there were that many; we adhered to the Keep It Simple Stupid (KISS) cruising principle of the early 1980s. Our electrical system consisted of a single 8D battery (200 amp-hours), charged by a standard engine-mounted alternator (nominal 55-amp output) with a typical automotive voltage regulator. This provided electricity for a modest complement of fluorescent lights, a couple of fans, navigation lights, and a VHF and Loran. We had no refrigeration, just a well-insulated icebox. We converted our galley stove, initially diesel-powered, to kerosene.
Seduced By Luxury Our systems worked well (excepting minor glitches, of course) throughout an extended cruise down the chain of the West Indies to Venezuela and back, but as I became more successful as a writer, we could afford and began to hanker after some of those gadgets and gilhickies we frequently encountered on more affluent boats.
We overhauled one system after another. Our first major upgrade was an engine-driven refrigeration unit, which we later replaced with a heavy-duty DC system. Life with both a fridge and a freezer is great! But more lights and fans, together with the DC refrigeration, necessitated a complete overhaul of the DC system. We doubled the size of our battery bank, installed a high-output alternator with a multi-step voltage regulator, and put in a sophisticated DC-monitoring device to track the DC systems status. We had to rewire all the primary battery and charging circuits to accommodate the much higher amperages flowing through the cables. Also, we added a 1,000-watt DC-to-AC inverter, allowing us to install a hot-water heater and microwave. An electric windlass retired our manual unit. We backed up our Loran, first with a SatNav, then a GPS, and we installed a shortwave receiver. The two-burner kerosene galley stove gave way to a three-burner propane unit with oven and grill — what a wonderful change that was! With a wind generator mounted on the boats stern, solar panels on the coachroof and a roller furler replacing our hanked-on headsails, Nada began to look like all the other boats we met in our travels!
Our upgrades resulted in a more comfortable, less arduous cruising life. Surprisingly, they created few maintenance problems, largely, I suspect, because Nada is very dry below, and because I took the trouble to use first-class materials and do each job right the first time around. However, there is no question that Nada could have functioned fine and continued to travel far without all this expense and effort, and we had done perfectly well before we had all these systems. Our cruising philosophy had changed, and our boat changed along with it.
Crunch Time By 1995 at least 30,000 miles had passed under Nada’s keel. The detailed surveys for cruising guides on which we worked had required us to run the engine an unusually long 5,000 hours. The core equipment — rig, sails, winches, and so on — had suffered 15 years of reasonably hard use. Most of the add-on equipment was over 10 years old. As someone who makes a living writing about preventive maintenance, I had to take a long, hard look at my own boat. Although we suffered no rash of breakdowns, I knew it was time to either sell the boat or engage in a massive refit. At first we opted to sell, but we subsequently withdrew Nada from the market and decided we’d rather redo her major systems.
This refit will end up costing us around $40,000, an astounding figure considering that, when we briefly put Nada on the market, wed honestly advertised that the boat was a harmoniously functioning unit with every piece of equipment and system well maintained and performing more or less flawlessly. So how can we run up a $40,000 refit bill?
Despite functioning well, by 1995 our equipment was becoming rather old by marine standards. And herein lies the rub: The marine environment is so harsh that it naturally foreshortens the life of most systems and equipment irrespective of conscientious maintenance. There comes a point at which you have to wonder when the first run of major failures will start. If you intend to do serious offshore cruising, as we do, and you are conservative, you simply cannot afford to wait for complete failure. You have to bite the bullet and begin to rip out and replace what have been, until then, serviceable systems and hardware.
You can view an older boat as a worthwhile platform on which to launch your dreams of extended cruising economically. Indeed, for many people an old boat is the only way to get started. But you need to approach such a vessel in a pretty hard-bitten and cynical fashion because in even the best maintained and most pristine looking 10- to 15-year-old boat may lurk a headache. Refit bills can rapidly escalate.
For long-distance cruisers, preventive maintenance and proactive gear replacement are the order of the day. If, on the other hand, you intend to limit your sailing to coastal waters close to services and other resources, you can afford to push much of the existing equipment a little longer, with dramatic short-term savings in expenditures. Nevertheless, whether purchasing or owning an older boat, you should always keep potential upgrades and repairs in the back of your mind, for they may be only a short step away.
Had you been interested in Nada when we put her up for sale, you would have first concerned yourself with the basic structural integrity of the hull and deck. If structural integrity is at all in question, you should walk away from any deal. In addition, youd want to check hatches and ports, lifelines and stanchions, the plumbing, including tanks and seacocks, and the rudder, keel, and spars which, on Nada, all were in fine shape. Yet when we withdrew Nada from the market, we still wanted to upgrade or renew a number of systems onboard, and we chose to do it in one go. (For more on how to inspect an older boat, see “What a Pro Looks for in a Boat Survey” by Henry Mustin)
Replacing Rig And Sails Our standing rigging was one of our major concerns, although it was all first-class with Castlok terminals. None of it showed any sign of problems. Never had any of it failed. Nevertheless, the rig was 15 years old, and had 30,000 miles on it. How many more fatigue cycles would the stays and shrouds go through before one failed without warning, imperiling the mast? Maybe the rigging was in good enough condition to go around the world. Then again, maybe not.
I know of no feasible way to test for these things, but I didnt want to be the one to discover that the rigging was approaching the limits of its lifespan, so we replaced it. This cost us something over $4,000, excluding labor, and took a couple of days worth of handyman-type work to cut the new stays and shrouds to length and to fit Norseman terminals.
We also considered our chainplates. For the past two or three decades, chainplates have invariably been fashioned from stainless steel and fastened with stainless steel bolts. Over time, moisture almost always penetrates the deck seals. If a section of the chainplate, or a fastener, resides in a permanently damp environment, hidden crevice corrosion of the stainless steel will ensue, which may or may not be evidenced by rust stains. Eventually, the crevice corrosion will lead to a sudden, potentially catastrophic rig failure. My prescription — a bitter pill to swallow — was to pull the chainplates and fasteners. On any older boat, you should at least pull a couple at random to see how they are wearing. Although replacement parts are unlikely to prove costly, labor can be extensive, depending on the installation. On Nada, we discovered a number of cases of incipient corrosion. Although none threatened the rig, our parts were fashioned from high-grade 316 stainless steel, as opposed to the more common 304. Had they been 304, I believe the corrosion would have been considerably more advanced.
Weve always been careful to cover or bag our sails after use, but even so, the working sails have now experienced the equivalent of several years continuous exposure to tropical sunlight. UV degradation must be taking its toll on the Dacron sailcloth. Although our Hood sails are well made and have never needed more than the most minor repairs, and although they still set well, I have to wonder to what extent the fabric and stitching has lost strength, and when the first seams will blow out. Anyone buying an older boat will be faced with the same significant question, no matter what condition the sails appear to be in, especially if the boat has seen a fair amount of use, and particularly in tropical waters. If previous owners have been less than diligent about using sail covers, or bagging the sails, then theres a good possibility the sails are just about done for. We need to replace our sails sooner rather than later. When we do, that will cost another $7,000 to $10,000.
An Aging Engine In 1995 our Sabb 2JZ was running great. Aside from blowing a head gasket in the midst of a coral maze inside Glover’s Reef, Belize, our exceedingly heavily built, relatively slow-turning, raw-water-cooled marine diesel had never given us a moment’s trouble. From day one I had changed its oil and filters religiously, and ensured that it was fed clean fuel. Although it had logged 5,000 hours, there was no reason to think it wouldn’t run for another 5,000. Or was there? In fact, it began taking longer to crank on cool mornings, and it ran a little hotter than when new. Clearly, as you would expect from an engine with this many hours on it, it had lost some compression. In addition, I suspected some corrosion in the cooling system.
I had known for a couple of years that at some point I was going to have to engage in a substantial overhaul. However, I had been deterred from opening the engine up by the difficulty of obtaining and the horrendous cost of spares, and by a lack of time to do a full overhaul if it proved necessary. My biggest nagging fear was about the raw-water cooling system. This Norwegian-built engine was designed for cold, North Sea waters. Fifteen years in warm, tropical waters might have corroded the block and cylinder liners to the point at which the engine was essentially shot, in which case opening it up was likely to hasten its demise.
In the end, spurred by the need for more power for some of our surveying work, I simply replaced the Sabb with a Yanmar 4JH2HE. This necessitated replacing the exhaust system, the stern tube, the propshaft, and the propeller (the Sabb had an attached variable-pitch propeller). Also, I had to rebuild the engine beds. In spite of doing all the work myself with a helper, which took two weeks, I still spent $14,000. A yard bill for the complete job would probably have been in excess of $20,000.
My experience is not atypical. It is a sad fact that few auxiliary engines in sailboats are in good shape after 10 or 15 years. No matter how good it may look and how few hours it has on it, if it has not been properly operated and fastidiously maintained, it may propel you only towards major repair bills. On the other hand, most engine replacements will not require a new shaft and prop and newer, more-powerful engines designed to replace common older models often are manufactured with identical “footprints” so that you wont have to build new engine beds.
When purchasing an older boat, mechanical problems-in-the-making may be detected by a mechanically-inclined surveyor, but all too often surveyors limit themselves to little more than checking that the machinery runs without any obvious signs of distress. In many ways, it is better to buy a boat in which the engine is clearly a wreck, because then at least the boats purchase price will be commensurably depressed and you will know up front what you have to spend to repower.
The Offshore DC System Whether intentionally or not, the DC system on an offshore boat mirrors the cruising philosophy of its owner. Those from the KISS brigade are likely to have little more than one or two batteries, the original engine-driven alternator, and an uncomplicated wiring harness powering a few lights and fans. On many days, I envy the simplicity of this approach. Those of us who have been seduced by the decadent 90s are going to lust after our fridges and freezers, inverters and microwaves, and electric windlasses and sail-handling devices, together with the large battery banks, high-output alternators, fancy voltage regulators, and sophisticated DC monitoring devices necessary to make it all work. The wiring harnesses for such systems will be as thick as your forearm, and woe to any new owner if all this hasn’t been properly installed using first-class components, and with thorough documentation and labelling of every cable and terminal!
Nothing had been wrong with Nadas original, 1980 harness, except that Id used what were readily available materials — mostly household wiring and automotive terminals — without any regard to boatbuilding standards, such as those legally required by the Coast Guard or the voluntary standards developed by the American Boat and Yacht Council (ABYC). Our system was very typical for an older boat, most of which could do with rewiring to bring them up to 1990s standards, particularly if continuous additions and alterations have been made to the electrical system, and especially if the owner made them! If the boat has a simple electrical system, any rewiring will be straightforward and relatively economical, which can be handled by a talented handyman prepared to study a manual or two (such as my Boatowners Mechanical and Electrical Manual, and Charlie Wings Boatowners Illustrated Handbook of Wiring). However, if a complex DC system needs replacing or upgrading, or if a simple electrical system is to be transformed into a complex one, just the necessary rewiring will be quite time-consuming and expensive, especially if it is contracted out to a marine electrician. And this does not include the cost of any equipment.
By 1995, multi-stranded, tinned cable, marine-quality terminals, adhesive-lined heat-shrink tubing, and a multitude of other products had become widely available for wiring boats. I also had become thoroughly familiar with the various standards that apply to electrical systems on boats. I felt it was no longer acceptable that I should write about these subjects while my own boat was not “up to code.” Hence, I rewired at considerable expense, including a couple of weeks of skilled labor.
When it comes to the equipment, a quick look at a couple of marine catalogs will show that a good-sized battery bank can run $1,000, a high-output alternator with a multi-step regulator and a DC monitor well over $1,000, a wind generator around $1,000, a couple of solar panels over $500, an inverter another $1,000 (plus the cost of the microwave it will primarily power), an electric windlass $2,000-$3,000 (with another $300 just for the high-current cables necessary to feed it), and so on. Add installation charges and its not hard to drop $10,000 into a DC system if you absolutely have to have all the creature comforts and toys and gadgets!
Its tough to determine the state of the DC system on an electrically-loaded older boat, especially if all the systems appear to work fine. The circuits and equipment may be properly installed with a pretty fair life-expectancy, but then again they may give rise to some seriously inconvenient failures early into a cruise, leading to expensive repair bills in out-of-the-way places. Unfortunately, many marine surveyors give only a rudimentary evaluation of electrical systems. If the DC system represents a significant part of the proposed value of a boat, it might be worthwhile to hire as well a competent marine electrical surveyor to give the system a thorough scrutiny.
The Rest Of The Story The rig, engine, and electrical systems were the big-ticket core systems that we had to deal with on our cruising boat, but anyone sailing or considering an older boat must consider numerous additional important matters, including deck gear, plumbing, safety, and many smaller items.
The running rigging, along with its associated blocks, winches and hardware, also will likely have many miles on them. Everything needs careful inspection. Bear in mind that modern synthetic lines and deck hardware do not come cheaply, although some sailors can root out sources for first-class but very affordable, used equipment.
And then theres the ground tackle. If you are lucky, the boat will have been owned previously by someone who puts a high premium on plenty of anchors and rodes, as we do. If not, and you intend to head offshore, you can easily spend $1,000 to upgrade.
High on the list of amenities now demanded by most cruisers is refrigeration. Some systems are put in correctly and work like clockwork for 20 years with never a hiccup. Others are a constant source of problems and expense. If renewal seems a likely proposition, the most economical way to go is with the ever popular Adler Barbour Cold Machine or one of its clones, which you can buy for less than $1,000. However, these have very definite limits when cruising, particularly in warm climates. Next, in terms of expense, you can choose between several engine-driven systems, ranging in price from $2,500 to $4,000. Finally, heavy-duty DC systems are, for a number of reasons, your optimum choice for cruising, but they cost from $3,000 on up, not including the DC system necessary to support them! (See our test of refrigeration systems in the June 1995 issue — The Cold Facts, by Joe Minick)
The Cold Machine type of unit is pre-charged, sealed, and can be owner-installed in about a day using basic handyman skills. Because of EPA regulations concerning the handling of refrigerants, the other types of systems will require a refrigeration technician, at least for the hook-up and refrigerant charging process, probably at a cost of $60 an hour. Installation costs on higher capacity and more complex systems can run as high as their purchase prices.
This still leaves the icebox to consider. If you want to keep the energy demands of the refrigeration system within acceptable bounds, the icebox must be well insulated and closed with a well-sealed lid or door. All too many, especially on older boats, require a considerable amount of work, and to upgrade the box you may even have to rip out the old one and start again.
After refrigeration, maybe even ahead of it, I would put a propane galley stove and oven high on my list of equipment that turns a boat into a home. Unfortunately, many older boats have alcohol or kerosene stoves. Some manufacturers offer economical conversion kits, but any conversion to propane is another substantial project. To make a safe installation and house the bottles, you must find or make a locker that is appropriately sealed from the boats interior, vented overboard, and that holds the bottles securely. This is likely to take a couple of days crawling around in awkward spaces, cutting plywood panels, glassing them in place, and so on. The total cost of a completely new system, including a stove with oven, bottles and accessories but excluding labor, can easily be in the order of $1,500.
Then there are the pumps. Before heading offshore, you should replace the pressure water pump if it is more than a few years old. Any saltwater wash-down pumps and shower sump pumps probably will need the same treatment. You should rebuild the toilet and replace the diaphragms and valves in all manual pumps.
Every other piece of mechanical and electrical equipment needs close scrutiny, even down to the ballasts in fluorescent lights. At the least, if the task list looks too intimidating, carry spares for all these items so that you can replace or rebuild them along the way.
And what about the dinghy? If it is an inflatable and more than a few years old, its days are numbered. Thats another $1,000-$2,000, with as much again if the outboard needs replacement.
Finally, you can spend as little as a couple of hundred dollars for some updated flares and small fire extinguishers, or many thousands on safety gear if you include large extinguishers, harnesses, man overboard equipment, a 406 mHz Epirb, ditch kit and a life raft.
When all this is done, you may decide that the boat needs sprucing up with a new full set of cushions ($1,000-$2,000), a dodger and/or bimini ($500 on up), and an Awlgrip paint job at a cost with labor (for the hull and deck combined) of $250 or more per foot!
Keeping Things In Perspective So you see, it is not difficult to drop $40,000 or more into an older boat, even one that is in basically good condition! Suddenly, your $60,000 bargain has become more like a $100,000 cruiser, even without the latest electronics for the navigation station, and this assumes that you’ve done much of the work yourself and do not account for your sweat equity!
Despite the seemingly high expense, the upgraded boat likely will cost not much more than half a comparably-equipped new boat. If you are careful to select an older cruising boat whose design and desirability have stood the test of time, your money will be well spent. If you select a boat design/model that is not popular, or is somewhat obscure, you may not be able to recoup your investment when you resell. Keep in mind that even a new boat is likely to need additional gear to make it ready for cruising. With scrutiny and the help of a good broker and surveyor, you may even find an older vessel with previous quality repairs, upgrades and care. In either case, an old boat can be a bargain — except, perhaps, when you come to sell it and find its value is depressed by all those cheaper, less well-appointed sisterships on the market. You will have to measure the return on your labor and investment by the years of pleasurable cruising that you get from your boat, rather than the price it fetches upon resale. In our case, Nada is just about ready for another 10 years of hard use.
Of course, not all upgrading is absolutely necessary. Someone could have bought Nada in 1995 and probably used her for a number of years without investing a single penny in new equipment, and without experiencing a major breakdown. Once again, I need to stress that we presumed that our boat would undertake serious offshore work and long-distance cruising to out-of-the-way destinations, which warranted a proactive approach towards replacing older systems and gear. Furthermore, a good part of our $40,000 upgrade was tied to our desire for a cruising life that includes ice in our cocktails and the ability to whip up a baked potato in the microwave. With scaled-down expectations, your up-front maintenance and replacement costs can be proportionately reduced. Remember, also, that the volume of the boat and the cost of new systems tends to increase rapidly, and disproportionally — a 40 footer and its gear and appropriate systems are actually nearly twice as large and costly as a 30 footer.
A well-found older boat can be an excellent starting point, and often the only possible starting point, for turning cruising dreams into reality. The core systems that are critical to safety will need a close scrutiny and, likely, some significant investment of time and money. Beyond these, most of us need very little in the way of luxuries to have fun.
Terrie and I have wonderful memories of our first extended cruise, which we made on a very simple boat. Now that we can afford greater luxuries, and we have a growing family, we will not return to that spartan style of cruising. But if we could not afford the luxuries, we wouldnt delay a long-dreamed-of cruise by a single day just to become able to purchase some fancy new piece of gear that was not necessary for the basic functioning of the boat. Altogether too many boats remain tied to the dock while their owners keep pouring money and equipment into them. At some point, if you are to get anything back out of your boat, you simply have to say, “Enough is enough; its time to go sailing.”
———————————————————————— For 20 years Nigel Calder has transformed Nada, a 39-foot Atkins-designed Ingrid, from a bare hull to a tricked out voyaging machine, but it has taken more than a few hours and a couple of bucks. Nigel Calder is profiled by John Kettlewell in “Meet The Guru Of Sailing Systems.”
- More: DIY Sailboat Projects
- More How To

Preparing to Head Out

Adding Onboard Electronics? Here’s How To Get Started

7 Boating Safety Tips for Summer Cruising

How to Prep for a Diesel You Can Depend On

The Data Difference: Advances in Marine Weather Forecasting

Best Father’s Day Gifts for Sailors

For Sale: 2000 Oyster 53

RIP, Squeaky
- Digital Edition
- Customer Service
- Privacy Policy
- Email Newsletters
- Cruising World
- Sailing World
- Salt Water Sportsman
- Sport Fishing
- Wakeboarding
Updating a classic fiberglass cruising yacht.

S/V Sure Shot is for sale….

Notes on hiring a delivery team

How to sail alone from California to Hawaii

Notes from a Pacific Crossing

Counting down to a Trans-Pacific Journey

Brightwork refinishing

Replacing a raw-water impeller

Dodger-mounted Solar Panels

Garmin InReach Mini 2 Set-Up

Installing, Programming, and Testing a Balmar MC618 regulator

Balmar SmartLink Network and Balmar App

Power Update 4: Yanmar Balmar Renogy Noco Lithium Installation w/Costs

Power Update 3: Product Selections

Power Update 2: System Design Factors

Power Update 1: Forensic Analysis

Aries Vane Control Line Updates

Good work by Pineapple Sails

How to Sew Reefing Dog Bones

How to Sew Sheet Bags

How To Sew Fabric Winch Covers

How to replace a battery charger on a sailboat:

How to replace a Ronco freshwater tank on a sailboat

How to Rebuild a Raritan PHII Marine Toilet Pump

Yanmar 3GM30F Fuel Filter Change

Yanmar 3GM30F Oil Change

How to update mid-boom sheeting

Out of the Blue, Into the Black

How to replace sailboat engine compartment insulation:

Sailing to Drake’s Bay

How to service a Lewmar winch

Farallon Islands, Cetaceans, Beginnaker Experiments

How to remove Ericson Yacht galley drawers

Yanmar 3GM30F Heat Exchanger Service, Don’t Mix Coolant Colors

How to repair a fiberglass keel stub

How To Replace Keel Bolts

Yanmar Transmission Mount Fabrication

How a Propeller Connects to an Engine

Fiberglass Surgery, Minor Engine Work

How to remove a sailboat engine

How to remove a sailboat keel

Re-packing a propeller shaft stuffing box

Rudder Post Observations and Anatomy

How to remove an Edson radial quadrant: (Clean and Rehab)

A fine line between stupid and clever

The End of the Affair?

Projects: Voltage, Balls, Bilge, Cold Start

Spinnaker Pole

How to install Dyneema lifelines

New Mast Cleats

Aries Wind Vane: Rigging and Test Sail

Aries Wind Vane: Hardware fitment

Aries Wind Vane: Fabricating transom backer plates with G10 and Epoxy

Slip Flips, Speed Mods, Sunsets

Tides Marine Sailtrack 4: Test and Conclusion

Replacing Sideliners

Tensioning and Rigging a Harken Mk1 Furler

Standing Rigging Replacement: Colligo Install & Test Sail

KKMI Richmond Boatyard Review

Form, Function, and Folly on a Foray into Fiberglass

The Mechanical Windvane Market

Standing Rigging Replacement: Colligo order receipt and review

Yanmar Engine Panel Warning Light Diagnostics

Re-bedding Lewmar hatches and mast collar with Compass Marine Bed-It butyl tape

Tides Marine Sailtrack 3: Installing sail slides

Removing a painted boat name

Standing Rigging Replacement: Ordering from Colligo

AIS Systems for Sailboats

Splicing Tiny Wires

Connecting coaxial cables

Mast re-wiring, lighting upgrades

Stuffing box inspection, analysis

Tides Marine Sailtrack 2: Luff Track Installation

Bringing sexy back: Hull paint cleaning/buffing

Through-hull inspection, Minor maintenance

Haul out, Initial Conditions

Mast disassembly and cleaning

Tides Marine Sailtrack 1: How to order

Sparcraft Masthead Tour, ATN Mastclimber review

Installing new rope halyards

Haul out and mast-crane preparations

Preparing to climb the mast with an ATN Mastclimber

Installing a NMEA2000 network on a cruising sailboat

Replacing pedestal guard feet

Fabricating a new navigation station dashboard

Removing old wiring and electronics from a cruising sailboat

Installing a NavPod instrument enclosure and pedestal guard

Replacing corroded zipper pulls

“A culinary tour de force”

Recreational yacht as pandemic isolation chamber

How to design a NMEA 2000 network for a cruising sailboat

Removing a stuck Edson steering wheel

Go sailing, go sailing, go sailing

Reefing revisited

Hawaii, June 2021

Rebuilding Edson engine controls

Overhauling a Kenyon Boom, new reefing sheaves

Rebuilding an Edson Wheel Brake

Practice Reefing Sails

Maintaining a Forespar Twist-Lock Whisker Pole

Prototyping Dog Bones for Reefing

- Forum Listing
- Marketplace
- Advanced Search
- All Topics Sailing
- General Sailing Discussions
- SailNet is a forum community dedicated to Sailing enthusiasts. Come join the discussion about sailing, modifications, classifieds, troubleshooting, repairs, reviews, maintenance, and more!
How to prepare/refit a boat for Bluewater

- Add to quote
As much as I enjoy the Bluewater debate, we personally now have our 'bluewater' next boat shopping list now down to about 5-10 boats. So what I am interested in hearing about( especially from those who have been there and done that) is what kinds of improvements, checks and preparations are common or at least good sense in preparing any given boat for 'Bluewater'? Clearly it would vary depending on the boat, but for the purpose of this thread (and selfishly because it is pretty close to what we are currently planning on doing) let's assume we are talking generally about a 10-15 year old well built 40+ boat that is in average/reasonable condition but has not crossed a ocean yet. In terms of defining 'Bluewater' let's be less ambiguous and define it as a 3 year circumnavigation by way of the Panama Canal and the Cape of Good Hope.
Keep the water out, keep it dry, seal up every possible leak. Hull deck joint to hoses. Keep the rig up. Chain plates to mast cap. Then look at the little stuff; OMG!!
I'm going through the same exercise and basically I'm going to do a full survey from stem to stern. This summer we're doing our refit and it's going to include: - servicing/replacing all thru-hulls - engine repower (30 year old Perkins to a new Beta43) - drop and inspect rudder - upgrading all electronics and electrical system - new lifelines We replaced the chainplates and standing rigging immediately upon purchasing the boat. For the past 9 months, I've been attending a college level marine technology course to learn how to maintain the systems on my vessel. $$$$$ ouch! But for my piece of mind, all necessary.
That is basically what I am anticipating as well :eek I could get lucky and find a genuine ready to go boat, but in our research so far such a boat (in our price bracket) is an illusion. I know my question is quite general. On the spreadsheet I currently have at the moment I am assuming and budgeting for the following, exceptions only if it has been done in the last 5-7 years with good receipts/documentation of the work. All new standing rigging. All new running rigging. All new sails, including adding some good light wind options. A full rebuild of the engine, or a new engine. Replace thru hulls. Drop rudder. Sodablast down to the bare hull, check hull and then fair and apply barrier coating. On my maybe list at the moment is the following, depending on money, the boat and circumstances. Drop/Inspect keel ( should this go up to the necessary list?) Replace Autopilot Add Windvane Add Watermaker You are absolutely right the $$$$ add up on all of this very quickly, which is why we are trying to prioritise carefully.

I have not been there . Your question is good and very open ended . First I have heard from people who have been there is , don't over think it and if you wait till everything is perfect you will be waiting for some time . If it were me one of the things I would really think about is heavy weather tactics . Here is a website about a couple that have completed a refit and are cruising right now . Sundowner Sails Again | No Longer Lubbers
chall03 said: So what I am interested in hearing about( especially from those who have been there and done that) is what kinds of improvements, checks and preparations are common or at least good sense in preparing any given boat for 'Bluewater'? Click to expand...

JonEisberg said: After the integrity of the rig and rudder, self-steering is the biggie. I'm a big fan of vanes, probably second on my personal list of upgrades on my boat for offshore... If you're gonna stick with an electronic AP, I'd want to be carrying the spares/means to essentially replace the entire unit... Click to expand...
The list seems endless, and a lot depends on how the boat is set up now. But the first priorities have to be mission critical systems... 1) mission critical - standing rigging, as much solar power as I could fit, water maker, new working sails, electric windlass and new anchor 2) highly important - running rigging, sail handeling, upgraded deck gear, asymmetric on a furler and bow sprit, up to date electronics, new batteries A few things not mentioned yet 1) standardize as much as possible on sump and bilge pumps. Carry a few spares 2) more impellers than you think you need 3) find a place to store engine oil 4) engine oil transfer pump 5) engine fuel in line pump 6) hot swappable engine fuel filter system 7) remove, recore (as needed), and rebed deck hardware 8) standardize deck hardware blocks as much as possible. Bring spares 9) have a dedicated space for spare parts. Bring more than you think you need. Clearly labeled in vaccume sealed bags 10 get a vaccume sealer and go nuts with it.
Stumble said: The list seems endless, and a lot depends on how the boat is set up now. But the first priorities have to be mission critical systems... 1) mission critical - standing rigging, as much solar power as I could fit, water maker, new working sails, electric windlass and new anchor 2) highly important - running rigging, sail handeling, upgraded deck gear, asymmetric on a furler and bow sprit, up to date electronics, new batteries A few things not mentioned yet 1) standardize as much as possible on sump and bilge pumps. Carry a few spares 2) more impellers than you think you need 3) find a place to store engine oil 4) engine oil transfer pump 5) engine fuel in line pump 6) hot swappable engine fuel filter system 7) remove, recore (as needed), and rebed deck hardware 8) standardize deck hardware blocks as much as possible. Bring spares 9) have a dedicated space for spare parts. Bring more than you think you need. Clearly labeled in vaccume sealed bags 10 get a vaccume sealer and go nuts with it. Click to expand...
Jon, The first thing I have done on every boat I work on is add that simple $15 in line pump. I hate trying to fill Racors without them. It also crossed my mind... A feathering prop. No question about it would be at the very top of my wants list. Testing shows that a prop will create almost as much drag as the entire rest of the hull. It makes a huge difference in how the boat sails, particularly in light air, where reduced drag equates directly into being able to sail instead of motoring. I am a racer at heart, and it hurts my soul to see how badly many cruising boat deck layouts are. Undersized hardware, difficult to control sails, leads that can't be adjusted the list goes on and on. Well thought out deck gear isn't about speed, it's about how easy it is to use. Which means you actually do use them. This leads to lower loads on the sails, less heal, more speed, a larger window of acceptable sailing conditions, and more fun. It just all adds up.

Stumble said: Jon, It also crossed my mind... A feathering prop. No question about it would be at the very top of my wants list. Testing shows that a prop will create almost as much drag as the entire rest of the hull. It makes a huge difference in how the boat sails, particularly in light air, where reduced drag equates directly into being able to sail instead of motoring. Click to expand...
And now for the opposite opinion...you don't need most of the swell things posted above. Sure, you can buy and maintain and later replace them if you like, but you certainly don't need these things. You can carry a multitude of spares, but you will often lack what you need. And more redundancy, like multiple different pumps and autopilots, means multiple redundant spares. My buddy here carries tons of spares, even for things he doesn't have. Yet he spends more time on the internet getting parts shipped in than anyone. This has become his lifestyle. I carry no spares. Yeah, a years worth of impellers, belts and anodes....a few screws, hose clamps, wire, crimps, but truly little else. Only the basic hand tools. When I started out I carried many spares, but since then, with many years experience, I've changed my practice with no loss of utility. Plus the boat gets heavy, slow, unsafe. And grinding thru the lists above will seriously eat away at your cruising calendar and budget. Better to go sooner. Except the critical maintenance items. Those items, helpfully posted above, especially the sails, rig, rudder and hull must be in perfect order and inspected frequently. Everything else can be tinkered with along the way. But then each person is different. Some of us are tinkerers. That's fine. Boats are a fantastic venue for repairs and tinkering with a zillion always imperfect gizmos. I just like sailing and living with my girlfriend.

aloof said: And now for the opposite opinion...you don't need most of the swell things posted above. Sure, you can buy and maintain and later replace them if you like, but you certainly don't need these things. Click to expand...

Some will make a mountain out of a molehill on refit items. We had the rudder and shaft out of this islander 44 in about 3 1/2 hours. New shaft fabricated deep up a river for less then a 100 bucks.
Attachments

I need to go up that river........
Let's get controversial! How about anchors and the whole ground tackle system? Obviously they get stowed low while offshore but what are some good pointers about the entire ground tackle system for bluewater cruisers? An electrical/manual wildcat and gypsy? Easily transferable rodes and shackles? A foldable anchor such as a Fortress? Any thoughts about these things? If you remove chain from the well and stow it near the bilge, what can you transfer to the anchor well? How about collapsible and reinflatable fenders? How about fender boards that double as racks for jerry jugs? Surely the Pardeys, Hiscocks, Roths and other have written a great deal about all this bluewater preparation-yes?

chall03 said: So what I am interested in hearing about( especially from those who have been there and done that) is what kinds of improvements, checks and preparations are common or at least good sense in preparing any given boat for 'Bluewater'? . Click to expand...
Mark--I don't see the point of your snarky comment, especially about circumnavigation by bus. I think the OP asks a good question and is getting good responses, except for one. Do you have some constructive advice to offer other than telling us that you just bought a boat and sailed off into the sunset?
I do see the point in my "snarky" (to some) comment. People die or people get old fast after retirement. Very fast. One's life starts running out of puff far before most peg out by becoming incapacitated. The life long held dream is lost because too many people buy boats that turn into project boats costing all their dream kitty and that valuable time. So my advice is LIVE NOW! You will be dead or incapacitated or unable to sail soon. So buy a boat and get going downwind. If the rigging check says you need new rigging buy another boat with good rig If the engine survey says repower buy another boat. Snarky? No, mate, its experience from seeing people dreams shattered by the realities of cruising. Cruising on a well found boat is expensive enough but cruising on a pile of junk is life limiting: No money, no travel, no work... And then the wife gets pissed off and leaves. So buy smart, buy a boat that works, surveys well, needs no works or upgrades, and sail off into the sunset. :smile Mark
Ok Mark, so that was certainly a lot less snarky and t offered some slightly more constructive advice, however finger-wagging and in-your-face it may have been. It's just this holier than thou attitude of telling people what to do with their lives instead of offering good sailing and boating advice that I find objectionable... and the then the wife gets pissed off and leaves...Indeed!
Mark is in the been there and done that category, in terms of the advice he has given it is word for word what he has done himself. That is the definition of putting your money where your mouth is. I think your perhaps reading into his comments an attitude that isn't intended. As an Aussie (and responding to me the OP who is another Aussie) he basically just straight talking, colourfully :smile A cultural/style interpretation issue perhaps?

this may have been mentioned already here but I'll add it anyway. Water storage/capacity. My Alberg 30 was not built to be a "bluewater" boat but her design has enabled many to sail her enywhere. One of the areas I am addressing is added water tankage and storage. A "bluewater" boat must be able to store enough water for the intended passage for the crew. So depending on the boat you choose this may be a consideration during a refit.
Well, some people really get into preparing boats for offshore passage making and put in the hard yards. Jerry Litton grabbing the handles and prepping the rudder tube: Checking out the 250' of 3 strand rode: Etc: Custom made teak chairs for the salon Etc: New shaft in... Examining the 1" core from the fore deck and the 3/4" core from the aft deck... Ol Lapworth new hww to design and build a boat..

Take a look at the ISAF safety requirements for a Category 1 race. Things like a manual bilge pump operable from the cabin, secure the mast step and batteries. Put a line on the cabin boards so they don't float away etc. Then there are electronics - EPIRB, sat phone. AIS. Redundant GPS, means of getting weather
Some more fun deep up a river in Thailand:

- ?
- 174.7K members
Top Contributors this Month

The global authority in superyachting
- NEWSLETTERS
- Yachts Home
- The Superyacht Directory
- Yacht Reports
- Brokerage News
- The largest yachts in the world
- The Register
- Yacht Advice
- Yacht Design
- 12m to 24m yachts
- Monaco Yacht Show
- Builder Directory
- Designer Directory
- Interior Design Directory
- Naval Architect Directory
- Yachts for sale home
- Motor yachts
- Sailing yachts
- Explorer yachts
- Classic yachts
- Sale Broker Directory
- Charter Home
- Yachts for Charter
- Charter Destinations
- Charter Broker Directory
- Destinations Home
- Mediterranean
- South Pacific
- Rest of the World
- Boat Life Home
- Owners' Experiences
- Interiors Suppliers
- Owners' Club
- Captains' Club
- BOAT Showcase
- Boat Presents
- Events Home
- World Superyacht Awards
- Superyacht Design Festival
- Design and Innovation Awards
- Young Designer of the Year Award
- Artistry and Craft Awards
- Explorer Yachts Summit
- Ocean Talks
- The Ocean Awards
- BOAT Connect
- Between the bays
- Golf Invitational
- Boat Pro Home
- Superyacht Insight
- Global Order Book
- Premium Content
- Product Features
- Testimonials
- Pricing Plan
- Tenders & Equipment

Person injured as 25m Sunseeker Atlantis sinks off coast of Florida
The 24.8-metre Sunseeker yacht Atlantis has sunk two miles off the coast of Florida following a collision with a dredge pipe piling (25 May).
According to an official statement from United States Coast Guard, multiple marine units responded to the distress call at 11.37am. By the time the crew arrived on the scene, Atlantis was already partially submerged.
Imagery taken by rescue services shows Atlantis taking on more water until she begins to sink vertically.
The vessel's location was confirmed with the help of an emergency position indicating radio beacon. The two people on board were safely removed by marine units from St. Johns Sheriff's Office and St. Augustine Police Department, though one of the occupants sustained minor injuries and had to be transported to a local hospital.
"We extend our heartfelt gratitude to our partner agencies for their invaluable assistance during this case," said senior chief petty officer Ricardo Santacana, command duty officer, Sector Jacksonville. "With the weather improving and mariners heading out onto the water, it's imperative for everyone to verify the presence of all necessary safety equipment aboard their vessel. This ensures that responders, as demonstrated in this case, can swiftly locate you and render assistance when an emergency arises."
Atlantis was delivered in 1999 as one of the shipyard's Predator 80 models. Her racer profile was designed by Don Shead , while interiors are owed to Ken Freivokh . The model is known for its impressive top speed of 45 knots.
The owner of the vessel will arrange salvage and the cause of the incident is under investigation. BOAT International will update the story as it develops.
More about this yacht
Similar yachts for sale, more stories, most popular, from our partners, sponsored listings.
- Yachts for sale
- Yachts for charter
- Brokerage News

- Ferretti Group Unveils Two World Premieres at Venice Boat Show
- Yacht Harbour

Latest News

COMMENTS
We're refitting our bluewater sailboat to go cruising! Join us as we repaint the cabin top, touch up our topsides and recover the old cushions. We also show ...
Sailboat refit is the process of upgrading or renovating an existing sailboat. This can include replacing parts, installing new equipment, repairing structural damage, and painting or varnishing the interior and exterior. Refitting a sailboat can be a major undertaking, requiring specialized skills and tools, and can take anywhere from a few ...
DIY: a Top-to-Bottom Refit. I found my sailing "dream boat" in the spring of 1979 while racing on Lake St. Clair in Michigan. Everyone had heard about the hot new boat in town, and we were anxiously awaiting the appearance of this new Pearson 40. She made it to the starting line just before the race started and sailed by in a good breeze ...
The boat's pre-purchase survey is your best resource for figuring out what projects her refit will entail. Caveats. Every sailboat is different. That's even more true about 40 year old boats than it is about modern production sailboats. Counterpoint's 40 year refit is not a template; it is merely one example.
Military strategist Helmuth von Moltke said, "No battle plan survives contact with the enemy." This is also true for a boat refit plan. I started the refit of my boat, Passion, with a simple plan.Just as my geezerly body has needed a few parts replaced and some other repairs to keep me going strong, so too did my aging 1980 Pearson 40 to get her prepared for her future life as a long ...
Totem's Interior Refit. What's on the list of interior projects? It's tempting to say "too many to list!" but - a lot of folks are asking. Here's the scoop. ... This means baking in the tropics without heating the boat, and vastly more efficient use of propane. Jamie's workign on the metal surrounds and gimbal mounts currently.
A refit is the process of upgrading or restoring a boat to improve its functionality, safety, and overall appearance. This may involve anything from replacing outdated equipment and upgrading systems to overhauling the interior and exterior of the vessel. Regular refits are essential for maintaining the safety and performance of a sailboat.
Boat Refit Guide. Expert advice on planning and executing a smart refit can help you create a near-perfect boat (for now). Refits traditionally fall into two categories. The first features owners who love their yachts and just want to refresh the interiors and/or upgrade the systems to modern standards. The second consists of those buyers who ...
In my opinion, boat shows are the best place to quickly observe and assess the latest and greatest ideas in the sailing world. During the refit process, I attended the Annapolis, Miami and Newport boat shows multiple times, taking pictures, talking to equipment manufacturers and studying deck layouts, rigging and interiors. The information and ideas I gathered were instrumental to my refit plan.
Ever wonder if you can fix a sailboat? Looking for resources on how to refit your own sailboat? We got you covered! List of the most helpful DIY refit resour...
The first step in a refit to prepare a classic Passport 40 for offshore sailing was to keep out all the unwanted water. Hauled out at Maine Yacht Center in Portland, Maine, Billy Pilgrim undergoes a refit in preparation for bluewater passagemaking. Billy Black. The germ might not have sprouted on the Spanish Camino de Santiago in June 2013 ...
A Classic Plastic Refit on a Budget Ladonna Bubak. We've all heard of the "iron triangle" in some form or another, and it goes something like "Fast, good or cheap. Pick two.". The same can be applied to boats if you equate fast with "ready to go sailing" and good with "aesthetically pleasing.". Cheap is cheap.
If not, hire a company that refitting sailboat interior is their specialty. They can take that project boat and get it done right and in a timely manner. Maybe you already bought it before you priced everything out. You love it and you just had to have it. In the case that you already skipped all these steps, just hire a professional.
A boat refit commences with a vision, often stemming from the owner's desires and needs. Owners collaborate closely with experienced refit specialists, sharing their goals for the vessel. During this stage, a comprehensive plan is laid out, covering everything from technical enhancements to interior design changes. Every detail is ...
The three-month refit of the 88 metre Maltese Falcon was also able to happen thanks to a close relationship between the boat's owner, and the yard's (Zancle 757) CEO Rocco Finocchiaro, who also happened to be a former captain. The pair had met at Yacht Club de Monaco, and "the owner felt that she could count on us to make the best of the ...
Boat: CS27, C&C25 half a lifetime ago. Posts: 398. Re: Realistic cost to refit a 50ft cruising boat. About $320K, over and over again. By the time you finish the new engine will be seized from lack of use, the new sails will be old sails, new techonogy will make everything worthless and obsolete.
We give our 25 year old boat interior a modern new face lift whilst keeping the traditional wooden look. https://www.sailingnandji.com/ If you are getting so...
Why refit a boat? For some, the pleasure of bringing an old boat back to life is the driving force; for others it's a means of getting afloat on a tight budget. Whatever the motivation, all boat restorers share a love of the sturdily built and seaworthy lines of craft designed, in many cases, over half a century ago.
Summary. 1 - Refitting your boat by optimising storage space 2 - Customise and revamp the interior of your boat with a little paint 3 - Decorating the interior of a secondhand boat: fabrics. 1. Refitting your boat by optimising storage space. For certain secondary boat interior refits you don't always need to call in the professionals.
This refit will end up costing us around $40,000, an astounding figure considering that, when we briefly put Nada on the market, we d honestly advertised that the boat was a harmoniously functioning unit with every piece of equipment and system well maintained and performing more or less flawlessly. So how can we run up a $40,000 refit bill?
My boat came with a Forespar Anodized Aluminum whisker pole that had been little used in recent years. I believe… January 29, 2020 August 29, 2020 goldenstate. Prototyping Dog Bones for Reefing. My boat came with a set of new-ish crispy Dacron sails. The broker who joined me and the seller on…
1) standardize as much as possible on sump and bilge pumps. Carry a few spares. 2) more impellers than you think you need. 3) find a place to store engine oil. 4) engine oil transfer pump. 5) engine fuel in line pump. 6) hot swappable engine fuel filter system. 7) remove, recore (as needed), and rebed deck hardware.
The boat has recently been given structural refit, as reported by industry publication Boat International. Barry Diller and Diane von Furstenberg own Eos, a 305-foot superyacht. Photo: SuperYachtFan
Two Smugglers Light Their Own Sailboat on Fire as Authorities Approach. Published May 27, 2024 9:56 PM by The Maritime Executive Last week, French maritime authorities interdicted, busted and ...
After 1 year of building our old boat it has finally become the off grid yacht we dreamed of. Without having any experience this was a challenging project. E...
Person injured as 25m Sunseeker Atlantis sinks off coast of Florida. The 24.8-metre Sunseeker yacht Atlantis has sunk two miles off the coast of Florida following a collision with a dredge pipe piling (25 May). According to an official statement from United States Coast Guard, multiple marine units responded to the distress call at 11.37am.
Ferretti Group is set to make a significant impact at the 2024 Venice Boat Show, unveiling two world premieres: the Custom Line Navetta 38 and the Pershing GTX80. ... Iemanja underwent a comprehensive refit in 2018, which included a rebuild of the main engine, new hull paint, a new teak cap rail, and a full systems service and mast and rigging ...