- Fair American
- Tools and Techniques
- Kit Database
- Bluenose Canadian Schooner

Making Sails for Model Ships
December 3, 2017
On my Model Shipways Bluenose build , I debated whether or not to make the sails. Many (most?) ship models do not include full sails. The Model Shipways kit was designed with sails, and includes the sail cloth as part of the kit. The inclusion of sails was actually one of the factors that led me to select this kit for my second build.
With the booms and gaffs rigged and installed, I would basically be finished with the build if I omit the sails. The remaining rigging is all attached to sails, so I’d leave it off if I didn’t include sails. However, the sails really do add something to the model, especially for a schooner like this.
So, I decided to make sails. I’ve never made sails before, so this will be a learning experience. Here’s how I ended up doing it…
Choosing How Sails are Displayed
An important decision to make before you start is how you’ll be displaying sails. There are three different ways you can go:
- For Display
(I made those last two names up).
Furled sails are sails that are lowered. Many modelers choose to do furled sails on their ships. The advantage is that the sails don’t cover everything up and make a model look like a bunch of cloth. When doing furled sails, you typically don’t make the full sail, instead making smaller version. The sail is put in place, but is bunched up and tied to the appropriate boom or gaff.
Realistic sails try to show the sails rigged and set as they would be while the ship is actually at sea. Ships adjusted their sails depending on the situation. In most cases, some sails would be raised while others would be lowered. Some sails might be set off to one side. Realistic sails would try to show the ship in some kind of ‘real’ sailing state.
Making sails simply ‘for display’ is what I’m doing. I’m making all the sails, and installing them all in their raised state. I’m not going to set any sails off to the sides – everything is just going to be installed straight and even. You’d probably never see a ship at sea actually set like this, but I think it works well for a model.
When to Make Sails
From what I can tell, the general practice is to make the sails before rigging and installing the booms and gaffs. Several of the sails need to be laced onto the booms and gaffs, and that is nearly impossible to do directly on the ship.
The standard process seems to be:
- Build the booms and gaffs.
- Make the sails based on the plans.
- Attach sails to the booms and gaffs as appropriate.
- Install and rig the booms and gaffs.
- Add the additional rigging for each sail.
I’m not confident that all my booms and gaffs are 100% accurately sized, and I suspect that the dimensions of my sails might need to be adjusted to fit my particular ship. So, I intentionally put off making sails until I had installed all the booms and gaffs.
Once I had everything installed on the ship, I could make templates for the sails that take into account both the plans and the size/shape of my actual build.
Of course, this means that I had a bunch of rigging for the booms and gaffs that would need to be un-done so the booms and gaffs could be removed. That was fine with me, because I had avoided the use of glue when securing the rigging. Everything was either tied off (easy to un-tie), or attached with a hook or shackle (easy to remove).
So, my process is:
- Build the booms and gaffs .
- Install and rig the booms and gaffs .
- Make the sails based on the actual layout of my ship.
- De-rig the booms and gaffs, and remove them from the ship.
- Re-install the booms and gaffs, and their rigging.
For me, this approach (while more work) has several advantages:
- Initially, I’m able to focus on getting the booms and gaffs properly installed and rigged, without the sails getting in the way.
- I can start with sail templates based on the plans, and adjust as necessary to fit the exact size/shape of my ship.
- Once sails are ready to install, I can quickly get them rigged without spending any time on the other rigging for the booms and gaffs, since those runs are already done and just need to be re-tied/attached.
Paper Templates
Making the actual sails starts with making paper templates. Some of the sails were too big to use normal paper, so I picked up a roll of white craft paper.
For each sail, I took a piece of paper and laid it over the plans. I marked the corners of the sail, then used a ruler to draw lines between the marks, giving me the outline of the sail. Some sails have curves that I had to hand-draw.
Once the shape was laid out on the paper, I cut the paper to shape.

A paper template for the jib sail.
Next I positioned the paper template on the actual ship in the correct spot. I took note of anything that didn’t fit just right, and adjusted the template as necessary. Some sails needed to be made slightly smaller, while some had to be made slightly larger.
To help me visualize the sail, I also marked where the hems on the edges will go, along with any other key elements of the sail. For the edge hems, I’ll be folding the fabric over and sewing it. I’ll be shooting for a 1/16″ hem, so I used that size for the markings on the template.
The actual sails on the ship were made from strips of cloth, not one big piece. To simulate this, I’ll just be sewing lines onto the cloth. For some of the sails, I went ahead and marked these lines on the template since they need to be oriented correctly according to the plans.
The main and fore sails also have reef bands , which run horizontally along the lower portion of the sail. These were marked as well.
Preparing the Sail Cloth
Once I was satisfied with the template, I got out the sail cloth. Model Shipways includes sail cloth with the kit. This cloth is a medium weight cotton cloth in an off-white color. The kit includes enough to make all the sails, assuming you get everything right on the first try. I knew that wasn’t going to work, so I ordered two more packages of sail cloth from them. It was relatively inexpensive – about $7 for each package of cloth.
Sails on a ship were rarely bright white. I’ve seen that many modelers will dye their sail cloth to get a desired shade. There are many tricks for this, like dipping the material in coffee. I felt that the off-white color of the Model Shipways cloth was fine, so I didn’t dye my cloth.
If you’re wanting to use other sail cloth, look for something lightweight. Almost all fabric is going to be too thick and out of scale, so just do the best you can. I actually used some fabric from a local hobby store for a few ‘test runs’, and learned a few things. Look for fabric with a tight knit, so the fabric doesn’t start to come apart as you cut it. Also look for something without too much stretch, as stretchy fabric can distort the shape of the sails as you sew them.
Ideally, you want to wash, dry, and iron the sail cloth before you start. Most fabric will shrink a little during this process, so you want this out of the way before you start cutting things to size. Doing this will also release any wrinkles in the fabric. (I was too excited to get started, and didn’t do this.)
Once you’ve got your fabric ready and your template sized, you’re ready to cut some fabric.
I used a fabric marker to do all the markings on the fabric. I picked this up at a local hobby store in the sewing section for a couple dollars. This marker uses special ink that disappears as it evaporates. This means I can draw all over the fabric, and within a few hours the ink is gone. I found this to give much better results than using a pencil and trying to erase markings.

The paper template is used to mark up the fabric being used for the sail.
A note on marking fabric…since I’m going to be folding over the edges of the sail to create hems, one side of the sail is going to look better than the other. Often, you pick a ‘display side’ of the ship, and put ugly stuff (like the worse sail side) so it isn’t visible from the display side. I found that with the way I was marking, folding, and sewing the cloth, I wanted the markings on the display side. Making sure I marked the display side ensured that I as I worked I ended up with all the ugly stuff on the back.
First the outline of the sail is marked on the fabric. Be sure to leave extra space on all sides outside of the sail.
A second outline is made 1/16″ outside of the first outline. This is the hem that I want to end up with on the finished sail.
A third outline is made 1/2″ outside of the second outline. This one doesn’t have to be perfect…this is just a guide for cutting the fabric.
You can also mark the reef lines and strips at this point if desired. I typically didn’t mark the strips, since I was able to position those accurately using my sewing machine.

The fabric is trimmed, leaving excess material around the edges.
Once everything is marked, I cut the fabric along the outer-most outline. I used a rotary cutter (like a pizza cutter), which gave much better results than scissors.
To make sails you have to do a lot of sewing. I have no experience sewing. Doing all this by hand with a needle and thread was not practical, so I bought a cheap little ‘hobby’ sewing machine. That machine was junk, and broke within the first 20 minutes. Since I’m hoping to keep this hobby going for a few decades, I decided to go ahead and invest in a real sewing machine.
At my local hobby store, the staff helped me select a good quality machine. I got it for under $200. The advantages of a real machine include:
- It won’t jam.
- Variable speeds.
- Selectable stitch length and width (critical for trying to get the stitching remotely close to ‘scale’).
- Many different computer-controlled stitch types, so you can do more than just a simple straight stitch. This would end up making the reef bands much better.
It took me a few hours to get the hang of using the machine, but my skill level increased quickly. While I certainly couldn’t sew a shirt or a pair of pants, by the second or third sail I was flying along like a pro.
Since you’ll be sewing, you’ll need thread. There are three main considerations with the thread.
First is the color. This is a matter of personal preference. I’ve seen some models where the stitching on the sails was very high-contrast (dark brown thread on white cloth). I’ve also seen some where the thread was the same color as the cloth. I felt like the stitching shouldn’t stand out too much , and I wanted to rely on the texture of the thread to define the lines rather than the color. So, I went with a ‘natural’ color thread that ended up being really close to the color of the cloth.
The second consideration is the thread material. A hobby store will likely have hundreds of different kinds of thread. There are synthetic materials and natural materials. I went with a cotton thread. Why? No really good reason except that all my rigging lines are cotton and the sail cloth is cotton, so it seemed like a good idea.
The final consideration is quantity. I have no idea how to predict the amount of thread that will be needed (there may be some ‘trick’ to it that the pros know). Initially I bought one spool of the thread. That only made two sails. When I went back to by more, they were out of that exact thread, so I had to order more online. That caused a week delay in making sails. Obviously you wan the thread to be the same on all the sails, so buy a lot of the same thread up front. Thread is cheap, and it is better to have some leftover than to run out.
Sewing the Edges
On to sewing.
The first step is to sew the hems on the edges. I start with the longest edge first, then do the opposite edge, continuing on until all edges are sewn. The cloth is folded over at the first outline (the line that defines the actual edge of the sail) and pinned into place. The 1/16″ line that indicates the edge of the hem should be inside the sail. Since the cloth was cut 1/2″ past that line (on that third outline), there is some extra material here that makes pinning easier. I’ll cut that off later.

The edges are folded over to create a hem and pinned in place.

The hem is sewn on the edge.
The cloth then goes into the machine and gets stitched up. I used the machine’s reverse feature to double-stitch the first couple stitches to secure the thread, then just ran a straight stitch down the edge, staying between the edge of the sail and the 1/16″ hem marking. I used a small stitch length so things weren’t too out of scale.

My machine lets me set the position of the needle, allowing me to get really close to the edge.
Once the stitch was complete, the extra thread was clipped off. I used a pair of sharp scissors to carefully cut off the extra cloth along the 1/16″ hem line.

A completed edge hem, about 1/16″ wide.
This was repeated for each edge.

Two edges meet in a corner.
Adding ‘Strips’
To simulate the strips of material, some modelers simply draw lines on the cloth. I decided to run a stitch for each strip instead. It is more work, but it goes pretty fast

The ‘strips’ of sail sail cloth are simulated with stitches. Each sail has a unique strip layout shown on the plans.
The width of the strips is indicated on the plans, as well as the layout of the strips. It turned out that the width of the strips matched with space between the needle on my sewing machine and the edge of the ‘foot’. So I didn’t need to mark the strips on the fabric – I just positioned the fabric under the foot and ran the material through the machine.
Reef Bands and Points
The large lower sails (main sail and fore sail) have reef bands . These are horizontal bands across the sails. My sewing machine has a setting that creates a stitch that looks like a ladder (or railroad tracks?). I adjusted the stitch length and width to get the desired size, then ran this stitch across the sail to create the reef bands.
I ran this right over the strip lines. This is easier than doing the reef bands first and trying to start/stop the strip lines at the bands, and you can’t really tell the difference.

Reef bands were sewn in using a different stitch pattern on my machine.
At each point where a strip line crosses the reef band, there is a short rope that goes through the sail. These ropes were used to secure the sail when it was lowered and bundled up. I cut a bunch of 1″ long pieces of 0.008″ tan rigging line and punched them through at the appropriate spots. I used a small bit of fabric glue on each side to keep these ropes flat against the sail instead of sticking out.
Corner Attachment Points
The sails typically have rigging lines attached to the corners of the sails. This means you need something in each corner to attach a rigging line to. From my research, it looks like most sails had a rope that ran around the outside edge of the sail, and that rope would form an eye at the sail corners to create the attachment points.
I decided not to add this rope. I wasn’t confident I could make it look good, and I thought the tan line would stand out too much.
So, I simply sewed brass rings (made from wire) into each corner. This was done manually with a needle and thread.

Anchor points in the corners were made from brass wire and sewn in.
Finishing Up
Once everything is sewn and I’m happy with the results, there are a few final steps.
I do a final pass to trim anything that looks bad (edges of hems, loose threads, etc.).
After all my disappearing fabric markings have evaporated and disappeared, I iron the sail to flatten it out and remove any remaining wrinkles.
Finally, I use some fabric glue along any exposed fabric edges (like the hems) to keep them from fraying. I also use a little fabric glue on the ends of stitches to ensure they don’t come loose.
Then the sail is ready to install!

A few completed sails on the ship.
- Click to share on Twitter (Opens in new window)
- Click to share on Facebook (Opens in new window)
- Click to share on Reddit (Opens in new window)
- Click to share on Tumblr (Opens in new window)
- Click to share on Pinterest (Opens in new window)
- Phantom NY Pilot Boat
- Model Ship Kit Database
Copyright © 2018 SuburbanShipModeler.com The text, photos, and content are copyright of this site unless otherwise noted.
Photos were taken by the author unless otherwise noted. All brands and trademarks referenced are the property of their respective owners.
Discover more from The Suburban Ship Modeler
Subscribe now to keep reading and get access to the full archive.
Type your email…
Continue reading
- Classifieds
- Remember Me Forgot Password?
- Boats Sailboats Discussion How to make your own sail ???
- Electric Flight
- Advertising
- Our Sponsors
- Review Policies
- Terms of Service
- Privacy Policy
- Site History
- Mark Forums Read
- Member Search
- Upcoming Articles
- Do Not Sell My Data
- Manage Consent
- Back to Top
JavaScript seems to be disabled in your browser. You must have JavaScript enabled in your browser to utilize the functionality of this website.
Simply Designed Better
Making Model Yacht Sails - Larry Robinson's method of building in shape
- Shopping Cart
- Shipping Info
- Terms & Conditions
- Suppliers and Stock
- Meet the Staff
- Environment
Quick Overview
Product code. BK-38
Availability: In stock
- | Add to Compare

- Product Description
Larry Robinson - Making Model Yacht Sails - how to build in their shape, a master class in sail making for modern rc model yachts. Around 700 copies sold by mid 2015 and still going strong.
If you want to know how to make well shaped rc model yacht sails, and make them efficiently and consistently, this contains all you need to know. The method used by the top sail makers for putting the 3D shape into the sails, as well as the luff shaping, is described in some detail. The design and construction of the all important moulds themselves is also dealt with at some length. Packed with other hints and tips and very well illustrated. A thorough master class in sail making for modern model yachts.
"Even those sail makers who have advanced to higher levels of their craft will find thought provoking ideas. Anyone thinking of testing the waters should be greatly helped and inspired by what they find here. In short it’s a master class in high precision sail making for R/C yachts."
- Products by Class
- Products by Category
- Products - Spotlight
You are using an outdated browser. Upgrade your browser today or install Google Chrome Frame to better experience this site.
Sail Making Articles
We have several articles related to sails and sailmaking.
- The first is a short discussion of theory: The Design of Model Yacht Sails by A.M.Ballantyne .
- We then move on to the most complete set of instructions on how to sew a set of sails from cotton: “Sails” by Walter K. Moss from The Modelmaker , 1940 .
- The next article discusses the one thing that is possible on a freesailing boat and difficult in R/C: spinnaker: The Spinnaker .
- Finally there is a treatise on proportions of sails for the Marblehead class of boats: Sail Plans: Dimensioned and Balanced for the Marblehead Class Racing Yacht .
These articles represent the state of the art of 50 years ago or more. The modern expert on model sails, and a good source if you want to have a suit made, is Rod Carr .
Rod Carr’s Observations
After reading these pages, Rod offered the following observations on the difference between the freesailing designs of the 40s and the R/C sails of today:
Modern panel joint tapers produce a vertical camber distribution that is the opposite of what the 1940 texts say. I do believe that it was likely that the flat headed vintage sails were the result of two requirements: a) As the cloth was asked to carry more load near the head, it would deform more, hence cutting hollow in the luff would remove some of that unwanted camber. b)The camber was defined as unwanted, because camber high in the sail can result in excessive heel, and as the boat heeled in a puff, it seems logical that the vane skipper would opt for the sail to be flatter up there to release the wind and reduce the heel. We all know that balance changes as a function of heel angle, and without a rudder to counteract things in real time like we R/C types, an automatic means of controlling heeling episodes with a flat section in the top of the sail seems sensible.
The concern with heeling is reinforced by the fact that freesailing models, because they had to be able to sail anywhere in a pond, have substantially less draft than modern R/C boats, which can be steered to the deeper parts.
Cotton Sailcloth
We have not found any cotton sailcloth completely suitable for sailing on the water. The instructions contained here are, however, suitable for constructing an accurate set of reproduction sails for display of a vintage or antique boat. The closest material we have located is called “long staple down cambric.” This is a tightly woven cotton material used in down pillows, quilts, and comforters.
If you need a set of display sails made, the best approach is to locate a quilter. Quilting clubs can be found by going to your local fabric supply store such as JoAnne or Hobby Lobby. They generally have bulletin boards giving club contact information.
- Vanquish 65
- Mini Maniac
- RG65 Appendages
- Maniac MK II
- IOM Appendages
- Marblehead Class
- Marblehead Appendages
- RT65 Ragnarok
- RT65R Armageddon
- RC65 Adrenaline
- ST65 Sowelu
- Mini40 / F48 Class
- Nightmare X
- Nightmare MK VIII
- MultiOne Class
- FireDragon 1000
- DIY Sail Winch
- Rig Building
Rig building

- Masting, rigging and sails

- Remember me Not recommended on shared computers
Forgot your password?
Your best sail cloth and technique
By steven sturgis March 11, 2015 in Masting, rigging and sails
- Reply to this topic
- Start new topic
Recommended Posts
Steven sturgis.
Hi every one. I have been looking for the best sail cloth for my Flying Fish build. I would like to get a lot of suggestions that I can look at. Please include where the cloth can be bought. Do you change the color with dyes? do you age the cloth some how? How do you add detail to the sails? All sail makers are welcome to post their designs I know a lot of you don't put on sail because it covers the rigging so anyone that does would be a great asset to the topic. Looking forward to seeing your tricks and designs.
sail techniques http://modelshipworl...-and-technique/
Link to comment
Share on other sites.

Click on the Nautical Research Guild Home Page straight up to the top of the page, then, click on Ship Modeling Resources, then, click on Ship Modeling Database of Articles, Then click Rigging and Sails, then click the pdf "Making and forming sails for your model."
I could have pasted the direct link, but thought it better for you to see everything that was available here on MSW.
You can go to a Joanne's or any yard goods store and buy Egyptian cotton, almost silk like. Coffee and/or tea make good stains, very controllable.
I'm certain there will be other suggestions to follow....
- tasmanian and LFrankCPA

Thank you twintrow. I did look at that but some one needs to go back and up date the links. About 80% don't work any more. I was going for full rigged full sails. Can you do that in paper? 1/8 scale
Im sure this is old hat to the expert modelers but passing on that knowledge is needed by the next generation of builders
- JerseyCity Frankie

I make sails for models in scale 1:75 with seams of the cloths sewing marked with single thread ( courtesy of Admiral ). For models in scale 1:100 I use computer printing of cloths lines and reef bands on thermal transferring paper for ironing on to sails fabric . Sails leech, head and foot ropes are fixed in its place with use of textile adhesive .
Material for sails I prefer is old bed linen many, many times washed .
Work step by step
1.Make paper stencil for each sail and check it’s dimensions on your model.
2.With soft pencil transfer all lines in to fabric – add stripe 5-7 mm around
sail edges.
3.Make all necessary lines on fabric using sewing machine and thin thread with light brown or beige color.
For sails with thermal transferring of line any sewing is not necessary.
Cut of sail shape.
4. Fold the edges stripe to reverse side of sail and apply textile adhesive
5. Put sail on flat surface protected against glue adhesion ( wax paper )
and fix it with pins and nails for forming clews.
Using textile adhesive attach thread around sail and form clews and cringles as necessary.
After adhesive excess removal from sail surface and final ironing your sail is ready.
Foto 1-10 Sail making Step by Step
Foto 11 HMS Speedy - printed sails
Foto 12 HMS Warrior - printed sails
Foto 13 Patern for printing sails for S/S Savannah

- skipper1947 , Mirabell61 , thibaultron and 9 others

I wouldn't use paper. If you don't want to use cloth, use silkspan from a hobby shop that deals with the RC guys/gals. It comes in various weights and you'd probably need to acquire small amounts of several sizes to find which one works best for you.
- Elia and Canute
Mark "The shipwright is slow, but the wood is patient." - me Current Build: Past Builds: La Belle Poule 1765 - French Frigate from ANCRE plans - ON HOLD Tri ton Cross-Section
NRG Hallf Hull Planking Kit HMS Sphinx 1775 - Vanguard Models - 1:64
Non-Ship Model: On hold, maybe forever:
CH-53 Sikorsky - 1:48 - Revell - Completed Licorne - 1755 from Hahn Plans (Scratch) Version 2.0 (Abandoned)
Good stuff.
I have seen some members using silkspan and modelspan. Any thought on this material. I'm not familiar with thermal transferring paper. can you elaborate. How do you use textile adhesive with out making a mess? Is it diluted in any way?
The adhesive is not diluted , unwanted stains of adhesive on sails can be easily removed by scraping .

Thanks for outlining the step by step process you use. In my opinion, the thermal transfer is brilliant. I have been hesitating to start my sails for quite a while because I don't want to sew the seam lines (I think they would look too bulky) and I don't trust myself to be able to draw them evenly using pencil. You have certainly given me something to think about! I imagine transfer will be more durable than pencil - another plus for the technique.
Current build -- MS Bluenose
Future build - MS Flying Fish
"A ship is safe in harbor, but that's not what ships are for." - William G. T. Shedd

Guest Tim I.
Good stuff. I have seen some members using silkspan and modelspan. Any thought on this material. I'm not familiar with thermal transferring paper. can you elaborate. How do you use textile adhesive with out making a mess? Is it diluted in any way?
Silk span is easy to work with. PVA glue works well and any glue that moves outside what you are trying to glue will dry clear. Also Rubber Cement works well, if applied sparingly. Here are some sails I have done using silk span. Nothing to write home about, but my first attempts at sail making.
I use strips of silk span to simulate seams and sail detail and work them up in layers. You can also add bolt ropes and reef points to add more detail. I did not go into a lot of detail with these, rather kept them simple to work on my technique. Also if you use PVA a good idea is to press the sails between some parchment paper and heavy books while drying to prevent buckling or bubbling of the thin strips of silk span.

I hope this helps.
I like the look of the silkspan and the layering of the cloth details. What weight silkspan do you use?
Not quite sure on the weight. I just bought what my local hobby store has. This Silk Span in my pictures is the "SGM White".
Hope this helps,

A question about silkspan. Can it achieve the draped and folded look of clewed up sails? Or will it be too stiff? I want to show my ship in the process of reducing to battle sail.
Laissez le bon temps rouler !
Current Build: Le Soleil Royal
Completed Build : Amerigo Vespucci
Just saw this while looking for a source for Sig Silkspan, source of quote is the Stuntbarn an RC Forum:
"Title: Silk Span Covering
Post by: ericrule on October 22, 2012, 12:10:29 PM I just got off the telephone with Sig Mfg where they informed me that they will no longer have silk span available. At the present time they have only OO (Light) in stock and when that is gone they will no longer be able to obtain it.
According to the person I spoke to the company that supplied the silk span is out of business and they can not find any other supplier. Mike is searching for a new source but it does not look like he is having any luck."
So not sure if real or not....? But if true silkspan may not be around loong??
Just saw this while looking for a source for Sig Silkspan, source of quote is the Stuntbarn an RC Forum: "Title: Silk Span Covering Post by: ericrule on October 22, 2012, 12:10:29 PM I just got off the telephone with Sig Mfg where they informed me that they will no longer have silk span available. At the present time they have only OO (Light) in stock and when that is gone they will no longer be able to obtain it. According to the person I spoke to the company that supplied the silk span is out of business and they can not find any other supplier. Mike is searching for a new source but it does not look like he is having any luck." So not sure if real or not....? But if true silkspan may not be around loong?? Tom
That is what my local hobby store told me as well. That is why I bought out everything they had, for stock.
Oh noooooooooooooooooooooooooo !!!!! Say it ain't so.
Thank you all this is good stuff. I hope I can still get silk span I would like to try it out.

Landlubber Mike
Is there a difference between silk span and model span? I have a roll of model span, but haven't tried using it yet.
Current Wooden builds: Amati/Victory Pegasus MS Charles W. Morgan Euromodel La Renommèe
Plastic builds: SB2U-1 Vindicator 1/48 Five Star Yaeyama 1/700 Pit Road Asashio and Akashi 1/700 diorama Walrus 1/48 and Albatross 1/700 Special Hobby Buffalo 1/32 Eduard Sikorsky JRS-1 1/72 IJN Notoro 1/700 Akitsu Maru 1/700
Completed builds : Caldercraft Brig Badger Amati Hannah - Ship in Bottle Pit Road Hatsuzakura 1/700 Hasegawa Shimakaze 1:350
F4B-4 and P-6E 1/72 Accurate Miniatures F3F-1/F3F-2 1/48 Tamiya F4F-4 Wildcat built as FM-1 1/48 Special Hobby Buffalo 1/48
Citroen 2CV 1/24 - Airfix and Tamiya Entex Morgan 3-wheeler 1/16
Terminated build: HMS Lyme (based on Corel Unicorn)
On the shelf: Euromodel Friedrich Wilhelm zu Pferde; Caldercraft Victory; too many plastic ship, plane and car kits
Future potential scratch builds: HMS Lyme (from NMM plans); Le Gros Ventre (from Ancre monographs), Dutch ship from Ab Hoving book, HMS Sussex from McCardle book, Philadelphia gunboat (Smithsonian plans)
I believe its just a different brand butt lets let the experts handle that question.
For what it's worth I got a big roll of model span last year from CornwallModelBoats.
Steven, if you're interested in furled sails, I shared my techniques that I used on my Badger in a separate thread:
http://modelshipworld.com/index.php/topic/3944-landlubber-mikes-technique-for-furled-sails/
- 2 months later...

jablackwell
Those looking for SilkSpan can still find it at the Guillow model airplane homepage. It can be found under the spare parts section. Each model plane has a spare parts assortment, and the wing covering is an option for most.
U.S. Brig Syren - 1803 - Model Shipways - First PoB Build
Sopwith Camel F.1 - 1916 - Model Airways - Not a Ship! , Completed
Kate Cory - 1856 - Model Shipways - Second Build, completed
Sultana - 1767 - Model Shipways - First shipbuild, completed

There's more on using SilkSpan for sails in a new booklet by SeaWatchBooks, or as a new chapter in a new edition of Swan IV.
- EricWilliamMarshall
Be sure to sign up for an epic Nelson/Trafalgar project if you would like to see it made into a TV series http://trafalgar.tv
- 1 month later...

Jolley Roger
For what it's worth I got a big roll of model span last year from CornwallModelBoats. Steven, if you're interested in furled sails, I shared my techniques that I used on my Badger in a separate thread: http://modelshipworld.com/index.php/topic/3944-landlubber-mikes-technique-for-furled-sails/
Can you recall under what product name CMB was selling the model span?
I've been unable to find it on their site.
Samuel Pepys notes in his diary on 19 July 1667: "the Dutch fleets being in so many places, that Sir W. Batten at table cried, By God , says he, I think the Devil shits Dutchmen."
I can't find it on the website either. I'm fairly certain it was under building materials or something and listed as Modelspan. I looked at the packaging, and it had the Mantua name/emblem on it, but I don't see it under the Mantua fittings. Maybe email them and ask?
Thanks Mike, i'll send them a mail.
I am a passionate advocate of including sails on models so I am pleased you are making the decision to include them on your model.
I had a look at your Victory build log, those sails looks fantastic!
I think I will follow your method when I get to that part on my build.

Richard Griffith
Bluejacket Shipcrafters ran out of silkspan recently but they substituted model span which to me is the same material. I used it to added furled sails to Le Superbe. I am a very happy customer of BJ, not an employee.
- Canute , Landlubber Mike and MrBlueJacket
I'm just using old worn bed sheets for my 1/100 scale HMS Victory. Check out my build log which is really not much at all about building the kit and mostly focussing on how I am making the sails. I bet if you searched through all my comments on MSW you would find 1/2 of all my posts are having to do with sails or rigging. I am a passionate advocate of including sails on models so I am pleased you are making the decision to include them on your model. I don't think the thickness of the material is that big a deal as long as the texture of the weave is fine enough not to draw attention to itself. Many very convincing ship model sails have actually been carved out of wood. My build log goes into a lot of detail on these points but I will just set them out here again: Don't use pure white sails, this will look too stark and in fact actual sails were cream colored or very light grey.(staining with coffee is super easy and very effective) Don't sew the boltropes on, no matter how fine a thread you use, it will look out of scale. Just glue them on. Do include sail construction details like reef bands and reinforcing patches, these give a good texture and are realistic. Look at all the photos you can find of reproduction ships that resemble your ship and try to duplicate that look.
JCFrankie, thanks so much for your detailed log on your sail techniques. I went with furled sails on my Badger, but was planning on doing a mixture of furled and unfurled on my Pegasus and future builds. Your results are fantastic, and I will certainly bookmark your log for when I get to that point! I experimented with tissue and a few other materials as well, but ended up with cloth as well.
Once again, a big thank you!
- 3 years later...
Hi I am making sails for a large pond yacht which will of course become very wet , if I chose a material that becomes too wet and heavy that will cause problems,
what is the best material to use
for a large expanse of sail.
My pond yacht is 5ft long not inc
bow sprit.
Join the conversation
You can post now and register later. If you have an account, sign in now to post with your account.
× Pasted as rich text. Paste as plain text instead
Only 75 emoji are allowed.
× Your link has been automatically embedded. Display as a link instead
× Your previous content has been restored. Clear editor
× You cannot paste images directly. Upload or insert images from URL.
- Insert image from URL
- Submit Reply
Recently Browsing 0 members
- No registered users viewing this page.
Modelshipworld - Advancing Ship Modeling through Research
SSL Secured
Your security is important for us so this Website is SSL-Secured
NRG Mailing Address
Nautical Research Guild 237 South Lincoln Street Westmont IL, 60559-1917
Model Ship World ® and the MSW logo are Registered Trademarks, and belong to the Nautical Research Guild (United States Patent and Trademark Office: No. 6,929,264 & No. 6,929,274, registered Dec. 20, 2022)
Helpful links.
- Articles Database
- NRG Home Page
- NRG Online Store
- Important: Our Guidelines
- Terms of Use
- Buildlog Index
About the NRG
If you enjoy building ship models that are historically accurate as well as beautiful, then The Nautical Research Guild (NRG) is just right for you.
The Guild is a non-profit educational organization whose mission is to “Advance Ship Modeling Through Research”. We provide support to our members in their efforts to raise the quality of their model ships.
The Nautical Research Guild has published our world-renowned quarterly magazine, The Nautical Research Journal, since 1955. The pages of the Journal are full of articles by accomplished ship modelers who show you how they create those exquisite details on their models, and by maritime historians who show you the correct details to build. The Journal is available in both print and digital editions. Go to the NRG web site (www.thenrg.org) to download a complimentary digital copy of the Journal. The NRG also publishes plan sets, books and compilations of back issues of the Journal and the former Ships in Scale and Model Ship Builder magazines.
Our Emblem ®
Nautical Research Guild ® and the NRG logo are Registered Trademarks, and belong to the Nautical Research Guild (United States Patent and Trademark Office: No. 6,999,236 & No. 6,999,237, registered March 14, 2023)
- Existing user? Sign In
- Latest Posts
- All unread content since my last vist
- Unread topics I have posted in
- Create New...
- PRO Courses Guides New Tech Help Pro Expert Videos About wikiHow Pro Upgrade Sign In
- EDIT Edit this Article
- EXPLORE Tech Help Pro About Us Random Article Quizzes Request a New Article Community Dashboard This Or That Game Popular Categories Arts and Entertainment Artwork Books Movies Computers and Electronics Computers Phone Skills Technology Hacks Health Men's Health Mental Health Women's Health Relationships Dating Love Relationship Issues Hobbies and Crafts Crafts Drawing Games Education & Communication Communication Skills Personal Development Studying Personal Care and Style Fashion Hair Care Personal Hygiene Youth Personal Care School Stuff Dating All Categories Arts and Entertainment Finance and Business Home and Garden Relationship Quizzes Cars & Other Vehicles Food and Entertaining Personal Care and Style Sports and Fitness Computers and Electronics Health Pets and Animals Travel Education & Communication Hobbies and Crafts Philosophy and Religion Work World Family Life Holidays and Traditions Relationships Youth
- Browse Articles
- Learn Something New
- Quizzes Hot
- This Or That Game New
- Train Your Brain
- Explore More
- Support wikiHow
- About wikiHow
- Log in / Sign up
- Cars & Other Vehicles
- Boat Building
How to Make a Sail
Last Updated: November 8, 2023
This article was co-authored by Nitzan Levy . Captain Nitzan Levy is a Sailor, Social Entrepreneur, and the Founder of Sailors NYC, a recreational sailors’ club based in Jersey City, New Jersey that specializes in cruising boats and a variety of community programs. Capt. Levy has over 20 years of sailing experience and has sailed in many places around the world including: the Atlantic Ocean, the Mediterranean Sea, The Caribbean, and the Indian Ocean. Capt. Levy is a U.S. Coast Guard Licensed Master of vessels up to 50 Tons with Auxiliary Sail and Assistance Towing Endorsements. Capt. Levy is also a NauticEd Level V Captain Rank Chief Instructor, an American National Standards Assessor, an SLC instructor, an ASA (American Sailing Association) Certified Instructor Bareboat Chartering, and an Israeli licensed skipper on Boats for International Voyages. This article has been viewed 108,001 times.
Ships and boats of all sizes have harnessed the power of wind for centuries. Sailing boats have continued to use sails to this day for recreational sports and hobbies. Whether you’re looking for a calm day on the water or to compete in a race, making your own sail can be a beneficial skill.
Getting Started

- Research the dimensions of similar sails and have an idea of what kind of sailing you’d like to do. This gives basic reference points to research and execute.

- If you are planning to sew the sail yourself, you will also need a special sewing table to be able to support the industrial sewing machine. This table needs to be about twice the size of a table tennis table in order to support the size of the sail.

- Shorter booms give you more maneuverability.
Designing the Sail

- The luff curve won’t match the curve of the mast. The top third of the luff curve will be slight and the bottom of the curve, close to the boom, will be greater than the mast curve. There are different theories on what the perfect luff curve should be so research how to optimize the luff curve for your prefered type of sailing.

- If you want more stability, add more battens; however, use less battens to make your boat easier to manoeuvre and more lightweight.

- Use heavier materials near the bottom of the sail. Seams also help to optimize the amount of material you use.

- Tape fabric or newspaper together for more surface area when creating a large sail.
- The luff curve and shaping the seam will create a three dimensional sail so don’t worry if your sail lies flat as you construct your pattern.

- Ensure that the material you choose resist stretching and can withstand rips.
- Heavy monofilm and woven sailcloth are common choices.
Assembling the Sail

- Stick and sew two panels at a time until the sail is all in one piece. You can now trim it to your design on the table and draw on the batten pockets.

- Create an adjustable head for your sleeve if this is your first attempt at a sail.
- Use pulleys from old sails or get them from a sail maker.
Expert Q&A

- Know what shape you want and rig your sail until it takes that exact shape. Thanks Helpful 0 Not Helpful 0
- Learn what type of sails work best for your vessel relative to the sailing conditions. Thanks Helpful 0 Not Helpful 0

- Create a budget to ensure you optimize your resources. Thanks Helpful 1 Not Helpful 1
- Design with safety first, do not cut corners to favor aesthetics or cost. Thanks Helpful 0 Not Helpful 0
Things You'll Need
- Sailcloth, polytarp, nylon or Dacron sail material
- Industrial sewing machine
- Measuring tape
- Sail pattern
- Double sided adhesive tape
- Dacron tape or reinforced monofilm tape
You Might Also Like

- ↑ http://www.startedsailing.com/sail-battens.html
- ↑ http://jezebel.com/5916905/how-to-turn-your-dress-idea-into-reality-by-making-your-very-own-custom-pattern
- ↑ Nitzan Levy. Sailing Instructor. Expert Interview. 24 April 2020.
About This Article

To make a sail, first sketch the luff curve using your boom and mast measurements. Next, choose a scratch-resistant material that works best for your budget and sailing needs, such as Monofilm or Pentex taffeta scrim laminate. Then, place your pattern onto your material and outline the panel, battens, and seams. Once you have your sail’s shape, cut out the panels, and stitch them together, leaving extra cloth at the edges for seams. For more tips from our Nautical co-author, such as how to reinforce your sail against the elements, read on! Did this summary help you? Yes No
- Send fan mail to authors
Did this article help you?

Featured Articles

Trending Articles

Watch Articles

- Terms of Use
- Privacy Policy
- Do Not Sell or Share My Info
- Not Selling Info
wikiHow Tech Help Pro:
Level up your tech skills and stay ahead of the curve
- Join Newsletter & Get 10% Off Your First Order
Join / Login
Rigging tips for building a model ship.
- Updated on: 25th January 2021
- Written by Gary Renshaw
Introduction
Rigging is a significant part of the process of building a model ship. It can be tedious and time-consuming however putting the effort in adds to the beauty of your finished model.
In general, the instructions on rigging provided by the manufacturers of model ship kits are fairly sparse. Whilst there are several specialised and very detailed books on masting and rigging, they are more concerned with matters of historical and technical accuracy than with the sort of advice that might help the beginner to understand the best way of going about what might appear to be quite a daunting task.
Highly recommended is a 3 DVD set available from Modellers Shipyard on Masting and Rigging . This is a comprehensive set which shows all aspects of preparing the masts, spars and yards and the rigging for a period model. For further information call our office or visit our website.
We do strongly recommend “Ship Modelling Simplified” by Mastini – it contains excellent advice on ship modelling in general and has a good section on rigging. Modeller’s Shipyard has produced the following information as an introduction to the Rigging of a model ship. The following points should be noted:
- This is a general guide only and is to be used in conjunction with any instructions and plans provided by the kit manufacturer. In particular, it must be emphasised that any illustrations used in this leaflet are purely for the purpose of example and may not relate to your specific model.
- The approaches described are not the only way of doing things and the order in which the various processes are carried out may be varied, within reason, to suit the individual modeller.
Building a model ship is as much an exercise in using the mind as it is in using your fingers and hands. In this small leaflet, we can’t hope to cover all the problems and queries that may be encountered in the construction of your model. It is necessary to spend as much time thinking about the task at hand as actually doing it. If having thought about it, you still have a problem then contact us. We’ll either be able to advise you ourselves or refer you another modeller in your area who’ll be happy to help you with “hands-on” assistance.
TYPES OF RIGGING
The rigging of a ship can be divided into two main parts:
- “Standing” or “Fixed” rigging, which is used to support the Masts and Bowsprit.
- “Running” rigging, which is used to manipulate spars and sails.
On an “actual” ship any Rigging which didn’t pass through a pulley block was coated with tar to help prevent it rotting. For this reason, standing rigging is often, although not always, black on ship models.
If you do want your standing rigging black, and black cord is not supplied in the kit then you can consider these options:
- You can purchase Black cord.
- The use of black rigging “wax” gives a very authentic tarred look but it is difficult to do well.
- The cord supplied with the kit can be coloured using black dye or “Raven Oil” as used by leatherworkers/saddlers.
- Black felt-tipped “Texta” is an easy way to colour the cord.
- Black “Padawax” shoe colour is also very satisfactory.
When any liquid dye has been used it will be necessary to stretch the cord by hanging it on a clothesline, with weights, to prevent it going slack after installation on the model. It will also probably be necessary to use clear wax to eliminate any furry look in the cord.
STANDING RIGGING
This includes the rigging of the Stays, Backstay, Bowsprit and Gammoning. This is fairly straightforward and should present few difficulties. Work from the centre of the ship out and try to avoid difficult and confined spaces. A Rigging Tool presented in the Tools section of our Catalogue will be helpful when rigging. The various names for the standing rigging are presented below.
- Fore topmast stay
- Fore topgallant stay
- Flying-jib stay
- Fore royal stay
- Fore skysail stay
- Main topmast stay
- Main topgallant stay
- Main royal stay
- Main skysail stay
- Mizzen stay
- Mizzen topmast stay
- Mizzen topgallant stay
- Mizzen royal stay
- Mizzen skysail stay
- Mizzen topmast backstay
- Mizzen royal backstay
- Mizzen skysail backstay
- Main topmast backstay
- Main topgallant backstay
- Main royal backstay
- Main skysail backstay
- Fore topmast backstay
- Fore topgallant backstay
- Fore royal backstay
- Fore skysail backstay
- Bowsprit shrouds (bobstays)

Source: “Ship Modeling Simplified” by Mastini Pages 143 –144
FITTING OF BLOCKS, EYE PINS & CLEATS
Before proceeding further fit all the eye pins and rigging blocks to the bowsprit, masts, yards, and deck – also to the insides of the bulwarks if required. Cleats may be required on the lower masts, deck or bulwarks. Pay particular attention to any area which will be relatively inaccessible once the shrouds and other standing rigging ropes are in place.
It is as well to drill out the holes in the blocks and deadeyes to facilitate the threading of the rigging cord when the time comes.
For the most inaccessible blocks, insert a short piece of thin rigging cord through the hole and glue it to itself forming a loop. Later, when you wish to insert the permanent running rigging you cut the loop, glue the new cord to one end and pull it through the hole using the other end of the pilot cord. No awkward threading
DEADEYES (LOWER) AND CHAIN STRAPS/ DEADEYE STRAPS
In most models, the lower deadeyes are fitted into “deadeye loops” which are inserted into gaps in the outer edge of the “Channel”. Once the complete row of deadeyes are installed a capping strip is fixed along the front.
From the bottom of the deadeye loop either a straight ”Deadeye Strap” or a “Chain Strap” goes to the side of the hull at a lower level. The style of this fitting will depend on the period to which the particular ship belongs and also the price/ quality of the ship being built.

There are several points to keep in mind when setting up these “deadeye assemblies”
The deadeye strap (or chain strap) is rarely, if ever, perpendicular. Rather, it should be at an angle which is an extension of the angle of the shroud which will eventually be attached to the deadeye above it. The diagram on the left of this page should make that mouthful clearer!!
The lower deadeyes, the ones being attached at present, should be placed so that the three holes are positioned with the lowest one being the centre of the three. When at a later stage the upper deadeye is fitted, it is equally important that the centre hole is the highest of the three. Refer to the diagram on the right-hand side of this page.

These together with the “forestays” and “backstays” are the ropes that support the masts. Shrouds, which are the group of ropes to which the ratlines are attached, are made up in pairs with a deadeye at each end of a single rope.
First cut a piece of cord to an appropriate length and with the help of an alligator clip or a small clamp glue one end around a deadeye. This deadeye should then be temporarily connected to the front portside (left hand) lower deadeye using a wire jig. This jig will provide the correct spacing between the upper and the lower deadeye.

The loose end of the rope then goes up, around the mast and down to the position of the lower deadeye immediately behind the first. Using glue, alligator clip and another wire spacer, the upper deadeye is attached to the shroud. At a latter stage, the double thickness of cord immediately above the upper deadeye will be bound with fine thread as shown as shown in some of our diagrams. The “Lanyards”, made of the thinnest rigging cord, are then installed as shown in the adjoining drawing. Because on the “real thing” the lanyards were constantly used to take up tension on the shrouds they were never tarred and should not be black.
Once the first pair of shrouds has been completed, the exercise is repeated on the other (starboard) side, then, back to the port side and so on.
If, when the others have been done there remains a single lower deadeye on each side then the final pair of shrouds goes from one side of the ship to the other with a large seized eye around the masthead. In all of this, it is important to ensure that the deadeyes are in straight rows parallel with the channels and with each other.

SEQUENCE OF SHROUDS

The forestays should now be fitted paying attention to the particular fittings used. Quite commonly “heart deadeyes” and lanyards will be used for tensioning purposes.

These are always rigged with a large seized eye around the masthead as with the “odd” shrouds (if any). As with the shrouds they are rigged with deadeyes and lanyards but the upper deadeye will normally be at a higher level than that of the shroud deadeyes.
The colour of the ratline cord is grey or fawn. The tying of ratlines can be fairly tedious but it is worth going to some trouble to ensure that it is done well. Among the points to keep in mind are:
- They should not be too tight otherwise they will pull the shrouds together.
- They should be parallel to the waterline.
- On the “real thing” the spacing between each row was about 400mm so, on a model at a scale of say 1:50, the gap would be approximately 10mm.
- Avoid tying knots tightly until all the ratlines are in place. This will allow some “fine tuning” before placing a tiny dab of glue on each knot. Placing a sheet of white plain paper behind the shrouds will assist with gaining contrast to make the tying of the ratlines a tad easier on the eyes.

ATTACHING RIGGING LINE TO BELAYING PINS
The adjacent diagram demonstrates clearly the method best used to attach the cord to the belaying pins.
If you have any difficulties determining which belaying pin a rope is intended to go to, a good rule of thumb is that the higher up the mast it starts then the further back it finishes.

ROPE COILS
Plenty of rope coils draped over the belaying pins provide a finishing touch. These can be made from odd lengths of offcuts. If placed into the shapes you require they can be (fixed) permanently by using hair lacquer or nail polish.
WHAT SIZE ROPE TO USE
In the plans or in the instructions there should be a key or description of the size of cord to be used for various purposes. In the unlikely event that no indication is given, then the following can serve as a guide:
Forestays & Anchor ropes – Heavy cord
Shrouds & Backstays – Medium cord
Ratlines & Running Rigging – Lightest cord
RUNNING RIGGING
Once the standing rigging has been completed you can now start the Running Rigging. You will have enlarged the holes in the blocks which are already in place. Do the same with all other blocks as you come to use them.
When threading cord through blocks, you will find that a needle threader (available from sewing shops) will be very handy. Also, a smear of super glue on the end of the cord can stiffen it and make it easier to thread. Work from the centre of the ship out and try to avoid locking yourself into difficult positions. A Rigging Tool presented in the Tools section of our Catalogue will be helpful when rigging.
The various names for the Running Rigging are presented below.
- Fore brace
- Fore lower topsail brace
- Fore upper topsail brace
- Fore lower topgallant brace
- Fore upper topgallant brace
- Fore royal brace
- Fore skysail brace
- Fore yard lift
- Fore topsail yard lift
- Fore topgallant yard lift
- Fore royal yard lift
- Fore skysail yard lift
- Main lower topsail brace
- Main upper topsail brace
- Main lower topgallant brace
- Main upper topgallant brace
- Main royal brace
- Main skysail brace
- Main yard lift
- Main topmast yard lift
- Main topgallant yard lift
- Main royal yard lift
- Main skysail yard lift
- Mizzen yard brace
- Mizzen lower topsail brace
- Mizzen upper topsail brace
- Mizzen lower topgallant brace
- Mizzen upper topgallant brace
- Mizzen royal yard brace
- Mizzen skysail yard brace
- Mizzen topmast yard brace
- Mizzen topgallant yard lift
- Mizzen royal yard lift
- Mizzen skysail yard lift

Source: “Ship Modeling Simplified” by Mastini Pages 145 –146
TYPICAL RUNNING RIGGING APPLICATIONS

NAMES OF MASTS & SPARS
- Fore lower mast
- Fore topmast
- Fore topgallant mast
- Fore royal and fore skysail mast
- Main lower mast
- Main topmast
- Main topgallant mast
- Main royal & main topgallant mast
- Mizzen lower mast
- Mizzen topmast
- Mizzen topgallant mast
- Mizzen royal & mizzen skysail mast
- Fore topsail yard
- Fore upper topsail yard
- Fore lower topgallant yard
- Fore upper topgallant yard
- Fore royal yard
- Fore skysail yard
- Main lower topsail yard
- Main upper topsail yard
- Main lower topgallant yard
- Main topgallant yard
- Main royal yard
- Main skysail yard
- Crossjack yard
- Mizzen lower topsail yard
- Mizzen upper topsail yard
- Mizzen lower topgallant yard
- Mizzen upper topgallant yard
- Mizzen royal yard
- Mizzen skysail yard
- Gaffsail boom
- Flying-jibboom
- Martingale boom, dolphin striker

Source: “Ship Modeling Simplified” by Mastini Pages 142 –143
Learn The Art Of Building A Model Ship
Get started in wooden model ship building today
Join 18,543 other modelers to hear about specials, new products and modeling tips
- Become a Member
- Modeling Hub
- Model Ship Building
- Maritime History
- Affiliate Program
Information
- Terms & Conditions
- Privacy Policy
Copyright © 2023 Modelers Central. ABN: 31 114 830 732
- Claim 10% Off First Order
- Get 5% off ALL orders with a Membership
- Gift Vouchers
- Help & Advice
Modelers Central. 2023, All rights reserved.
- Claim 10% Off Your First Order
- Get 5% Off All Orders With A Membership
Get 10% off
Your first order.
10% off applies only to full-price items. By providing your email address, you agree to our Terms & Privacy Policy
10% off applies only to full-price items. By providing your email address & mobile number, you agree to our Terms & Privacy Policy and consent to receive marketing messages from Modelers Central at the addresses provided. You can unsubscribe at any time by replying STOP.

How to Sail an RC Sailboat – Step by Step Instructions – 5 Minute Read

Affiliate Disclaimer
As an affiliate, we may earn a commission from qualifying purchases. We get commissions for purchases made through links on this website from Amazon, the Ebay Partner Network (EPN) and other third parties.
Sailing an RC sailboat is fun, but it takes some practice before you get good at it. I certainly needed it when I started! If you want to take your interest in RC model boats to another level, then you should consider learning how to sail an RC sailboat.
However, learning how to sail RC sailboats requires patience and perseverance. There are several things that you need to master before you can begin sailing. This article will teach you how to sail a radio-controlled sailboat.
Read on below to discover tips that will avoid failure in learning how to sail model sailboats, that apply to all size boats.
Step by step Instructions
How does a yacht sail, how are the sails and rudder of an rc sailboat moved, moving forward in a straight line, sailing into the wind, sailing away from the wind, final thoughts.
First, here’s a summary step by step approach to learning how to sail an RC sailboat:
- Consider joining a local club ( USA UK ) where you’ll find lots of helpful RC sailors and RC sailing events that will help you learn. You may even be tempted to get into RC sailboat racing.
- In any event, choose a day with a gentle, consistent, light wind, preferably with the wind direction towards you, just in case you lose control of your boat.
- Find a medium-sized lake or pond, and avoid rivers or the sea, where there may be strong undercurrents. A local club will have a safe sailing area. Look out for areas that may have weeds or reeds, or shallows that could strand your boat. Remember to factor in the depth of the keel, which, on most model sailing boats, is significant.
- Check you are able to sail in your chosen area – ie no prohibitions – and keep clear of swimmers, people fishing, full sized boat traffic, and wildlife.
- Avoid days when it’s busy in your sailing area with other modelers until your sailing skills are such that you can feel confident.
- Set up your RC sailboat on its stand, and check the rigging is as it should be according to the boat’s instructions. Ensure you have brought the boat battery pack charger, the batteries are charged, and you have spare AA batteries for transmitter. Turn on the transmitter, and test that the rudder control and sail servos are all working properly.
- Ensure you understand the basics of sailing, set out below, before launching your RC sailboat. Keep a keen eye on how your boat reacts to the wind, and be ready to react in turn by altering the sail angle to maintain the boat speed as far as possible.
The first thing you’ll need to know is how does a yacht sail? An rc sailboat sails just like a full size yacht. The wind energy pushes against the sails and flows over them, creating a difference in wind pressure on each side of the sail, which is translated to forward movement by the keel of the boat. Without the keel, the boat would be pushed in the direction of the wind.
To keep the yacht moving forward, the sail angle to the wind is adjusted depending on the position of the boat. Paradoxically, a sailing boat can sail into the wind, as well as with the wind. The only direction that can’t be sailed is with the wind directly in front.
The direction of the boat is adjusted by the rudder, which is at the back of the boat.
The following diagram shows the sail angles at different points of the wind:
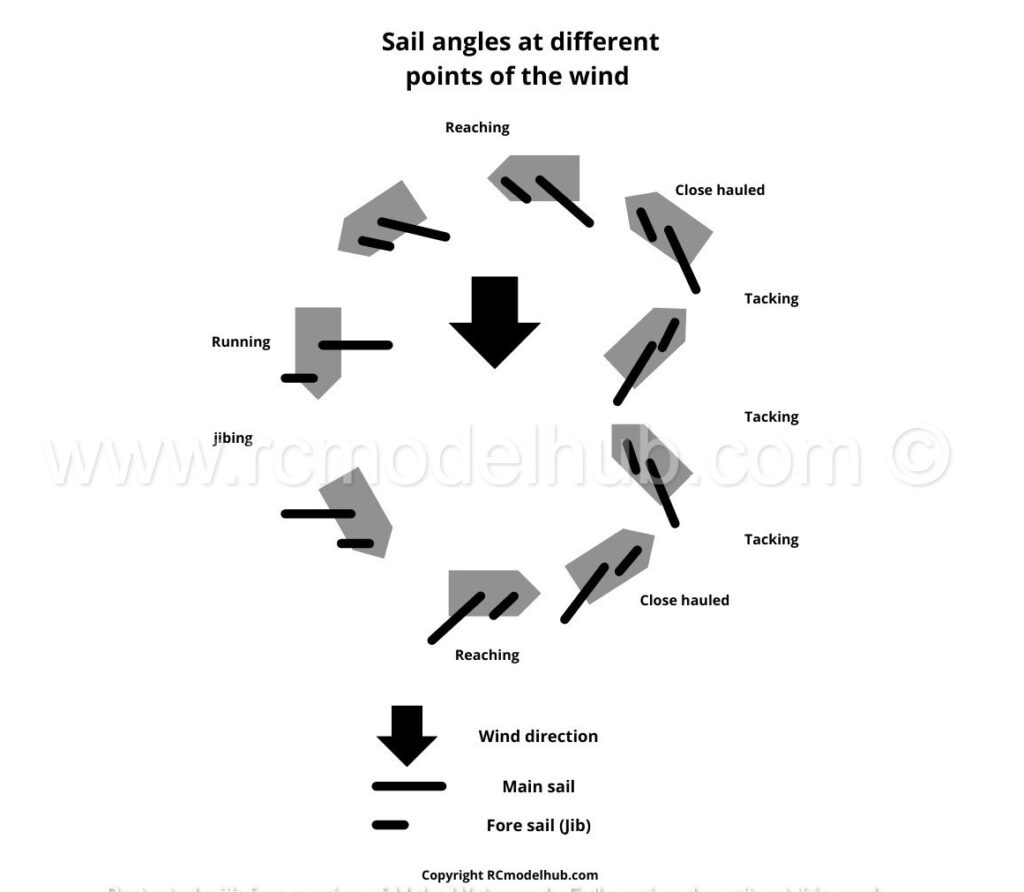
As a beginner RC sailing boat helmsman, many of these terms will be confusing to you, but they will soon become familiar.
The controls of an RC boat are explained in more detail in t his article , but basically, the hull (body) of the boat contains batteries that power servos which in turn move the rudder, the main sail, and the fore sail (the “jib”). The servos are controlled by a receiver, that takes commands from the RC transmitter which you hold in your hand. Here’s a short video that explains the transmitter controls:
How to sail an RC sailing boat
First, the basic skills. With the boat in the water, start with the wind half way between the front (bow) of the boat, and the side (beam). Keeping the rudder straight, trim (move) the sails so that they are close to the hull (close hauled) and the boat should move forward. If the wind is gusty, or very strong, move your transmitter control to let out the sails, spilling the wind, to keep the boat from keeling over.
If you’re sailing into the general wind direction, you’ll need to learn to “tack”, which involves turning the boat from a position where the wind is coming on one side of the bow, through the head-on wind, to end with the wind on its other side. This is achieved by moving the rudder to turn the yacht, whilst changing the angle of the sails to the wind – see the diagram above.
So the boat moves forward via a zig zag course.
As the boat turns into the wind, it slows, so this maneuver should be completed as quickly as possible, otherwise, the boat could get stuck with the sails flapping – this is called being “in irons”.
If the direction you wish to sail in means the wind is behind the boat, it is called running before the wind. In this case, turning the boat involves “jibing”, which is the opposite of tacking.
To change direction whilst running with the wind, move the rudder so the wind goes around the back (stern) of the boat and haul the sails in. As the boat comes round, the wind will move from one side of the sails to the other.
If this is not done smoothly, it could cause the sails to violently move in the opposite direction, possibly causing damage and maybe even capsizing the boat.
So those are the basics of learning how to sail an RC sailboat. As I’ve said above, the best way to refine your skills is to get out on the water and practice.
if you have any interest in remote control sailing but aren’t sure where to begin, use the step-by-step guide above to learn how to sail an RC sailboat. Once you’ve mastered the basics, you can move on to the exciting world of racing sailboats.
If you’re still considering your first RC beginner sailboat, take a look at our article on beginner RC sailboats , or for the more adventurous, consider building your own RC sailboat from a kit. More about that here .
Image credit Nick Kinkaid
About the author
It all started with a line controlled spitfire 50 years ago….
That turned into a life long interest in models, in particular radio controlled models, but I’ve only got back into it since I’ve been retired. As a result a lot has changed, and I’ve been happily starting afresh, researching into the hobby and finding answers to the questions all beginners have when starting out.
I hope you find some answers to the queries you have, and go on to enjoy all aspects of this fascinating hobby.
Latest posts

VOLANTEXRC P51 Mustang RC Plane Review: A Beginner’s Dream?
I was thrilled when I discovered the VOLANTEXRC RC Plane. This 4-channel WWII RC Airplane, specifically the P51 Mustang model, is truly a beginner’s dream come true. With its ultra-stable Xpilot gyro stabilizer system and 3-level flight control system, it’s incredibly easy to fly, whether you’re a novice or an experienced flyer. The impressive 2.4…

RTF RC planes with SAFE technology: No More Crashes?
RTF RC planes with SAFE technology have revolutionized the world of remote control aviation, offering a new level of ease, control, and safety for both beginners and experienced hobbyists. What a change from my early days of flying RC planes, when you fully expected to come home with your plane in bits! These innovative aircraft…

Top Race RC Plane TR-C385 Review: Stunt Flying Delight
I recently had the chance to test out the Top Race 4 Channel RC Plane TR-C385. It surpassed all my expectations. Designed for adults and older kids, this ready-to-fly airplane offers an exhilarating stunt flying experience. With precise control and maneuverability, thanks to its 4-channel system, this RC plane is a great starter or intermediate…
COMMENTS
Sails are the only means to propel a RC yacht that's why a lot of attention is needed building the sails. Anyway it is not difficult to build well cut and working sails. The more experienced the sail maker gets the better the sails work. This guide is intended to help newbies to cut heir own sails and build their own rigs. Sailmaking Tips:
Install and rig the booms and gaffs. Make the sails based on the actual layout of my ship. De-rig the booms and gaffs, and remove them from the ship. Attach sails to the booms and gaffs as appropriate. Re-install the booms and gaffs, and their rigging. Add the additional rigging for each sail.
Easy Tutorial for Ship Modelling: Creating Realistic Sails in 1/72 Scale 🚢🔍Learn how to create lifelike sails for your wooden ship model with this simple t...
Patreon: https://www.patreon.com/user?u=18274359Hello guys how are you?A lot of guys asked me how i did my sails on my Revell 1:225 HMS Victory full build vi...
The book 'Making Model Yacht Sails' by Larry Robinson is recommended reading for anyone wanting to learn how to make competitive rc yacht sails - it describes the mould method of shaping sails used by the top sailmakers and is a contemporary masterclass in its own right. It is stocked by SAILSetc,
Make sure to read the whole description. There's some useful stuff further down!Here's my method for creating sails for ship models using silkspan. Parts 1...
Larry Robinson - Making Model Yacht Sails - how to build in their shape, a master class in sail making for modern rc model yachts. Around 700 copies sold by mid 2015 and still going strong. If you want to know how to make well shaped rc model yacht sails, and make them efficiently and consistently, this contains all you need to know.
Almost any material used for scale model sail making is, by definition, too thick. With furled sails, though, it's possible to compensate for that problem by reducing the sail's depth - and thus the size of the bundle. A favourite material for furled sails is "silkspan" tissue, subjected to a special (but quite simple) treatment.
The recut seam looked better, wrinkle-wise. I have 2 seams in the sail, at about 1/3 luff and 2/3 luff, trying to get draft into the sail (and some practice with the gadget). I did not recut the upper seam - the wrinkles don't seem to hurt the performance. The Tyvek sail, with 1 gadget seam, looks very nice, and sailed well too.
the sail to take on a slight "billow" when installed. When the sails are first cut, a generous border is advisable (at least an inch). Paper patterns are made and test fitted on the model for proper fit. A carefully drawn pattern is then made, which shows all the individual panels of the sail. Don't forget to add a
Cut 1/2 in outside of template for tablings on the luff and foot. Rub them up as on the mainsail. The stitching should be laid out as in the mainsail, two rows on luff and foot and one on leech. Let the edge row run around head and clew for 2 in as on leech of main. Battens are not needed on this sail.
SAIL MAKING FOR MODEL YACHTS by Ben Morris (last edited 15/07/2021) Shape in Sails: Building Board: Making Seams: Set the Seam Curvature: Making a Sail: Sail Material: Diagonal Seams etc: Back to Intro page: Setting the Sails: The Claudio Tool: Measuring Procedures:
Product Description. Larry Robinson - Making Model Yacht Sails - how to build in their shape, a master class in sail making for modern rc model yachts. Around 700 copies sold by mid 2015 and still going strong. If you want to know how to make well shaped rc model yacht sails, and make them efficiently and consistently, this contains all you ...
Three-part video on how to make paneled sails for radio-controlled sailboats.
Sail Making Articles. We have several articles related to sails and sailmaking. The first is a short discussion of theory: The Design of Model Yacht Sails by A.M.Ballantyne. We then move on to the most complete set of instructions on how to sew a set of sails from cotton: "Sails" by Walter K. Moss from The Modelmaker, 1940. The next article discusses the one thing that is possible on a ...
Close both ends of the tube with 2mm long cuts from the 5mm brass tube and solder in place. Use 8mm OD aluminum tube or anything similar for the booms. Find an aluminum rod whose OD fits the ID of the aluminum boom tube. Using a hack saw, cut a slot and make a snug fit with the flattened end of brass rod.
Work step by step. 1.Make paper stencil for each sail and check it's dimensions on your model. 2.With soft pencil transfer all lines in to fabric - add stripe 5-7 mm around. sail edges. 3.Make all necessary lines on fabric using sewing machine and thin thread with light brown or beige color.
Once you have outlined your pattern onto your material, including battens and seams, you may now cut out your pattern. When creating a seam with shape, you want the shape to be about 35% from the luff. 3. Stitch the materials. Move from panel to panel while leaving extra cloth at the external edges of the sail.
For the most inaccessible blocks, insert a short piece of thin rigging cord through the hole and glue it to itself forming a loop. Later, when you wish to insert the permanent running rigging you cut the loop, glue the new cord to one end and pull it through the hole using the other end of the pilot cord.
In this issue, I show my technology of making sails for scale sailboat models:I like three-dimensional (wind-filled) sails...With wrinkles in the corners of ...
Moving forward in a straight line. First, the basic skills. With the boat in the water, start with the wind half way between the front (bow) of the boat, and the side (beam). Keeping the rudder straight, trim (move) the sails so that they are close to the hull (close hauled) and the boat should move forward.
About Press Copyright Contact us Creators Advertise Developers Terms Privacy Policy & Safety How YouTube works Test new features NFL Sunday Ticket Press Copyright ...
In this video I will show you how to make a wooden model sail boat. I will also show you some tips and tricks. How do you build a model boat. How to build a ...