
Swageless Mechanical Fittings or Swage Terminals…

…Which do you prefer?
When talking about wire standing rigging for sailboats, there are two primary ways to secure a fitting to the end of the cable, the swage fitting and the mechanical fitting. One requires a specialized, expensive machine (pictured below) that is used to essentially squeeze or hammer the fitting onto the wire, this is called the swage fitting. The other simply requires the use of some wrenches (a vise is a great tool here too), some thread locker, a bit of patience, and some experience wouldn’t hurt either ;0). The latter is referred to as the mechanical or swageless fitting.
SWAGE FITTINGS:

Yes, there a few other types of swaging techniques which we might save for another time. One of which we commonly refer to as the “Nico Press”, a generic term. This is an entirely different ‘box of frogs’ all together. If you are interested read more on that here , written by our friends at Sailing Services .
[youtube https://www.youtube.com/watch?v=cLM-crQeN-A&w=560&h=315]
SWAGELESS (MECHANICAL) FITTINGS:

Our favorite high quality mechanical or swageless terminal manufacturers are: Hayn Hi-mod and Stalok . Let us not forget Noresman (Navtec), one of the more popular fitting manufacturers on the market up until recently, as they have since shut down production. A mechanical fitting is typically a three part fitting (sometimes four) . This type of fitting does take a bit longer to execute than the swage fitting, even by the most experienced of rigging technicians. The real bonus here is it does not require a ridiculously expensive machine. Which makes it a very appealing product for the DIY project.
.[youtube https://www.youtube.com/watch?v=QTGB_kfTxUg&w=560&h=315]
PROS AND CONS:
There does appear to be some controversy about which type of fitting is better, so I’ll try to clear things up a bit. Let’s take a moment to talk about the pros and cons regarding these two styles of wire terminals. Swage fittings require one of these expensive machines, so you will likely have to pay someone to do it for you. Whereas Mechanical fittings can be the perfect solution for the DIY sailor. Swage fittings are substantially less expensive than mechanical fittings. For example, a swage stud for 1/4″ wire with 1/2″ thread retails for around $25 and the comparable mechanical fitting retails around $75. Multiply that times the amount of fittings you’ll need and it can make quite a difference in price when replacing an entire rigging set.

Having said all of that, a properly made swage fitting will last about 7-20 years or roughly 25,000 nautical miles, depending on geographical region and use before replacement is recommended. Regular inspection , regardless of fitting choice, is always recommended with service intervals around every 3-5 years.

We, at TRC, recommend using swage fittings over mechanical fittings when the stay is rigged with a furler, i.e. forestay.
There are also hybrid sets made, utilizing both types of fittings, with Swage fittings at the top of the stay and mechanical fittings at the bottom. This is the meet in the middle solution when price becomes a factor. Also this method is commonly practiced when building new masts.
TRC has had great success with the longevity of our swage fittings over the years {knocking on wood}. I’d say this is attributed to the use of high quality fittings, wire, the right machines, as well as proper execution. We end up selling mostly complete rigging sets using swage fittings. When discussing options with our customers we can really only justify the additional cost of mechanical fittings when the boat is going to endeavor on high mileage journeys. This way the wire can be replaced, the fittings inspected, and re-used with new cones (wedges). One of the other big benefits of mechanical fittings is/was at sea repairs. As the sailor could use wrenches and some Loctite to terminate a new cable at sea if needed, but not without the purchase of some good quality wire cutters (not cheap). With developments in synthetics we think that this problem can be much easier overcome with the use of Dyneema or Vectran . We offer a TRC Spare Stay Kit specifically for this purpose…no tools required!

Either fitting, if not made properly, will have issues and can cause failures. Conversely, when done properly, either of these fittings will provide the boat and its crew with many years of trouble free service. With either fitting, given that they were executed properly, age, geographical location, and wear are the biggest enemies for standing rigging longevity.
RIGGERS TIPS FOR MAKING UP SWAGELESS TERMINALS :
First, when choosing a mechanical fitting ensure that it is for the correct wire type being used, i.e. 1×19 , 7×19 , and dyform/compact strand . you’ll need to disassemble the mechanical fitting (with sta lok you can leave the former inside of the fitting) and then read the directions which should be included (or can be found online). the general gist for any mechanical fitting (regardless of manufacturer) goes as follows: start with a nicely cut end of wire. then the socket portion of the fitting gets slipped onto the wire..

Next, the end of the wire must be unlaid evenly (the tricky part), so that the core strands are exposed and the cover strands are evenly splayed open.
Once that is done, the cone (or wedge piece) is pushed onto the core strands. with the outer wires surrounding the cone evenly, work the socket back up to the end of the wire, and re-lay the cover strands onto the core. do this until the outside strands protrude from the end of the socket evenly and parallel (as pictured below), and the socket cannot slide up any further., this is all done while keeping the cone (or wedge) appropriately submerged below the end of the cut wire by the recommended amount. the amount of core stick out varies by fitting manufacturer, so read the directions and follow the guidelines closely. the outer wires cannot be flared out (see diagram 2) and must be parralel or curved-in slightly. you will not be able to assemble the fitting properly (or at all) if you don’t get this step right. now, (unless using a hi-mod fitting for which you will need to rig their “crown ring” in place) you are ready for the fitting to be screwed together and to form the wire. to do this we use loctite primer and red loctite to help lubricate things as shown in the video above., warning: stainless on stainless will gall (or cold weld) with too much friction and you’ll have a fitting that can’t be screwed-on or off. , once screwed down completely we recommend that the fitting be unscrewed again before the loctite activates (so hurry depending on temp) and checked for proper forming of the cover (outside) strands. lastly, if all looks to be fine, we coat the threads with more red loctite and then screw it back together tight some manufacturers recommend the use of sealants along with loctite into the fitting before the final assembly to mitigate water intrusion and to help secure things. recently it seems that most manufacturers are getting away from this, perhaps because of oxygen deprivation causing corrosion. so again, please follow the instructions and guidelines that come with the fittings that you have., …so there it is in a nutshell. as i always say, seek the council of your local rigger for product specific information as well as any tips and tricks so that you have it right., thanks for the read and leave us your comments below ., similar posts, first ac 72.
Well, Team New Zealand did it. Check out the footage of the new AC 72 revealed and christened in the city of sails Auckland, NZ. Man, those things are going to be fast. It’s okay to fast forward as I did to cut to the chase. Do they really expect us to sit through 15 minutes…
A Most Destructive Leg – VOR
Video highlights of a disastrous leg 5. Mar Mastro was the only boat to escape with no damage. Now that all boats have arrived in Brazil (one way or another), let’s take a look and review…… [youtube http://www.youtube.com/watch?v=qE1ebE34lac&w=560&h=315]
Deck Tie Downs
What is a deck tie down? A deck tie down keeps the deck from being pulled up on keel stepped masts, where the mast does not sit on the deck. When the halyards are led aft via turning blocks attached to either the mast collar or the deck surrounding it, the deck will try and…
V.O.R. Take a Final Look….
A documentary highlighting the best footage from the 2011-2012 Volvo Ocean Race. This one deserves to be in your sailing vid archives. Take one last 1 hour trip with these boats and their crew. The race started in Alicante, Spain in October 2011 and concluded, around the world, in Galway, Ireland in July 2012. The teams sailed some…
Take a Break from Your Cyber Monday!
[youtube http://www.youtube.com/watch?v=T4Cj-wztyMI?list=SP4D2712YsGHLERzC9eKTGN9WqlAP4qusk&hl=en_US&w=560&h=315] If you need to give your mind a break for a few minutes from the stress of online shopping, then kick back, relax and press play. Enjoy these highlights from day 16 of the Vendee Globe Challenge. The worlds very best sailors challenge each other in these high speed racing machines as they…
The End is Near…
The Vendee Globe challengers are approaching the end, which may come as early as this weekend. However, the drama has not stopped. Jean-Pierre Dick (still in third but surely to be passed soon), has broken his keel, but is puttering along at a measly 11 knots. The skipper of Virbac -Paprec 3 has yet to…
Leave a Reply Cancel reply
Your email address will not be published. Required fields are marked *
Save my name, email, and website in this browser for the next time I comment.
11 Comments
This is not a comment but rather a product request. I need 4 U-shaped toggle jaws which are part of the standing rigging on my 30′ Hunter sloop. They are 2 1/4″ overall length by 1″ wide. They hold a 1/2″ diameter by 1″ slug at the top of solid threaded rigging. Any direction you can give would be appreciated. Bob Carr [email protected]
Thanks for the question. I think I know what you are after, but please email us an image at [email protected] . We can likely decipher your needed item once you send us a pic to confirm.
Cheers, ~T.R.C.
Thanks for your directions and tips on mechanical fittings. I have to change out the two forward port and starboard standing rigging because of on the port side of the mast below the shroud is pulling out. I will drill new holes, compression fitting inside with a lap patch over the outside of the mast. Once that is done will install one ear on each side to take the pin for the new Hi-Mod Mechanical fittings. I do hope I measure correctly as where I will be doing this besides up the mast is in a place with not many parts so taking it all with me in the next week.
I will try my best to take photo but I am doing all this single handed so may not take as many as I should.
I used a lot of Stalok fittings for a (not boat-related) job, and although they are straight-forward I found them rather tedious to make-up. For that reason alone I chose to try Hayn Hi-MOD for my boat, and ohmigosh they are fast and easy compared to the Stayloks! I started off with one: had a kinked shroud – it was easy to run a new shroud with a swaged stemball fitting and put the Hayn fitting on the bottom. Great! My boat was missing two shrouds so I did two more – easy peasy!! Next time I renew the shrouds I’ll do them all!!!
Fast forward a few thousand very stormy miles later (why me??): I pulled the mast and couldn’t remove those three shrouds because the crown rings and wires were STUCK inside the fitting housing. I tried all sorts of penetrating oils, heat, banging, LOTS of heat … and by then the fittings and wire were so abused they were no longer seaworthy so I let everybody (riggers included) try anything they wanted. The boat needs all new shrouds before I go offshore again and when I cut those fittings off I’m going to send them to Hayn and ask for a refund. :-(
It would have been interesting to have had a Staylok fitting or two on the boat for comparison. I really like the Hayn Hi-MOD fittings, but can’t recommend them for blue water (ab)use – I’ll stick with swaged fittings. Plus, with the advancements and reliability of synthetic rigging that’s a MUCH better way to go for emergency repairs and having spare shrouds aboard. And lookie! Someone has already invented a ready-make spare stay kit!! Brilliant. :-)
Very interesting story about those crown rings. To be honest we haven’t had to take many apart as they are relatively new to the US market still. Well about 10 years now (If I really think on it), man time flies. Thanks for the heads up though. I will keep an eye out next time we take one apart.
Priscilla I would like to send you one of our shirts if you like. What Size are you and what is your shipping address?
…and let us know if you need one of our spare stay kits or more information on them.
Serious bummer about the Hi-MODs, one would be ho-hum, but all three?! All are on 3/8″ upper spreader shrouds (dbl spreader cutter rig), two port one stbd, five or six years old (yeah where does the time go?), installed at different times on wires from different rigging companies. Not sure when I’ll pull the mast again, hopefully within a year. I want so much to cut one in half to look, but Hayn needs to figure out the problem and fix it so (unless they say otherwise) I’ll send them all three. You read it here first so of course I’ll keep TRC posted … and I won’t forget, women never forget anything, and don’t argue about that because we are always right. :-D
Ooh, a shirt! I’ll proudly be a walking billboard for TRC – this is a very impressive web site, educational, good annotated pictures – a true (sailing) community service. I’ll wear your shirt to our boat show next month – the local riggers will find out I’m cheating on them. hahaha!
..Can’t wait until everybody sees your new shirt :-0
Great tips! Thank you. I always learn lots when I read your posts. :)
Thanks Viki. I was wondering how you fared down there through that rough weather? Is everyone safe?
Having a few issues with big earthquakes at the moment… but we are ok :)
Good to hear. I heard that it was very close to where sent those shirts! ~T.R.C.
Username or Email Address
Remember Me
Lost your password?
Review Cart
No products in the cart.
- Privacy Overview
- Strictly Necessary Cookies
This website uses cookies so that we can provide you with the best user experience possible. Cookie information is stored in your browser and performs functions such as recognising you when you return to our website and helping our team to understand which sections of the website you find most interesting and useful.
Strictly Necessary Cookie should be enabled at all times so that we can save your preferences for cookie settings.
If you disable this cookie, we will not be able to save your preferences. This means that every time you visit this website you will need to enable or disable cookies again.

- Lines & Rigging
- Sailboat Standing Rigging
Swage Terminals

Johnson Marine Stanchion Terminal 1/8

Johnson Marine Stanchion Terminal with Solid Button 1/4

Johnson Marine Stanchion Terminal with Solid Button 3/16

Johnson Marine Stanchion Terminal with Solid Button 1/8

Johnson Marine Stanchion Terminal with Solid Button 5/32

Swaging & Rigging Services
We not only connect all of our fittings on to the wire rope for you but we will also special order any other fitting we may not have in stock to custom make exactly what you want!
Swaging Labor Charges Machine swage terminals
Larger sizes available, please call for quotes.
Swaging of all machine swage terminals is done with a hydraulic-compression swaging machine which compresses the fitting on all sides at once. This method is far superior to roller swaging machines that are commonly used. You will not get a "banana" swage! NOTE: Custom swaging is NOT returnable. We'll work with you to assure what you order is exactly what you want and need the first time.
- USA Made Anchor Shackle With Screw Pin
- USA Made Round Pin Anchor Shackle
- Anchor Shackle
- Bolt Chain Shackle
- Bow Shackle
- Chain Shackle
- Long D Shackle w/ Captive Pin
- Long D Shackle w/ Screw Pin
- Round Pin Anchor Shackle
- Round Pin Chain Shackle
- Special Bow Shackle w/ No-Snag Pin
- Special D Shackle with No-Snag Pin
- Stainless Bolt Anchor Shackle
- Straight D Shackle
- Straight D Shackle with Captive Pin
- Twist Shackle (Cast)
- Twist Shackle with No-Snag Pin
- Wide D Shackle
- Wide D Shackle With No-Snag Pin
- Halyard Shackle with Key Pin
- Long D Shackle Shackle w/ Key Pin
- Headboard Shackle w/ Captive Pin
- Stamped D Shackle
- Webbing Shackle
- Survival Bracelet Accessories
- Coarse Thread Closed Turnbuckle Bodies
- Fine Thread Closed Turnbuckles Bodies
- Turnbuckle Body (Forged)
- Turnbuckle Body Cast
- Nuts, Wing & Turnbuckle
- Cast Body Jaw And Eye Turnbuckle
- Forged Jaw And Eye Turnbuckle (Open Body)
- Turnbuckle (Closed Body) Jaw & Jaw
- Turnbuckle (Closed Body) Jaw & Swage
- Turnbuckle (Closed Body) Toggle & Swage
- Turnbuckle (Closed Body) Toggle & Toggle
- Turnbuckle (Open Body-Cast) Eye & Eye
- Turnbuckle (Open Body-Cast) Hook & Eye
- Turnbuckle (Open Body-Cast) Hook & Hook
- Turnbuckle (Open Body-Cast) Jaw & Jaw
- Turnbuckle (Open Body-Forged) Eye & Eye
- Turnbuckle (Open Body-Forged) Hook/Eye
- Turnbuckle (Open Body-Forged) Hook/Hook
- Turnbuckle (Open Body-Forged) Jaw & Jaw
- Turnbuckle (Open Body-Forged) Stud & Stud
- Wire Rope 1 x 19 (304)
- Wire Rope 1 x 19 (316)
- Wire Rope 7 x 19 (304)
- Wire Rope 7 x 19 (316)
- Wire Rope 7 x7 (316)
- Wire Rope Lifeline - 7 x 7 PVC (316)
- Anchor Chain (BBB)
- Commercial Chain
- Lifting Chain
- Stainless Safety Chain
- Proof Coil Chain
- High Test Chain
- Long Link Chain
- Twist Link Chain
- Single Jack Chain
- Double Loop Chain
- Cast And Forged Connecting Link
- Square Quick Link
- Long Quick Link
- Delta Quick Link
- Pear Quick Link
- Clevis Grab Hook
- Clevis Slip Hook
- Eye Grab Hook
- Eye Slip Hook
- Swivel Eye Hook
- Threaded Shank Hook
- Master Links
- Hammerlocks
- Blue Water Cleat
- Stainless Folding Cleat
- Stainless Steel E-Z Push-up Cleats
- Studded Cleat
- Herreshoff Cleat
- Trimline Cleat
- Flagpole Cleat
- Flat Top Cleats
- Lifting Eye Cleat
- Mooring Bitt Cleat
- Bow Chocks, (pair)
- Skene Chocks, (pair)
- Straight Chock
- Bimini Fittings, Deck & Rail Hinges
- Bimini Fittings, Top Caps & Slides
- Bimini Top Cap & Swivel Base
- Rail End Caps (Flat)
- Rail Fittings, Rail Ends
- Rail Fittings, 3-Way Corner
- Rail Fittings, 4-Way Tee and Corner
- Rail Fittings, 60 & 90 Degree Tee
- Rail Fittings, 90 T with Eye
- Rail Fittings, Bow Form & Elbow
- Rail Fittings, End & Center
- Rail Fittings, Rectangular Base
- Rail Fittings, Round Base
- Rail Fittings, Take-Apart Slides
- Rail Tubing
- 6 Inch Deck Access Hatch
- Hinges, Door - Equal & Unequal
- Flush Hinges For Both Doors and Tables
- Hinges, H.D. Flush Strap
- Hatch Hinges
- Hinges, Heavy Duty Offset Door
- Hinges, Strap & Butt
- Hinges, T Strap
- Hinges, Take-Apart
- Hose Deck Fills
- Teak Platforms
- White Poly Swim Platforms
- Through Hull Fittings
- Chain & Deck Pipe
- Stainless Steel Rub Rail Ends
- Stainless Steel Rub Strakes
- Stainless Fairlead and Gasket
- Brackets, 90 Degree Angles
- Door Stop & Catch
- Holders, "Holdall" Spring Clamps
- Holders, Boat Hook Holders
- Hooks, Awning & Fender
- Hooks, Cabin/Clothes
- Barrel Bolt
- Brackets, Folding Table
- Hasps, Padlocks and Locking
- Hatch, Flush Deck Latches
- Hatch, Flush Lift Rings
- Winch Handle Holder
- Utility Wall Clip
- Hawse Deck Pipes
- Transom Drain Plugs
- Floor Drain Plate/Vent
- Louvered Vents
- Antenna Mount, Adjustable Rail
- Antenna Mount, Rail/Surface
- Antenna Mount, Ratchet
- Fishing Rod Holder, Flush Mount
- Fishing Rod Holder, Removable
- Fishing Rod Holder, Side Mount
- Four Tube Fishing Rod Holder
- Stainless Steel Rod Holder, Rail Mount
- Flag/Pennant Staff, Bow Rail
- Folding Boat Step
- Lights, Navigation
- Bow/Stern Eye, U-Bolt
- Fender Hook
- Microphone Clip
- Shore Power Cable Holder
- Ski Tow Ring (Transom Mount)
- Pintles & Gudgeons, Dinghy/Keelboat
- Kong Elastic Tethers
- Machine Swage Pelican Hook With Stud
- Swage Domehead
- Swage Marine Eye
- Swage Marine Fork
- Swage Marine Toggle
- Swage Stemball & Cups
- Swage Stud Terminal
- T Terminals & Plates
- Terminal Gate Eye
- Hand Swage Gate Eye (Non-Swivel)
- Hand Swage Joined Gate Eyes (Non-Swivel)
- Hand swage Joined Swivel Gate Eyes
- Hand Swage Lifeline Adjuster
- Hand Swage Pelican Hook
- Hand Swage Short Stud
- Hand Swage Stud
- Hand Swage Swivel Gate Eye
- Hand Swage Toggle
- Hand Swage Toggle Turnbuckle
- Hand Swage Tool
- Mini Hand Swager
- Thimble, Federal Specification 304SS
- Thimble, Federal Specification 316SS
- Thimble, Heavy Duty
- Thimbles, Extra Heavy Duty
- Thimbles, Standard
- Mini Pulley Blocks w/ 1 Sheave
- Schaefer 3 Series Cheek Blocks
- Schaefer 5 Series Cheek Block
- Schaefer 7 Series Cheek Blocks
- Schaefer M-Series Foot - Cheek Block
- Clamp-on Furling Blocks
- Double Blocks
- Double Blocks with Becket
- Exit Blocks
- Fiddle Blocks
- Fiddle Blocks With Becket
- Fiddle Blocks with Cam and Becket
- Lashing Block
- Schaefer 5 Series Single Blocks
- Schaefer 7 Series Single Blocks
- Schaefer M-Series Single Blocks
- Schaefer Series 3 Single Blocks
- Single Blocks with Becket
- Seine (Snatch) Blocks
- Snatch Blocks
- Square Swivel Eye Blocks
- Rope Sheave (Bushing)
- Rope Sheave with Bearings
- Rope Sheave with Bushing
- Wire Rope Sheave with Bearings
- Wire Rope Sheave with Bushing
- Surface Mounted Block with Sheave
- Swivel Blocks w/ 1 Sheave
- Swivel Blocks w/ 2 Sheaves
- Swivel Eye Blocks w/ 1 Sheave
- Swivel Eye Blocks w/ 2 Sheaves
- Wire Rope Clip, 304 Cast
- Wire Rope Clip, 316 Forged
- Wire Rope Clips, Chair Clips
- Bimini/Webbing Clips
- Boom Bails, Heavy Duty - Forged
- Chainplates
- Clevis Pins
- Fixed Snap Shackles
- Aluminum Stop Sleeve
- Aluminum Swage Sleeve
- Cooper Stop sleeve
- Copper Swage Sleeve
- Stainless steel oval sleeve
- Zinc Plated Copper Swage Sleeve
- Suncor Quick Release Pin Style D
- Suncor Quick Release Pin Style M
- Snap Shackles, Cast Jaw Swivel
- Cunningham Hooks
- Downhaul Hooks
- Heavy Duty D Rings
- Rectangular Rings
- Reefing Hooks
- Round Rings
- Tack (Lashing) Hooks
- Triangle Rings
- Stamped Jaw Swivel Snap Shackles
- Swivel Snap Shackles
- Federal Spec. Jaw and Eye Swivel (AN100)
- Swivels, Eye & Eye
- Swivels, Eye & Jaw
- Swivels, Heavy Duty Eye & Eye
- Swivels, Heavy Duty Eye & Jaw
- Swivels, Heavy Duty Jaw & Jaw
- Swivels, Jaw & Jaw
- Threaded Pelican Hook
- Toggle Pins
- 316 Stainless Steel Rigging Toggle
- 316 Stainless Steel Rigging Toggle Traditional
- Triangular Plates
- Additional Buckles (Non-Ratcheting)
- Nylon Webbing
- Over-Center Buckle Assembly With Clips
- Stainless Ratchet Assmeblies With Flat Hooks And 1" Blue Webbing
- With 1" Webbing
- With 1.5" Blue Webbing
- With 1.5" Webbing
- With 2" Blue Webbing
- With 2" Webbing
- With 1" Blue Webbing
- With 2' Blue Webbing
- With 1" Webbing and S Hooks
- With 1-1/2" Webbing
- Ratchet Buckles
- With 1-1/2" Blue Webbing
- Webbing Assemblies
- Delta Link For Webbing
- Double J Hooks
- Web 'Star' Adjuster
- Web Adjuster Slide
- Web Shackle
- Web Threading Plate
- Welded 'S' Hook
- Webbing Kits and Hangers
- Hand Crimp Lifeline Parts
- Lifeline Wire Rope With PVC
- Suncor Quick Attach Lifeline Kits
- Lifeline Wire Rope, Uncoated
- Stanchions & Brace
- Stanchion Base (Suncor - Cast)
- Pelican Hook
- Stanchion Base (Schaefer - Welded)
- Stanchion Caps
- Stanchion Slide with Eye
- Stanchion Ring
- Stanchion & Furling Blocks
- Forged Eyebolts With No Shoulder
- Forged Eyebolts With Shoulder
- 304 Stainless Steel Unwelded Eyebolts
- 316 Stainless Steel Unwelded Eyebolts
- Metric Stainless Welded Eyebolts
- Standard Stainless Welded Eye Bolt
- Cast Lifting Eye Nut
- Forged Lifting Eye Nut
- Machine Eye Bolt
- Lag Eye Screw
- Lag Ring Bolt
- M6 Stainless Metric Shoulder Eye Bolt
- M8 Stainless Metric Shoulder Eye Bolt
- M10 Stainless Metric Shoulder Eye Bolt
- M12 Stainless Metric Shoulder Eye Bolt
- M16 Stainless Metric Shoulder Eye Bolt
- M18 Stainless Metric Shoulder Eye Bolt
- M20 Stainless Metric Shoulder Eye Bolt
- M24 Stainless Metric Shoulder Eye Bolt
- Eyebolts with Rings
- Special Eyebolts
- Asymmetrical Harness Clip
- Harness Clips with Extras
- Heavy Duty Swivel Eye Hook
- Key Lock Spring Clip
- Mooring Hook Kit
- Rounded Harness Clip
- Screw Lock Harness Clip
- Single & Double Swivel Eye Bolt Snaps
- Spring Clip & Eye (Snap Hook)
- Spring Clip & Eye Key Lock
- Spring Clip (Snap Hook)
- Spring Clip w/ Key Lock
- Spring Clip w/ Screw Lock
- Spring Clip w/ Special Gate
- Spring Gate Snap
- Stainless Key Ring
- Trigger Snap
- Unthreaded Shank Hook
- Wide Asymmetrical Clip
- Fixed Eye Snap
- Spring Clip (Wire Lever)
- Swivel Eye Snap
- Asymmetrical Spring Clip
- Double Action Safety Hook, Wichard
- Shock Cord Hooks and Hog Rings
- Anchor Base With Stud
- Heavy Duty Folding Pad Eye
- Hinged/Folding Cast Pad Eye
- Bolt-On Lashing Ring
- Weld On Lashing Ring, Bent
- Stainless Steel Anchor Base With Shackle
- Stainless Swivel Pad Eye
- Stainless Tow Pad Eye
- Stamped Diamond Pad Eye
- Swivel Pad Eye With Ring
- Weld-on Lashing Ring
- Oblong Pad Eyes & Backing Plates
- Pad Eyes, Tie-Down & Footmans Loops
- Heavy Duty/Oblong Pad-eyes
- Stamped Pad Eyes
- Standard Pad Eyes
- Eye Strap Pad Eyes, 2 Hole/4 Hole
- Folding Heavy-Duty Pad Eyes, Forged
- Round Pad Eyes
- Heavy Duty Square Pad Eyes
- Heavy Duty Diamond Pad Eyes
- Large Mast Pad Eyes
- Pad Eyes, Anchor/ Anchor With Swivel
- Pad Eyes, Lifting Ring
- Pad Eyes, Removable Eye Deck Plate
- Side Ring Pad Eyes
- Standard U-Bolt
- U-Bolt w/ Plate (Standard Thread)
- U-Bolt, Bow/Stern Eye
- Long U-Bolt
- Square U-Bolt
- Anchor Points
- Roller Pins
- Stainless Roller Brackets
- Stainless Steel Trailer Tongue
- Stainless Steel Trailer Winch
- Trailer Couplers
- Trailer Hitch Balls
- Trailer Safety Chain
- Trailer U-Bolt
- 12 Volt LED Microstar Lights
- 24 Volt LED Microstar Lights
- LED Tri Star Back Mount
- LED Tri-Star Microstar Light
- LED Tristar Light With Stalk
- Microstar Transformers
- Cutting Tools (Wire Rope & Bolt/Chain)
- Johnson Crimping Tools
- Passivating Fluid
- Stainless Steel Shackler & Bottle Opener
- Steritool Stainless Screwdrivers
- Swage It Swaging Tool
- Stainless Adjustable Wrenches
- Stainless Steel Locking Pliers
- Stainless Steel Spanner Wrenchs
- Hand Riverting Tools
- Steritool Stainless Steel Open End Wrenches
- Anchor Roller, Replacement Wheels
- Anchor Swivel
- Anchor Swivel Multi-Directional
- Anchor Swivel Replacement Pins
- Folding Grapnel Anchors in Various Colors
- Anchor Bracket, Stanchion-Mount
- Anchor Chain Snubber
- Anchor Chocks
- Anchor Tensioner, AT3 Anchor-Tite
- Chain Stopper
- USCG Chain Stopper
- Galvanized Folding Grapnel Anchors
- Horizon Claw Stainless Steel Anchors
Bestsellers
- 1/8" Stainless Steel Delta Quick Link
- Stainless Steel WIRE ROPE 316, 7x7, 1/16", Per Foot
Authentication
- Forgot password?
~ Back to T-Ball Backing Plates ~
~ Back to Tangs Main Page ~
~ Back to Rigging Main Page ~
SAIL | KAYAK | SUP
416 251-0384
Contact Online
- Wire Rigging
Stays, Swaging, and Nicro Press

The Standing Rigging (shrouds, forestay, backstay) of your sailboat are critical components and need to be inspected and maintained. Each wire should be checked for loose strands and breaks along the entire length of the wire with specific attention to the end fittings and anywhere it comes in contact with other rigging (ie. spreaders). Each fitting should be inspected for wear and the assembly should be replaced if there is significant wear, stress cracking or if the fitting hole has become oval.
Wire running rigging is also subject to wear and should be inspected often. wire to rope halyards are the most common wire running rigging but adjustable forestays, vangs, and backstay systems can also have wire components. the wear normally found on wire running rigging is broken strands at the fittings and along the length (often referred to as meat hooks) of the wire that passes around a sheave. as the wire wears the small broken strands along the length can catch clothing, skin, and sails resulting in small injuries, discomfort, and chafe. broken or worn strands significantly reduce the strength of the wire and should be replaced., swaging and nicro pressing.
Fogh Marine can perform either Nicro Pressing or Machine Swaging on most types of rigging wire. Unfortunately, our swaging machine is not capable of working with rod rigging and we do not sell 'hand swage' fittings.
Nicro Press Fittings : Are used to put loops or stops in a wire. The two primary fittings are a stop sleeve which fits the diameter of the wire and an oval sleeve that allows two wires through. This is a common fitting found on many dinghies, catamarans, and daysailers. Ideal for lower load applications and very convenient as there are many hand tools available. Fogh Marine can nicro press wire from 1/16" to 3/16"diameter.
Machine Swage Fittings: Are compressed on a wire using a Swaging Machine. There are many different fittings available and the mechanical joint between the fitting and the wire is much stronger than a nicro press. This style is found on many boats from dinghies to mega yachts. Ideal for standing rigging but requires a specific tool and is not a do-it-yourself option. Fogh Marine can swage wire from 3/32" to 3/8" diameter. For larger jobs Fogh Marine can swage wires at your location.

Ordering A New Wire From Fogh Marine
There are three methods you can use when ordering a new wire from us..
Option 1 - Build from Existing
The simplest method is to bring in to the store or mail us the wire you want to replace. Cam will look at your existing wire and wire fittings and give you a quote for fabrication. He will incorporate any changes you may want to the fittings or length in the quote. Once you have approved the work he will build your new wire for you.
Option 2 - On Site Inspection
This option is only available in the Greater Toronto Region. One of our staff will come to your boat and measure the wire to be replaced. The site visit is charged at $80/hr including travel time from Fogh Marine. It is not possible for us to accurately measure stays attached to a mast when it is stepped on the boat but, if you are not confident that you can get the length or fittings right and are unable to get it to us, we are happy to examine the rigging when the mast is off the boat. Once we have the specifications Cam will quote you for the job and, upon approval, build your new wire.
Option 3 - Send us your specifications
If you know what you need or are able to accurately measure your wire and choose the correct fittings, you can Contact Us the wire length and fittings and he will quote the job and, upon approval, fabricate the wire to your specifications. We are happy to help you with this process and are often able to help choose fittings based on photographs of the existing ends.
Please read the information below for items to include in your specifications.
Measuring Your Existing Wire
The most accurate way to fabricate a new wire is to bring us your existing one. leave the turnbuckle set to at the tensioned position and fogh marine will build a new wire using hardware that is as close a match as possible to your existing fittings..
There are times however, either due to need or distance, when it is not possible to bring in the wire you need to have replaced. In that case there are several pieces of information that we will need in order to fabricate a new wire that is a close match to your current one.

- Wire Diameter: Measure the current diameter of your wire. A simple way to do this, if you have swaged fittings, is to look on the fitting; there is often a number engraved on it. This number corresponds to a 32nd of an inch so a #4 fitting is used on 1/8 wire while a #8 fitting is used on 1/4" wire. If there is no engraving or the ends are nicro pressed the wire diameter can be measured with calipers or estimated with a ruler.
- Fitting Types: The most common fittings can be found in a section below. Request the fitting by name and we will select the correct one based on your wire diameter.
- Thread Direction: Threaded ends are either left or right handed. A right hand thread is the standard thread found on commonly available bolts but in the case of rigging turnbuckles the two threaded ends have to be opposite threads for the turnbuckle adjuster to work properly. The standard is for the swage fitting to have a Right Hand thread but it is not always the case. Always confirm the hand of your threaded fitting using the image below.

- Clevis Pin Sizes: The size of the clevis pin in eyes and forks is fairly standard but it is possible to have different size pins in fittings that work on the same diameter of wire. In some cases builders will drill out the fitting used on their boats in order to match up with hardpoints on the hull.
- Length of Wire: Fogh Marine uses the effective length of the wire for measurement also known as bearing point to bearing point. This method of measurement uses the point of contact or load at each end of the wire. In the case of an eye or toggle this is the outer edge of the hole.

Typical Bearing Points For Wire Length Measurement (click on images below)

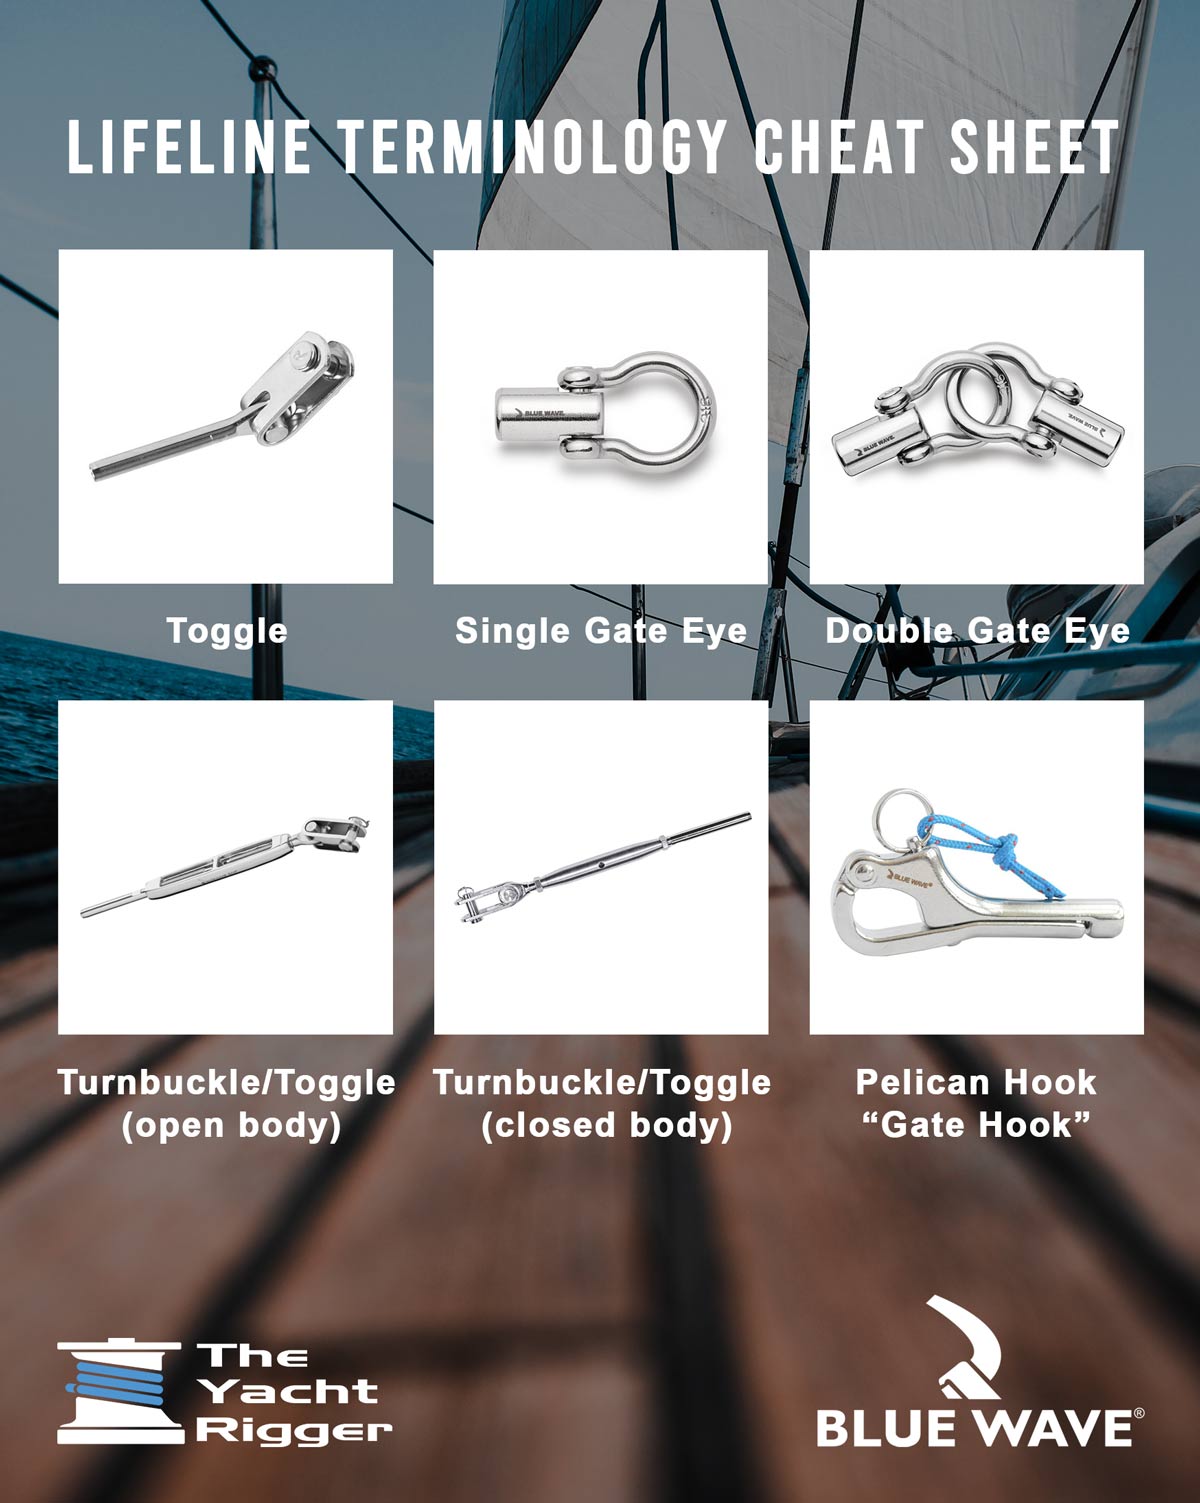
Wire Fittings for Swage and Nicro Press

These copper nicro press stops are most often used to create lock points on halyards which correspond to mast mounted lock forks. They can be used whenever a stop or indicator is needed on a single wire.
Pricing and Availability

The oval sleeve is primarily used to create a loop at the end of a wire but can be used any time two wires need to be attached. Use with a thimble to create a hard loop or without for the tail end of a halyard being attached to a tensioning system.

Thimbles create a hard loop in a wire. When a wire rope has a loop on the end, there is a risk that it will bend too tightly. A thimble added inside the loop to stiffen it, and protect the cable from pinching and abrading on the inside. The use of thimbles in loops is a best practice when there are no space considerations (ie halyard entering a mast).

Closed thimbles do not have any sharp edges and are used when snags or chafe are a concern.

The Marine Eye is the standard wire end fitting. This eye has a larger clevis pin hole and a thicker, rounder eye compared to the aircraft type eye. Marine eyes are commonly used at the top of headstays and backstays when a fork or double strap fitting is found on the mast or using a masthead toggle. Also common at backstay bridles when double triangle plates are used to join the bridles to the primary backstay wire.

The Blue Wave Eye Terminal is a highly polished, load rated marine eye.

Aircraft Eyes are similar to the standard marine eye but with a more pronounced teardrop shape. Originally used in aircraft control cables and struts, the aircraft eye is thinner than a corresponding marine eye allowing it to fit narrow forks.

Aircraft Forks have a pronounced teardrop shape. Originally used in aircraft control cables and struts, the aircraft fork has a thinner opening than a corresponding marine fork allowing it to fit with reduced slop when attached to mast fittings. The narrow fork opening matches the thickness of the corresponding Alexander Roberts Aircraft Eye.

Toggles feature an articulating fork which in conjunction with the pivot at the clevis pin allows two axis of motion. This added adjustability allows the wire to pull evenly even if the deck or mast fitting is not completely aligned. This fitting is not common, however, as usually a turnbuckle with a swage stud at one end and a threaded toggle at the other.

Threaded Studs are usually found on the bottom of standing rigging. They allow sailors to tension the rigging through use of a turnbuckle. When choosing the stud it is best to match it to the wire and thread diameter as most manufacturer offer a variety of threaded diameters to match existing turnbuckle bodies.
Pricing for Wire Rigging Labour
Visit our shop on line site for current pricing and product up dates . http://www.riggingandhardware.com/c-642-standing-rigging.aspx
Please verify you are a human
Access to this page has been denied because we believe you are using automation tools to browse the website.
This may happen as a result of the following:
- Javascript is disabled or blocked by an extension (ad blockers for example)
- Your browser does not support cookies
Please make sure that Javascript and cookies are enabled on your browser and that you are not blocking them from loading.
Reference ID: fed40f14-14b1-11ef-a87b-8d0adde3cc3b
Powered by PerimeterX , Inc.

The Yacht Rigger
Empowering Your Marine Adventures
Advanced Alternator Regulator
#1 Authorized Rainman Distributor in the USA
We’re committed to offer the lowest Rainman prices in the US!
Marine Solar & Electrical
Marine solar installations on all vessels
DIY Marina Wet Slips & Haul-Out Facilities
Slips can accommodate catamarans up to 55' with beam limitations at 30'
New Youtube Series
Join us as we venture into the world of Marine Professionals! Like Share & Subscribe!
The Yacht Rigger is a marine specialist group dedicated to marine upgrades and maintenance. From rigging, electrical, lithium batteries, solar, custom metal fabrication, air conditioning, deck hardware and much more.
We specialize in all types of yacht rigging, whether your boat is for cruising or racing, our team provides a comprehensive unbiased service tailored around you and your vessel. Please explore our services and products pages to discover what we have to offer.
Meet the crew
Featured Services
Rigging & lines, solar & electrical.
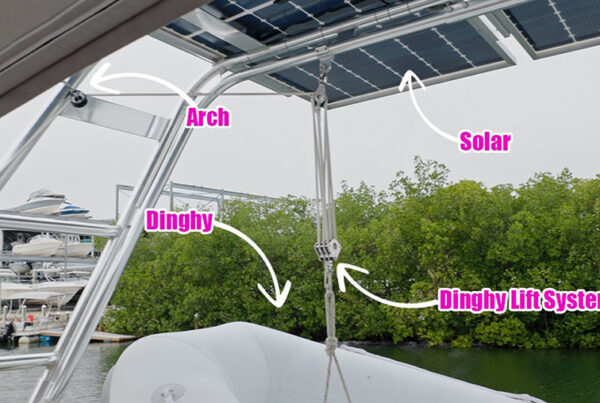
- Sailboat Arches
HVAC & Refrigeration
Quality brands.
High quality brands namely Blue Wave, Selden Furlex, Ewincher, Rainman, Spectra, Mantus, Harken, Waterline Design and more. We are currently expanding the store so keep an eye out.
Quality Services
At The Yacht Rigger we pride ourselves in offering top quality service, installation, and maintenance to a wide range of products and brands. Have a look at our lit of services below.
Marine Solar & Electrical Systems
The Yacht Rigger is proud to be the premier choice in Florida for marine solar installations on all vessels, from sailing catamarans, to cruising mono-hulls, to power cats and small motor trawlers. We’ve got your solar & electrical needs covered. Including new system installation, existing system troubleshooting, parts replacement, new system integration or additions, new battery banks and much more. Let our partnered ABYC certified technicians come out to take a look at your electrical needs and we’ll make sure you have an efficient, well integrated system up and running in no time.
Standing Rigging Production Facility
With our Wireteknik A350 swage machine and a production shop full of swage fittings, spools of KOS Stainless steel wire and wire rope, and brand new chrome bronze turnbuckles by the dozen, we can produce standing rigging from lifeline size – up to 5/8″ (16mm) standing rigging. Competitive pricing and top quality parts mean your new standing rigging will be safe for many years to come.
We have a very large inventory of Blue Wave standing rigging components on hand at all times. See our Blue Wave page for more details on this top quality Danish supplier.
We ship anywhere, so send us your orders for standing rigging and we’re happy to produce your rigging and ship it out to you, or come see us at the boat yard!
Lifeline Rigging
If you need your Lifeline rigging replaced, look no further. We offer full service Lifeline rigging replacement. We only use top of the line marine grade stainless steel products, and our A350 swaging machine can handle swaging up to 5/8″ (16mm) wire.
Let our team renew your Lifeline rigging and get back out on the water sailing safely.
Marina Wet Slips & Haul Out Facilities
In our wet slips we can accommodate catamarans up to 55′ with beam limitations at 30′. We have a large float bag on site for service work on catamarans such as thru-hull installations, sail drive removal, propeller work, and underwater light installations.
On the hard we are limited to a 16′ beam for haul out and offer full service bottom jobs as well as gelcoat repairs, propeller and shaft replacements, and even re-power projects (and more).
We do offer do it yourself “DIY” yard spaces, as well as DIY wet slip spaces, and all our wet slip spaces allow liveaboard and offer bathrooms with showers and laundry facilities.
Solar Frame & Arch Fabrication
We utilize the latest state of the art solar panels and build custom frames in house out of light weight marine grade bright anodized aluminium. (Stainless steel frame fabrication is also available if requested). Our goal is to maximize your vessel’s solar potential whilst maintaining minimalist concepts to create a beautiful, and highly functional end product.
Custom Frames Arches
Rigging Inspections & Consultations
The Yacht Rigger provides comprehensive rigging inspections on all masts to vessels located within our service area. We inspect all running and standing rigging. All rigging termination points are visually inspected. Sheave pins and sheaves inspected, spreaders, furler or headsail foils, and all gooseneck fittings. Electrical wiring is inspected for chafe/corrosion.
We also check all light fittings, blocks, cars, tracks, clutches, winches and any other hardware. A complete cleaning of all rigging ends, pins, and cars can be added if the mast is going into storage. We provide a detailed report of our findings, including suggestions for any additional parts and work required.
At the Yacht Rigger we also offer a consultation service designed to assist you with both troubleshooting as well as with selection of any new rigging parts, from winches or furling gear, to a new mast, no job is too big or too small. Please visit our Contact Us page and get in touch so that we can assist you!
HVAC (heat, ventilation, air conditioning) systems, helps to control the climate on your boat allowing you and your crew to enjoy the time on board all year long. Not only control the temperature on cold winters or hot summers, they also control the humidity levels, making the living area feel more comfortable and helping to keep the boat dry, increasing the life of electronics, fabrics, headliners, etc. reducing mold growth and other moisture related problems.
Investing in a new installation or upgrade of an existing one will extend your boating season and increase the value of your boat.
Winch Servicing
Servicing your winches regularly not only improves their longevity, but also greatly improves performance. Correctly cleaned and lubricated winches will operate faster, and require less force when grinding.
We can service all of your winches professionally, on site, in a matter of a few hours. We carry parts for most major brands and can source parts for almost any winch out there today.
Our riggers are highly competent splicers, capable of splicing any line in a given application. From basic polyamide docklines, to covered Vectran, we can assist you in selecting the correct line for the correct application. Be it a weight saving halyard for a race boat, or a topping lift for a cruiser, look no further than TYR.
Hardware Installation
At TYR we can supply all hardware relating to your mast and deck, for all brands of masts. Our team of expert riggers will guide you through getting the right equipment for your boat.
We supply many top of the line models of headsail furlers, including Selden Furlex and Harken. TYR can also provide servicing and spare parts for existing systems to ensure efficiency and reliability.
We supply a full range of blocks, clutches, cars and travelers from the leading brands Spinlock, Harken, Selden, and Ronstan. Be it a cruising boat wanting to maximize ease of use for all of running systems, or a high performance dinghy or racing yacht wanting to minimize weight, we will provide a product suited to your needs.
New Sails & Sail Covers
If you’re considering replacing your sails or sail covers, please get in touch with us through our contact portal. Our team has decades of experience in both cruising and racing and we’ve partnered with the most talented and detail oriented sailmakers and canvas specialists in the Tampa Bay area to offer you a comprehensive sail replacement service.
Our sail replacement service includes: Consultation – we’ll help you choose the sail material and cut that best suits your needs.
Measurement – if you fall within our service area we’ll come out to your boat and take precise measurements to make sure that your new sails perform optimally. We’ll also advise you regarding the variety of sail covers, mainsail storage systems, and sail furling systems available.
Installation – when your crisp new sails or sail covers are ready we’ll come out to your vessel and install them, to make sure they fit and perform exactly as needed.
Stern Arch & Davit Systems
If you are looking to store your tender on your stern, we have you covered. From large stern arches to smaller davit systems. We’ve partnered with suppliers from across the US to bring you the most cost effective, aesthetically pleasing, and practical solutions to this complex issue. We can also supply fully integrated solar and wind systems on top of our stern arches that will get you off the grid and ready to go out into the big blue!
Anchoring & Windlass Systems
We supply and install new windlasses, anchors, anchor chain, rode, and all the accessories in between. We can fabricate custom mounting platforms, install all the necessary switches, wiring, fuses, and additional batteries if needed.
Marine Electronics
At The Yacht Rigger we offer a comprehensive marine electronics service that includes new system installation, existing system troubleshooting, parts replacement, new system integration or additions, new battery banks and much more. Let our partnered ABYC certified technicians come out to take a look at your electrical needs and we’ll make sure you have an efficient, well integrated system up and running in no time.
Google Reviews
“ “ Stephen does regular work for me on rigging. He is very knowledgeable and dependable. First rate! ” Robert K
“ “ Steve and his crew listened to what we needed, then stopped by our just purchased 1997 Catalina 38 to look it over. In 10 minutes they diagnosed the issue, proposed a solution, removed the sail, gave me an estimate on money and time and off they went. Came in right on budget, hit the completion date on the mark, sent me photos to see the final product. Thoroughly professional and timely. I'd recommend these guys anytime, an will have them back on our boat as we need them for sure. ” Mike Conroy
“ “ Extremely knowledgeable in repair or upgrades to not just rigging, but all systems of sailboats. Professional and prompt service. These guys have helped my wife and I outfit our boat for live aboard cruising. From rigging replacement to solar panel install and also repair of systems specific to our boat, we couldn't have done it without them. Fair, reasonably priced, and always available for questions. 5 stars plus, nothing more I can say. ” Zach Duncan
“ “ These are the most professional guys I've met in the marine industry in St. Pete. They were very helpful in getting my boat ready for passage on a tight timeline. The job was done in time and on budget, but what really sets them apart is the fantastic communication. Highly recommend! ” Nate Mortensen
“ “ Great service. These guys are very knowledgeable. ” Pat M
Recent Posts / View All Posts
Contact number
We are monthly supporters. click below to donate..

- HVAC & Refrigeration Services
- Marine Solar
- Marine Electrical Systems
- Solar Frame Fabrication
- Standing Rigging & Forms
- Running Rigging & Forms
- Lifeline Rigging & Forms
- Anchor Chain & Rode Form
- DIY Marina Wet Slips
- Haul-Out Facilities
- Stern Arch & Davit Install
- Manuals/Catalogues
- Account details
ARCH INSTALLATION TIPS
- Measure where you think The arch feet are going to land on the back of the boat, pick either the front or back leg landing positions and measure the span. Check for backing plate/nut access at these positions.
- Assemble the arch laying on dock and slide the sides into the bridge evenly until the leg span you measured is Approx 5-6” wider than your goal span. Tape the joints at the bridge using masking tape to stop it sliding further in when you are test fitting.
- Measure the “drop” from where you think the forward legs will land and the aft legs will land and trim the forward legs. Accordingly. I usually leave them a couple inches longer than I think they need to be, and do the final trim once I’m at the mocking up stage.
- Assemble the arch feet and install them, using string to secure them to the arch legs using a rolling hitch.
- Use a block and tackle or a truckers hitch to squeeze the legs together to match the span you are aiming for. No more than 6”.
- Hoist arch into position using topping lift or main halyard (and two people) and test fit. At this point you can measure exactly how much you need to trim off the forward legs to make the arch fit level.
- If the arch needs to sit lower, once you have it level, you can trim both legs the same amount. Keep in mind that as the arch gets shorter the span will narrow slightly due to the geometry of the arch.
- Once you like the position, mark the feet in their positions using sharpie and lower the arch back to the dock. Release the block and tackle and drill/bolt the bridge. Drill and epoxy/bolt the feet into position.
- Hoist the arch again and check all landing positions on feet one final time. Mark bolt holes on gelcoat and move arch out of the way for drilling. Try to pick the forward or aft feet and do them in pairs, pick whichever set you think will allow you to bolt it down securely then pivot the arch back or forward to do the other pair after (check orientation of arch feet for pivot ability).
- Through bolt all feet and tighten. If fitting to an uneven surface, back fill the area behind the plate with thickened epoxy.
- Tighten all bolts on foot bases.

Salt Creek Marina and Yard Rules & Regulations (DIY & Storage)
“Common Sense, Compliance with Laws, Consideration Toward Others” (January 1, 2023)
This agreement shall be effective on the date hereunder by and between the undersigned Owner or Agent of the vessel(s) hereinafter (“Vessel Owner”) described below and Salt Creek Marina, Inc. and The Yacht Rigger LLC located at 107 15th Ave SE, St. Petersburg, FL 33701.
8/21/2023 UPDATE – If a hurricane system becomes a named storm and your boat is in one of our wet slips you MUST move it back to its original berth. The boat is not allowed to stay. The owner is responsible for planning with their preferred captain, or The Yacht Rigger has two captains on staff.
1. Fees: The Yacht Rigger and Salt Creek Marina reserves the right to change its rates upon one (1) months’ notice.
- Monohull DIY Dry Storage will be $900 monthly or $225 weekly, with a minimum of 1 week required. After the first 4 weeks, the rate will increase by $50 per week, for the remainder of the boat’s duration.
- Monohull Wet Slip will be $1,100 monthly or $275 weekly, with a minimum fee of $100.
- Catamaran Wet Slip will be $2200 monthly or $550 weekly.
- Haul / Block / Relaunch – One Time Charge $12 per foot
- Emergency Haulout – $25 per foot
- Short Haul – – – Special Haul to be scheduled by The Yacht Rigger or approved contractor only + $175 contractor fee (includes normal haul out rate)
2. Insurance: Vessel owners must provide insurance with Salt Creek listed as additional insurer on their vessel before arrival. Vessels must always be insured.
3. Hurricane & Summer Storm Season: June 1 – November 30 Haul out boats for storage or DIY work on the hard during this time are required to remove all canvas (including but not limited to Bimini, sail covers, dodgers, e.g.) as well as all sails on the boom or furlers. Remove all moveable equipment: canvas, sails, dinghies from davits, cushions, water toys, grills, biminis, roller furling sails, etc. Canvas and sails must be stored below and not on deck. Lash down everything you cannot remove tillers, wheels, booms.
4. Live Aboard – Wet Slip Only (Yacht Rigger Only Rule): Starting January 1st, 2024, customers may NOT stay on their vessel during electrical refit work or other major modifications or upgrades down below. Due to the nature of these projects requiring major upheaval down below within your living space and the need for our teams to work efficiently. Rigging and “above deck” type work will permit liveaboards. As much as we would love to accommodate liveaboards during this time, it is simply too inefficient for us and expensive for you, the customer. For vessels with excessive items on board preventing efficient work, we will provide on-site storage pods at market rates.
5. Third Party Warranties: This includes any warranty claim that is to be made against the original manufacturer or seller of the vessel or product. Should a warranty claim arise, The Yacht Rigger will estimate the job accordingly. It will then be up to the customer to obtain approval from the applicable 3rd party (boat manufacturer, spar manufacturer, etc.). If approved & immediately upon completion of the warranty issues, the customer is solely responsible for the payment of the work completed. It is then the responsibility of the customer to be reimbursed by the applicable 3rd party.
6. Yard Hours: The boatyard hours are 8:00am to 6:00pm, Monday- Sunday. The boatyard gate locks at 6:00pm. You may come check on your vessel, re-secure rigging, canvas and pump out water during business hours. Please check in with the office if you are near closing hours.
7. Utilities: Boatyard provides power & water to vessel owners as a part of their agreement so long as the owner fully adheres to all Rules and Regulations. When you are finished with the water hoses, turn them off and place them back neatly in the area you found them. Please ask a Salt Creek Marina Boatyard Employee for access to either option.
8. Outside Contractors/ Subcontractors With Management approval (determined individually) contractors may work on a storage vessel for a fee of $40 a day in addition to monthly storage/dockage fee. The owner shall be responsible for informing the office of any subcontractor working on the vessel for any purpose whatsoever. The subcontractor shall submit insurance before any work can commence. Salt Creek Marina and/or The Yacht Rigger reserves the right at its sole discretion to stop unsafe work practices and if deemed necessary to order the offending worker(s) to leave the site at the Owner’s/Skipper’s sole risk and expense.
9. Supplies: All paint including but not limited to, bottom paint, primer or barrier paint, haul or topside paint, varnish or otherwise any paint being applied to your vessel must be purchased through the Boatyard or approved by Management. This policy is for safety and environmental protection purposes of all persons operating in the Boatyard. Paint will normally arrive within 24hrs of purchase.
10. Paint Spraying: There shall be no spraying in the Boatyard under any condition. Any person spraying any paint will be immediately expelled and fines levied.
11. Cleanliness: All vessel owners shall be responsible for keeping their area clean and professional. The Boatyard reserves the right to charge the vessel owner for any cleanup required to comply with RR. All debris associated with boat repair activities must be disposed of daily. A dumpster is located near the parking area.
12. Disposal: There is a designed disposal station of 55 gal drums for oil and one for oily rags and filters located near the office door. PLEASE DO NOT PUT GASOLINE IN THESE DRUMS.
13. Facilities: Bathrooms are provided as a courtesy to all Customers. We will make our best efforts to keep it clean but reserve the right to limit access any time. Please use the outside sink for heavy clean up and use the indoor head/sink for bathroom purposes only. The Yacht Rigger has its own set of facilities to be used by its staff and customers. Please do not use SCM facilities.
14. Parking: Park in the designated parking area. Vehicles should be parked clear of travel lift path, not in storage areas, on the seawall or blocking boats. Salt Creek Marina and/or The Yacht Rigger is not responsible for vehicles that are damaged by equipment or conditions in the yard
15. Regarding noise outside of the scope of work not being completed, i.e., radio/stereo volume, please be respectful of neighboring boat owners’ tenants.
16. Salt Creek Marina and/or The Yacht Rigger is not responsible for any theft or loss of items left on or around the vessel.
17. The yard takes no responsibility for accidents, injury, or death to any persons in or working within the yard at any time. All people wishing to enter the boatyard for any reason do so at their own risk.
18. Failure to comply with these rules and conditions can result in additional charges if Salt Creek Marina and/or The Yacht Rigger personnel are required to do site cleanup operations and/or will be asked to remove your boat from the marina.
19. Additional Rules:
- Owners are not permitted to test engines, run water for AC or other purposes while on the hard. All electricity and water shall be for the sole purpose of working on their vessel and disconnected when unoccupied.
- There are to be no mobile AC / Heater Units or Refrigeration Units to be run on the hard.
- No unfurling of sails will be permitted at any time, under any circumstance.
- There is to be no hot work, flame cutting, welding etc. to be done in the yard.
- Jack stands and blocking may only be used and moved by employees of Boatyard.
- Boatyard reserves the right to move vessels when needed without permission or notifying owners.
- Any trailer, dingy, mast, or other personal property not directly attached to the vessel must be pre-approved, additional charges will apply if approved.
- Packages – you are welcome to send packages to our address here, but please make sure they state your name and “CO The Yacht Rigger” and limit your packages to 5 a week.
Any modifications outside of these rules will be determined individually by Management. REMEMBER THESE RULES & REGULATIONS ARE FOR EVERYONE’S BENEFIT. PLEASE HELP KEEP THIS BOAT YARD A CLEAN & SAFE WORKPLACE. ** Salt Creek reserves the right to change these rules at any time.

Use coupon code to activate discount. Add to coupon code box on your cart page.
Service Locator
- Angler Endorsement
- Boat Towing Coverage
- Mechanical Breakdown
- Insurance Requirements in Mexico
- Agreed Hull Value
- Actual Cash Value
- Liability Only
- Insurance Payment Options
- Claims Information
- Towing Service Agreement
- Membership Plans
- Boat Show Tickets
- BoatUS Boats For Sale
- Membership Payment Options
- Consumer Affairs
- Boat Documentation Requirements
- Installation Instructions
- Shipping & Handling Information
- Contact Boat Lettering
- End User Agreement
- Frequently Asked Questions
- Vessel Documentation
- BoatUS Foundation
- Government Affairs
- Powercruisers
- Buying & Selling Advice
- Maintenance
- Tow Vehicles
- Make & Create
- Makeovers & Refitting
- Accessories
- Electronics
- Skills, Tips, Tools
- Spring Preparation
- Winterization
- Boaters’ Rights
- Environment & Clean Water
- Boat Safety
- Navigational Hazards
- Personal Safety
- Batteries & Onboard Power
- Motors, Engines, Propulsion
- Best Day on the Water
- Books & Movies
- Communication & Etiquette
- Contests & Sweepstakes
- Colleges & Tech Schools
- Food, Drink, Entertainment
- New To Boating
- Travel & Destinations
- Watersports
- Anchors & Anchoring
- Boat Handling
Inspecting Sailboat Rigging
Advertisement
Here's how to go over your rig with a fine tooth comb.

Sight up the mast. Is it straight?
If there's one thing production sailboats have in common, it's that nearly all of them use stainless-steel standing rigging, whether wire or rod. There are likely also stainless steel fittings, chainplates and turnbuckles. Stainless steel is a great material for rigging but has its Achilles heel: corrosion. Stainless steel in a saltwater environment will eventually suffer from some form of corrosion, whether it's stress-crack corrosion, fatigue cracking or crevice corrosion. Sailboat rigging in freshwater may also suffer from stress and fatigue cracking (see below). What might appear to be a small crack or area of pitting will degrade the fitting by eating away at the metal. Any cracks or corrosion will weaken the fitting, and the failure of a single fitting can bring down a rig.
Stainless Steel Failures
Stainless-steel rigging under heavy stress can have stress cracking or fractures that will often be identified by hairline cracks. These cracks will lead to stress-crack corrosion and crevice corrosion in the saltwater environment.

Crevice corrosion can also develop in areas of pitting when the stainless steel is devoid of oxygen. This is the most common form of corrosion on a stainless-steel chainplate. This chainplate was cut in half to demonstrate how far the pitting went into the metal.

1. Take a look at the overall rig
Sight up the rig from deck level. How is the geometry? All stays and shrouds should be run without any bends and at even angles. Are there hard spots or kinks where a stay has an awkward bend? Standing in front of the mast, sight up from the base. Is the mast in column (straight)? There should be no bends in the mast side-to-side or facing forward. Walk around to all of the shrouds and stays and give them a pull. They all should feel roughly at the same tension. To be accurate, you would want to use a tension gauge. But when I first start inspecting a rig, I'm mostly trying to get a feel if anything appears to be dramatically out of tune.

Left: Inspect swages carefully for corrosion; this swage has broken strands. Right: This crack was only visible after cleaning off the surface rust.
2. Inspect all the deck fittings and wire.
If the mast is deck-stepped, start at the base, looking for corrosion on the step and cracks in the base of the mast. Then working clockwise to make sure you don't miss anything, inspect all fittings from eye level to deck level including swages/mechanical fittings, turnbuckles, chainplates, and toggles. Start with the wire at eye level, and scan downward, checking for rust and broken strands. For rod rigging, we're looking for cracks or corrosion. Take a good look for corrosion where the wire enters the swage or mechanical fitting. Next check the t-bolts, tangs, turnbuckles, and pins. Clean any rust off with the Scotch-Brite pad. This is important: anything more than light rust staining could be an indication of crevice corrosion, which weakens the metal. You may not be able to remove all of the rust, but you do need to see the underlying metal. Use your magnifying glass to look for cracks and pitting on the fitting. The turnbuckles should be straight without any bend to them. Inspect the condition of the threads of the stud. Ensure the turnbuckles have locking pins. Photograph the fittings, especially where you think you have sighted a crack or pitting. Get up close with the camera on the macro setting and make sure that the area of concern is in focus; this is important when you enlarge the photo later.

This chainplate has a crack just above where it passes through the deck.
3. Pay attention to the chainplates.
Inspect the caulking where it enters the deck; it should not be cracked or peeling. Look for cracks in the chainplates on the edges and especially around the pinholes. For external chainplates, inspect along the edges for cracks and rust blooms. A small amount of rust may be OK; it might just be staining, though it should still be investigated. But significant rust is a sign that there may be crevice corrosion, which is a reason to pull and inspect the chainplates. Unfortunately, the area that is probably affected the most is buried and not visible unless the chainplate is removed. Stainless-steel corrosion happens much faster when there is no oxygen present — like where the chainplates pass through the deck, which is why we'll inspect them belowdecks as well.

Look for peeling paint, which may be a sign of corrosion, and cracks at the gooseneck and other boom fittings.
4. Inspect all attachments to the mast and boom on deck and at eye level.
Inspect the gooseneck fitting for the mast and the vang attachment for corrosion or cracks. Any attachment points on the boom for running rigging also need to be inspected. Again, take close-up photos if you find any problems. Check all blocks to make sure they turn freely. All shackles should be secured with seizing wire. The winches need to turn freely and stop when the direction is reversed. Do the line stoppers stop the line? Give the line a good tug with the line stopper closed. There should be no movement. Inspect each piece of the running rigging for wear. What is the condition of the halyard and the safety line (a second halyard) you will use for going aloft? Don't take chances here.

Check for white powder and pitting on aluminum mast steps and at the base of the mast.
5. Inspect the condition of the mast step.
Mast steps here are often in a damp environment, and a lot of mast steps are made from non-stainless steel on older boats, which can rust. Some boats have an aluminum mast step. If the step or base of the mast is corroding, it will have white powder on it. Remove the powder and look for pitting underneath. If you find pitting here, or on any other aluminum fitting, such as the mast or boom, have a rigger follow up with a professional inspection.

Painting chainplates is a bad idea because it hides corrosion. Once rust is visible through the paint, the corrosion is severe, and the chainplate will need to be replaced.
6. Go below to take a look at the chainplates.
Are there signs of water intrusion on the bulkheads? You might have to remove some cover panels to gain access to the chainplates. Are there signs of rust? Clean any rust with your nylon pad. Use a flashlight and your magnifying glass to inspect the chainplate carefully. Pay close attention to the edges of the chainplate for rust and cracks. Cracks and corrosion can develop behind the chainplate and where it passes through the deck. Again, these are areas that are deprived of oxygen where crevice corrosion will develop. Chainplates don't last forever, and if you want to be absolutely sure you can count on them, I'd recommend replacing them after 20 years of service or if there are any signs of crevice corrosion, which can happen in less than 15 years in harsh environments.

Broken wire at swage fitting on a catamaran mast head.
7. If you found no deficiencies then it is time to go up the mast.
If you are not comfortable, then I recommend having a professional rigger conduct the aloft part of the inspection. Never do this by yourself, even if you have a hoist that allows you to do so. Have someone there to assist you and to manage your safety line. For the aloft portion of the inspection, work your way up from the bottom, rather than starting at the top. This way, if you are at the spreaders and find a cracked swage fitting, you can make the decision to stop. This part of the inspection will be conducted in the same manner as the lower fittings and chainplates, this time also paying close attention to where fasteners are installed into the mast. On an unpainted aluminum mast, we are looking for the white powder and pitting which are signs of corrosion and can lead to hairline cracks. Again, if you clean the powder away and find pitting, you'll need to have a professional rigger take a look. On a wooden mast, you're looking for soft wood and discoloration where the fastener goes into the wood. For carbon fiber you're looking for cracks. Inspect the spreader ends and tips for wear and the condition of the boots.
8. Thought you were finished?
Not yet. Now go find somewhere comfortable and view all of your photos on a tablet or computer. Enlarge them to help find any cracks or pitting. This is why you took your photos in order and made notes about what was what. Discuss any of your findings that concern you with a professional rigger. Save all of your photos in a file so you can compare them the next time you do the inspection.
Now that you've done a bottom-to-top rig inspection, you can feel more comfortable the next time the wind pipes up. At the beginning of each season, take an hour or so to re-inspect the rig, focusing on the areas you might have noted to keep an eye on.
Related Articles
The truth about ceramic coatings for boats.
Our editor investigates the marketing claims of consumer-grade ceramic coatings.
Fine-Tune Your Side Scan Fishfinder
Take your side-scanning fishfinder off auto mode, and you’ll be spotting your prey from afar in no time
DIY Boat Foam Decking
Closed-cell foam flooring helps make boating more comfortable. Here’s how to install it on your vessel
Click to explore related articles
Dylan Bailey
Contributor, BoatUS Magazine
Dylan Bailey is a marine surveyor with more than 30 years in the marine industry.
BoatUS Magazine Is A Benefit Of BoatUS Membership
Membership Benefits Include:
Subscription to the print version of BoatUS Magazine
4% back on purchases from West Marine stores or online at WestMarine.com
Discounts on fuel, transient slips, repairs and more at over 1,200 businesses
Deals on cruises, charters, car rentals, hotel stays and more…
All for only $25/year!
We use cookies to enhance your visit to our website and to improve your experience. By continuing to use our website, you’re agreeing to our cookie policy.
- standing rigging
- rope and line
- cams, cleats and clutches
- head sail gear
- roller furling
- main sail control
- mast hardware
- eye straps and pad eyes
- fairleads and bulls eyes
- anchor and docking
- miscellaneous hardware
- Alexander Roberts
- My Wishlist
T-bar terminals
- Customer Service
- Order Tracking
- Your Account
- Store Policies & Info
- Privacy Policy
- Helpful Links
- Payment Methods
Shopping Cart: 0 Items
Argonautrigging.com
Signed in as:
Ormond Beach, Florida. 954-599-3425 . Sailboat rigging specialist.
27 Years Experience sailboat standing rigging and rigging services.
Jason of Argonautrigging.com has 27 years of experience with formal large sailboat rigging parent companies of South Florida and most recently on his own. We are " Bringing " business to our area!
We are the only fully equipped rigging shop in N.E Florida
- We offer sailboat rigging services with a Wireteknik A-300 swage machine for standing rigging 1/4 inch wire rope up to 5/8 inch wire rope swage services in house.
- Kearney ( mobile ) hand machine swaging for small boat standing rigging and life line services. 3/32 inch to 1/4 inch.
- Wire rope Nicopress services for lifting applications. 1/8 to 3/8 inch wire rope.
- Hydraulic power supply system for Nitronic Rod rigged vessel services.
- Wire Rope Standing rigging and Rod Rigging tuning services utilizing Loose Branded tension gauges for small vessels. Dylan Branded Digital Electronic tuning gauge for wire rope 7/16 inch / 11mm up to 5/8 inch / 16 mm.
Formally trained in the many secrets of sailboat rigging with certifications to show. Always taking continuing education training with new technology arriving in the industry.
Veteran Owned and Operated
As a prior Coast Guard Member safety at sea has always been priority number 1. Sailboat rigging.
All of my prior Coast Guard Units have been rigging related. Add another 4 years of rigging service to my history!
Cross training has always been a part of my past sailboat rigging service! We have done amazing things!
View our Video and watch how we look at your sailing vessel.
https://www.youtube.com/watch?v=bk2A60ymfB0
Sailboat rigging inspection.
Standing Rigging
In house, standing rigging swaging services..
New additions to our sailboat rigging capabilities!
WireTeknik Wire Rope Swaging up to 5/8 Inch - 16 MM.
Mobile Life Line and Architectural Services
Kearney MK 2 Mobile wire swaging services for the perfect touch every time.
Rod Rigging Specialist formally trained in Christ Church England. Ocean Yacht Services. Up to - 540 sized rigging.
Running rigging / splicing / mooring lines / ground tackle, sail boat running rigging, mooring line / storm line manufacturing , splicing, sales, ground tackle chain sales / anchor snubbers.
Splicing Services- Halyard, Guys, Hauls, Lifts, Travelers, Rope in general sales.
All types of Lines.
Dyneema / Spectra / AmSteel
Polyesters
3 Strand, Double Braid, Mega Braid, Plated Line
Recovery / Farm Tractor / Off Road Vehicle rescue lines.
Thats right off road enthusiasts. All of your new high tech tow or winch systems started with a sailor and sailboat rigging professionals!
High Line / Utility Service / Linesman Services
We have spliced for:
Florida Power and Lighting
Duke Energy
Chain Plate Replacement Services
Refreshment in process.
Bigger, heavier, Stronger sailboat rigging. Sail harder with a peace of mind!
Total sailing re fit services.
Mast on ground, standing re- rig / re- fit.
Some owners prefer a fresh slate. For the rest of the vessels life span.
Everything from a primer coating to a full sailboat rigging refreshment.
Trampoline Sales and Replacement Services
Service and replacemt, drop us a line.
This site is protected by reCAPTCHA and the Google Privacy Policy and Terms of Service apply.
Argonautrigging.com. ASK FOR JASON!
Sandra Drive, Ormond Beach, Florida 32176, United States
954-599-3425 [email protected]
Copyright © 2021 Argonautrigging.com - All Rights Reserved.
Powered by GoDaddy
- Privacy Policy
- Terms and Conditions
This website uses cookies.
We use cookies to analyze website traffic and optimize your website experience. By accepting our use of cookies, your data will be aggregated with all other user data.
- Billing Terms and Conditions
- Shipping and Return Policy
- Shopping Cart
IMAGES
VIDEO
COMMENTS
When talking about wire standing rigging for sailboats, there are two primary ways to secure a fitting to the end of the cable, the swage fitting and the mechanical fitting. One requires a specialized, expensive machine (pictured below) that is used to essentially squeeze or hammer the fitting onto the wire, this is called the swage fitting.
We also offer a complete range of splicing and swaging services if you prefer an expert - so shop now and save. Can't find what you're looking for? Let us help. 206-632-4462. Equip yourself with sailboat rigging hardware from Fisheries Supply. Shop products from top brands like Hayn, Johnson, Alexander Roberts, Ronstan, and more.
Type 1: Boats up to 250 lbs Dollies. Type 2: Laser, Byte & Invitation Dollies. Type 3: Curled Gunwale Boats Dollies. Type 4.1: Small/Med Bowsprit Boats Dollies. Type 4.2: Heavier Sprit Boats Dollies. Type 5: Heavier Doble-Handed Boats Dollies.
This page provides information and links to all the swaging services you need for your boat or any other application you need to attach hardware to string! 443-214-9246 443-214-9246 Categories. ... For all your custom swaging and rigging needs. Bosun Supplies offers the experience, knowledge, and personal service you're looking for to rig your ...
The Rigging Loft Inc was established in 1984 to provide sailboat rigging, yacht hardware and provide on site hands on, quality rigging services to sail makers, boat yards and boat builders in South Eastern Massachusetts. ... We now stock and swage wire up to 5/8 diameter for standing rigging and architectural projects. Larger sizes are available.
Sailboat and yacht standing rigging of the highest quality, swage and mechanical terminals, rigging supplies and cable. Checkout View Cart (0) (508) 992-0434. Toggle navigation ... We work hard to make sure you get the sailboat standing rigging that you need, manufactured to the highest standards, using quality parts, at a fair price. Standing ...
Spars, Rigging, and Hardware for Sailboats. Rig-Rite, Inc. Phone: (001) 401-739-1140 -- FAX: (001) 401-739-1149 www.RigRite.com Ordering/Questions: T-Ball Swage & Fittings: T-Ball Backing Plates are used on Masts to provide a sleek, lightweight, non-protruding attachment for Rigging. Common fittings for them include Swage and Mechanical ...
Most sailboats rely on swage fittings at the terminals, but these fittings are not necessarily the most reliable, especially in warmer climates where they have a history of failure. Swage fittings are made by compressing a tube onto the wire under great pressure, a process that must be done exactly right to assure a strong bond.
Pricing for Wire Rigging Labour. Fogh Marine in Toronto, Ontario is a full-service wire rigging shop. Nicro Press and Swage fittings are installed on site. Choose from 1x19 (stiff) wire, 7x19 (flexible) wire, PVC coated wire, or Dyform® wire. Lifeline fabrication, Shrouds, Forestays, Backstays, Furling Systems, and any other wire work are done ...
Sailboat and yacht standing rigging machine swaged wire terminals for 1x19 wire, life lines available from Rigginig Only as eyes, forks, threaded studs, shroud terminals, stem balls and more ... All of our swage wire terminals are made of type 316 stainless steel. We use wire terminals from Hayn, Gibb, Navtec, C.S. Johnson, and more. We stock ...
Rigging Only e-mail: [email protected] Voice line: 508 992 0434 Fax: 508 992 0488 You ... SWAGE TERMINALS and toggles. WIRE, TURNBUCKLES. BACKSTAY ADJUSTERS. INNER FORESTAY TOOLS AND MISC HARDWARE . LIFE LINES. MEASURING GUIDE. HARDWARE and WIRE. RUNNING RIGGING. LINE. SHACKLES.
rigging tools. swage tools. CONTACT WEST MARINE. Live Chat. 1-800-262-8464. Store Locator. Shop the best selection of Swage Tools from West Marine. Visit for products, prices, deals and more!
All Sta-Lok Terminals are reusable, manufactured from Type 316 stainless steel, and have a long life span. Key Features: Reusable* alternative to swage. Easy to install. Only basic hand tools required. Manufactured from 316 Stainless Steel. Packed for 1x19 wire as standard. Different wedges are available to terminate 7 strand and compacted wire ...
For many years, Fisheries Supply has been producing quality wire-rope swaging. We have the capabilities to swage wires from 3/32"-7/16". From lifelines and standing rigging on sailboats to architectural applications like deck rails, we have the wire and fittings to meet your needs. Many styles of wire kept on hand &mdash typically 304 and 316 ...
The Yacht Rigger is a marine specialist group dedicated to marine upgrades and maintenance. From rigging, electrical, lithium batteries, solar, custom metal fabrication, air conditioning, deck hardware and much more. We specialize in all types of yacht rigging, whether your boat is for cruising or racing, our team provides a comprehensive ...
Check for white powder and pitting on aluminum mast steps and at the base of the mast. 5. Inspect the condition of the mast step. Mast steps here are often in a damp environment, and a lot of mast steps are made from non-stainless steel on older boats, which can rust. Some boats have an aluminum mast step.
Wire t terminals for sailboat mast shrouds and stays using internal backing plates and plugs by Navtec, Gibb or Selden. Checkout View Cart (0) (508) 992-0434. Toggle navigation. ... standing rigging → swage wire terminations → T-bar terminals. T-bar terminals. Navtec style SWAGE "T" FOR 3/32" WIRE. Price: $18.72
We are the only fully equipped rigging shop in N.E Florida. - We offer sailboat rigging services with a Wireteknik A-300 swage machine for standing rigging 1/4 inch wire rope up to 5/8 inch wire rope swage services in house. - Kearney ( mobile ) hand machine swaging for small boat standing rigging and life line services. 3/32 inch to 1/4 inch.
How to Replace your Rigging: Remove the rigging from your boat and ship it to us. We will duplicate it exactly and ship the new rigging to you. Before you remove your rig check out our post on How to Measure Standing Rigging. Use our handy Standing Rigging Order Form. Contact us for your Rigging Quote Today. Phone: (305) 758-1074
596K subscribers in the vexillology community. A subreddit for those who enjoy learning about flags, their place in society past and present, and…
Elektrostal. Elektrostal ( Russian: Электроста́ль) is a city in Moscow Oblast, Russia. It is 58 kilometers (36 mi) east of Moscow. As of 2010, 155,196 people lived there.
In 1938, it was granted town status. [citation needed]Administrative and municipal status. Within the framework of administrative divisions, it is incorporated as Elektrostal City Under Oblast Jurisdiction—an administrative unit with the status equal to that of the districts. As a municipal division, Elektrostal City Under Oblast Jurisdiction is incorporated as Elektrostal Urban Okrug.
Elektrostal , lit: Electric and Сталь , lit: Steel) is a city in Moscow Oblast, Russia, located 58 kilometers east of Moscow. Population: 155,196 ; 146,294 ...