- BOAT OF THE YEAR
- Newsletters
- Sailboat Reviews
- Boating Safety
- Sailing Totem
- Charter Resources
- Destinations
- Galley Recipes
- Living Aboard
- Sails and Rigging
- Maintenance

Forward Cabin Makeover
- By Roger Hughes
- Updated: February 3, 2021

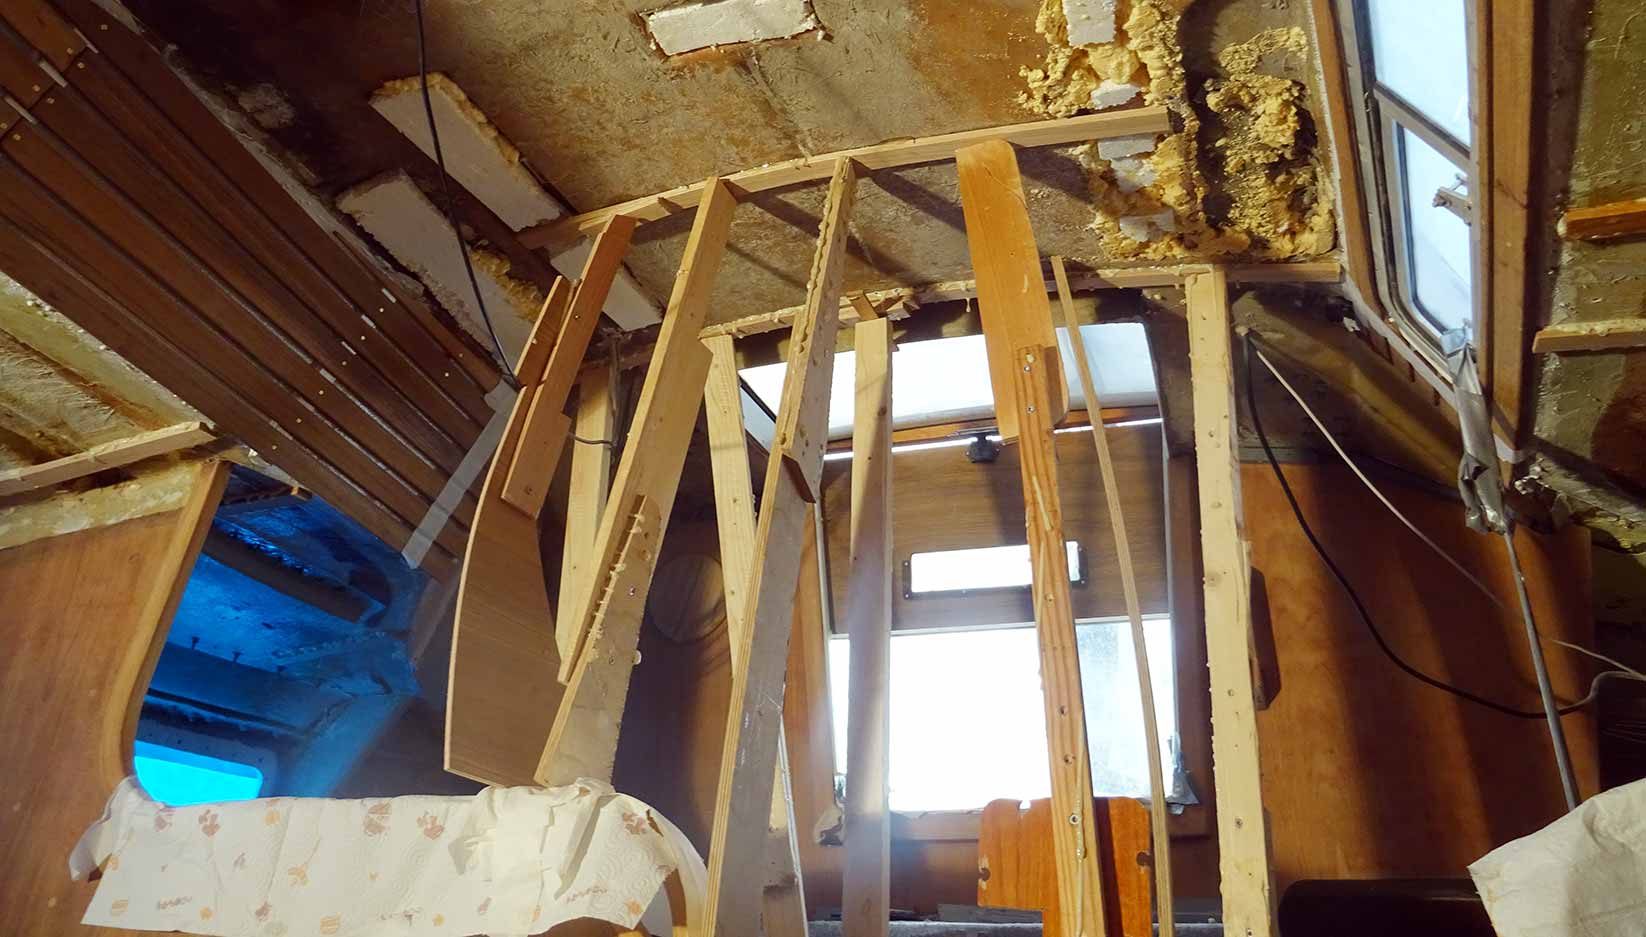
I have been messing about on boats for more years than I care to remember, but it still never ceases to amaze me how many new things you learn when you restore an old boat. One example: Who knew that the ceiling on a boat is not the ceiling at all? “Ceilings” are those wooden slats often fitted by manufacturers on cabin sides, most frequently in a fo’c’sle. The correct nautical term for the actual roof (i.e., ceiling) of the cabin is “overhead.”
I learned these archaic snippets (whose only value are in impressing fellow mariners) when I decided to renovate the forward cabin of my 1977 Down East 45 schooner, Britannia. The cabin was still covered with 40-year-old faded foam-backed vinyl, much of it in rotten, smelly condition, and all the woodwork needed revarnishing, if not a complete replacement.
Nautical expressions can get somewhat confusing when referring to ceilings, which are really slats, and roofs, which are overheads. So for this article I decided to use common terms. “Roof” means the underside of the fiberglass deck that forms the actual roof of the cabin, and also includes the underside of the lower deck, forward of the bunks. “Slats” are the teak strips on the sides of the hull. “Side” means the sides of the cabin, both the lower sloping sides with the slats, and also the upper sides with the port lights in them.
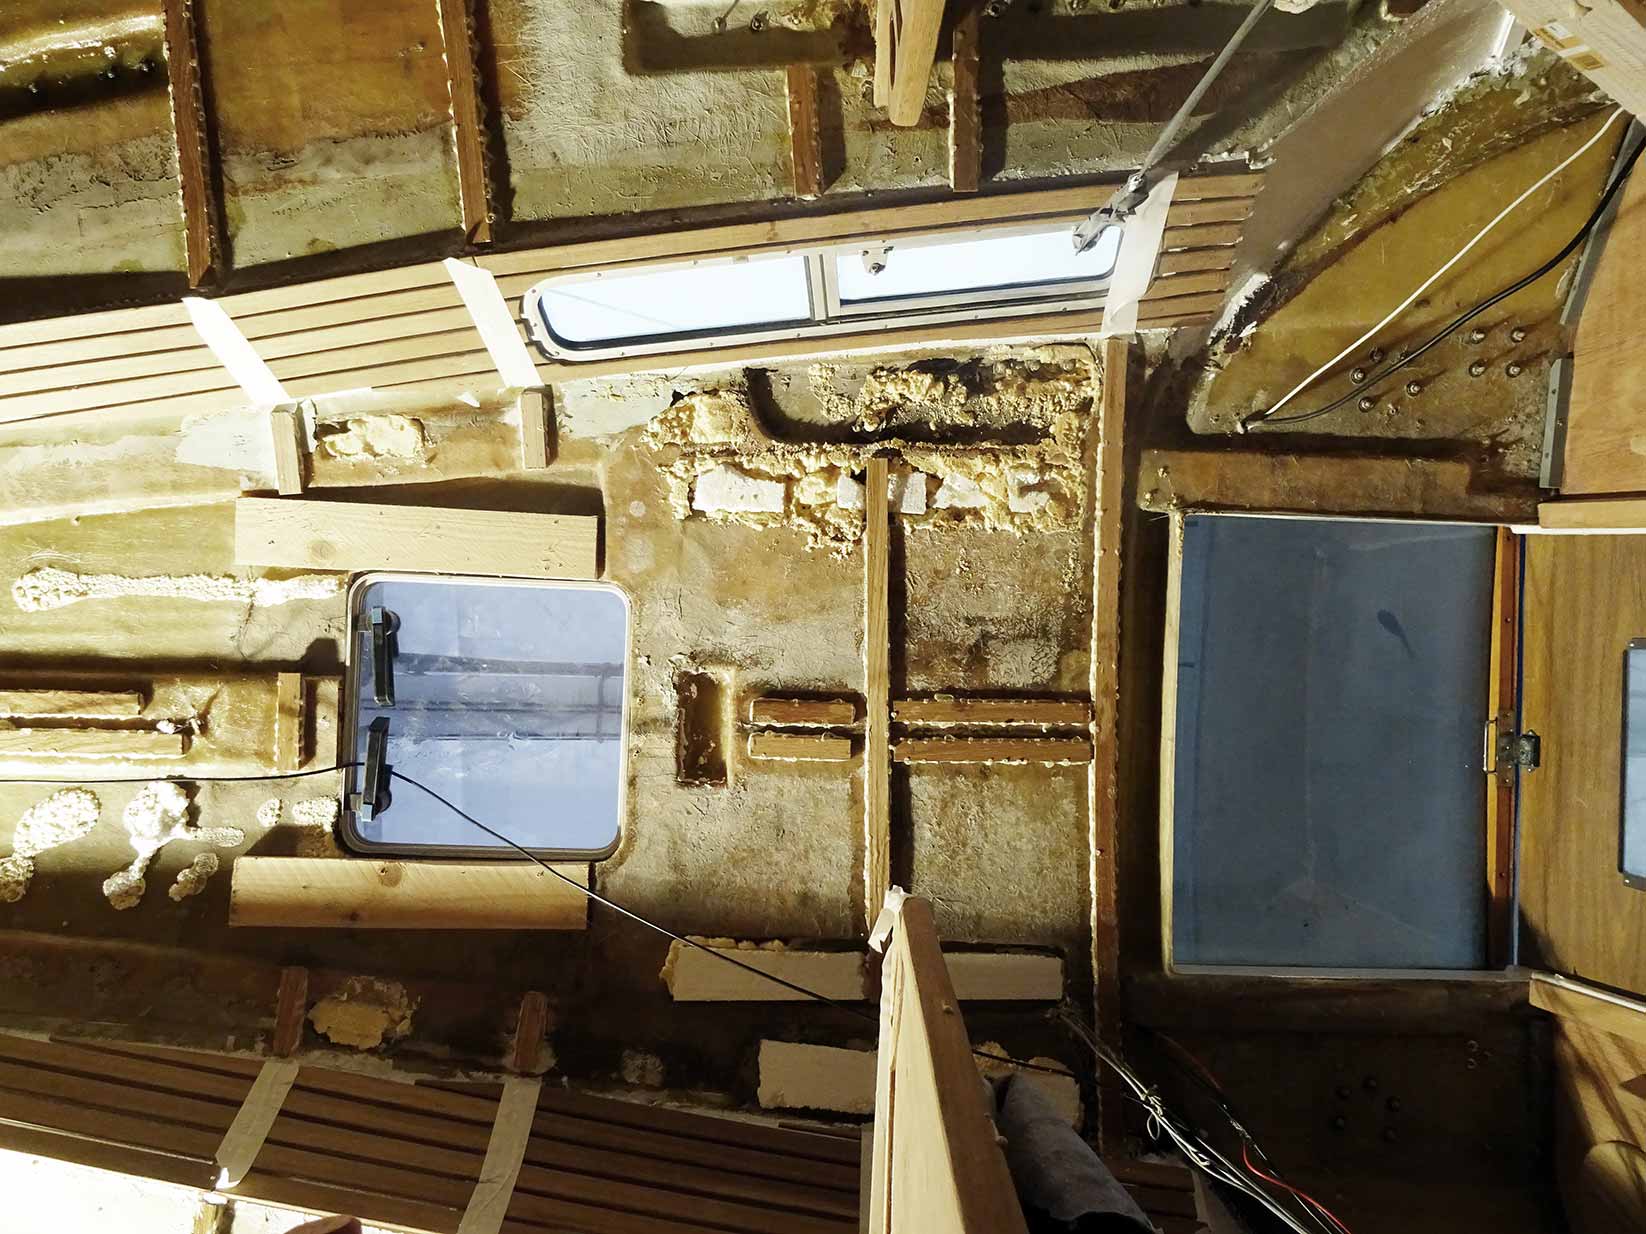
Teak slats might look nice, but they are extremely difficult to clean behind and can trap dust and mildew. I therefore decided to remove all 22 of these 2-by-½-inch-thick strips from the sides, and replace them with easy-to-clean hygienic plastic sheeting. With six plugged screws securing each slat to the hull ribs, that was a lot of unscrewing—132 screws, to be precise! After the sides had been washed, an immediate improvement was that the cabin appeared larger, even though it had actually been widened by only a little over an inch.
I then cut out all the dirty vinyl covering on the sides and roof, which was glued and stapled to the fiberglass deck. I removed three port lights—two on the starboard side and one to port—then temporarily sealed the outside with duct tape to try to keep any rain out until I could reinstall them after I had fitted the new plastic side coverings.
Anyone who works on boats knows it is usually much easier to strip things out than to rebuild them, and this project was no exception. After cutting out all the dirty vinyl, I then made templates by taping sheets of foam art board together, then cutting and adding bits to form the exact shape of each side. Then I traced the template on a plastic sheet on the marina dock. Plas-Tex plastic sheet comes in 4-by-8-foot panels about 1/16-inch thick. It is very pliable, waterproof and washable, yet easily trimmed with scissors and a box cutter. It is sold by Lowe’s hardware store at $20 per sheet. I used a total of five sheets.
I glued the panels to each side of the hull using contact adhesive on the side ribs and battens that run along the top of the cabin. I used gel-type adhesive because it is not stringy and doesn’t drip like the regular sort. This is particularly important when applying glue upside down. I screwed a teak batten along the bottom of the sheet, which stopped it from sagging between the ribs.
With the lower panels in place, I then made templates for the upper sides, which curve around the shape of the deck. These were larger than the lower sides and more difficult to glue underneath. Reinstalling the port lights helped to keep the large side panels in place.
The largest and final piece of Plas-Tex had to be glued to the forward underside of the roof. I made the template by taping the art boards to the roof with masking tape to hold them in place while I trimmed and added pieces where required.
RELATED: Restoring Your Gelcoat
After cutting a plastic sheet to shape, I pre-glued the fiberglass roof and the plastic. Sticking it up after about 10 minutes was a delicate once-off operation because contact adhesive sticks—as its name suggests—on contact. I lay on my back while my wife slid the large sticky sheet over me, and I carefully placed it where I had made marks from the template. It was became a question of “push it up and hope,” and then pressing it in place with arms and legs while the glue made contact. I then made props to hold the sheet in place while the glue hardened.
I had originally trimmed the sheets to overlap each other by about half an inch. This enabled me to score through both overlapping layers at the same time, using a box cutter with a sharp new blade. I then stripped off the top layer and peeled away the inside layer, leaving a perfect butt joint between the two pieces. It was just a matter of cleaning excess glue with solvent.
I cut other teak trim pieces from the slats I had removed, varnished them, then glued them to cover the joints between the sides and roof.
There were also two sections that needed covering in the roof of the cabin, between the deck beams and around the hatch. For this I used the same tongue-and-groove plastic boards I had used throughout the rest of the boat. It is called plank paneling and is PVC planking used as wainscot panels on house walls. Each board is 7 inches wide and ¼-inch thick and comes in a pack of three boards, each 8 feet long, for $20 from Lowe’s. It’s reversible; one is molded with two strips and the other with three thinner strips. I decided to use the two-strip side. An important benefit, particularly on a boat, is the rot- and mildew-free lifetime guarantee, along with the ability to wash it with soap and water. I had also found that the thickness gave better thermal insulation from the hot deck compared with thin vinyl. I measured and trimmed these panels individually to accommodate any unevenness between the deck beams, then slotted them into the previous panel, and discreetly nailed them to the wooden beads that had supported the original vinyl. I needed only one pack to complete this small area.
These improvements made the cabin appear much larger than before because the dark wood slats tended to bring the sides inward. It is also brighter and much easier to clean.
I added a second 12-volt dome light to provide better light into this cabin. I also wired two 120-volt sconce lights and connected both systems to a double switch mounted near the door. This is a much more practical method than groping in the dark for the tiny overhead dome-light switches.
There are two hanging lockers, one to each side, that had been varnished with multiple layers over the years. I removed both locker doors, along with the pin rails around the shelf tops. I also removed the cabin door and the chain locker door and framework, along with four sliding drawers. I took them home to restore in my garage. The locker sides and tops had to be stripped in situ with varnish remover, then scraped down to the original teak. This was then cleaned with teak cleaner and given two coats of satin varnish, which brought out the beautiful golden tones of the wood. The inside of the lockers was then painted white.
As part of the renovation, I wondered what to do about the imitation-teak laminate shelf covering on top of the lockers. These were not scratched or damaged because Formica laminate is very resilient, but they had lost their luster over time. After experimenting with a small section, I decided to varnish them with clear gloss varnish. I cleaned the laminate with soap and water, then slapped on a liberal coat of clear gloss with a 2-inch brush. I then left the tops untouched for a week so the varnish could thoroughly dry to a hard finish. It set to a fine, smooth, shiny finish with the advantage that when it gets scratched—which it undoubtedly will—it will be easy to retouch with a dab of new varnish.

I then reinstalled the freshly varnished pin rails around the edges of the shelves. But instead of the square corners, which the original pin rail had, I made rounded corners out of spare wood. These look much nicer, but more important, they are not as painful when you bump your arm against them as the boat rolls.
We had taken the foam bunks to our home to wash the covers. When everything was replaced, we found ourselves with a pristine new double cabin. It had not cost a lot of money, if you don’t count the effort—but it was all worth it.
Serial DIYer Roger Hughes is a frequent contributor to Cruising World . See more of Britannia ’s renovation projects at schooner-britannia.com .
- More: How To , interior , makeovers , print dec 2020 , projects , Refits
- More How To

Adding Onboard Electronics? Here’s How To Get Started

7 Boating Safety Tips for Summer Cruising

How to Prep for a Diesel You Can Depend On

Anchoring in Paradise

Now For Sale: Leopard 45

The Long Way Around

Sailing to the Land of Shrimp

Swallow Tattoos and Sailors
- Digital Edition
- Customer Service
- Privacy Policy
- Email Newsletters
- Cruising World
- Sailing World
- Salt Water Sportsman
- Sport Fishing
- Wakeboarding
Sailboat Parts Explained: Illustrated Guide (with Diagrams)
When you first get into sailing, there are a lot of sailboat parts to learn. Scouting for a good guide to all the parts, I couldn't find any, so I wrote one myself.
Below, I'll go over each different sailboat part. And I mean each and every one of them. I'll walk you through them one by one, and explain each part's function. I've also made sure to add good illustrations and clear diagrams.
This article is a great reference for beginners and experienced sailors alike. It's a great starting point, but also a great reference manual. Let's kick off with a quick general overview of the different sailboat parts.
General Overview
The different segments
You can divide up a sailboat in four general segments. These segments are arbitrary (I made them up) but it will help us to understand the parts more quickly. Some are super straightforward and some have a bit more ninja names.
Something like that. You can see the different segments highlighted in this diagram below:

The hull is what most people would consider 'the boat'. It's the part that provides buoyancy and carries everything else: sails, masts, rigging, and so on. Without the hull, there would be no boat. The hull can be divided into different parts: deck, keel, cabin, waterline, bilge, bow, stern, rudder, and many more.
I'll show you those specific parts later on. First, let's move on to the mast.

Sailboats Explained
The mast is the long, standing pole holding the sails. It is typically placed just off-center of a sailboat (a little bit to the front) and gives the sailboat its characteristic shape. The mast is crucial for any sailboat: without a mast, any sailboat would become just a regular boat.
I think this segment speaks mostly for itself. Most modern sailboats you see will have two sails up, but they can carry a variety of other specialty sails. And there are all kinds of sail plans out there, which determine the amount and shape of sails that are used.
The Rigging
This is probably the most complex category of all of them.
Rigging is the means with which the sails are attached to the mast. The rigging consists of all kinds of lines, cables, spars, and hardware. It's the segment with the most different parts.
The most important parts
If you learn anything from this article, here are the most important parts of any sailboat. You will find all of these parts in some shape or form on almost any sailboat.

Okay, we now have a good starting point and a good basic understanding of the different sailboat parts. It's time for the good stuff. We're going to dive into each segment in detail.
Below, I'll go over them one by one, pointing out its different parts on a diagram, listing them with a brief explanation, and showing you examples as well.
After reading this article, you'll recognize every single sailboat part and know them by name. And if you forget one, you're free to look it up in this guide.

On this page:
The hull is the heart of the boat. It's what carries everything: the mast, the sails, the rigging, the passengers. The hull is what provides the sailboat with its buoyancy, allowing it to stay afloat.
Sailboats mostly use displacement hulls, which is a shape that displaces water when moving through it. They are generally very round and use buoyancy to support its own weight. These two characteristics make sure it is a smooth ride.
There are different hull shapes that work and handle differently. If you want to learn more about them, here's the Illustrated Guide to Boat Hull Types (with 11 Examples ). But for now, all we need to know is that the hull is the rounded, floating part of any sailboat.
Instead of simply calling the different sides of a hull front, back, left and right , we use different names in sailing. Let's take a look at them.

The bow is the front part of the hull. It's simply the nautical word for 'front'. It's the pointy bit that cuts through the water. The shape of the bow determines partially how the boat handles.
The stern is the back part of the hull. It's simply the nautical word for 'back'. The shape of the stern partially determines the stability and speed of the boat. With motorboats, the stern lies deep inside the water, and the hull is flatter aft. Aft also means back. This allows it to plane, increasing the hull speed. For sailboats, stability is much more important, so the hull is rounded throughout, increasing its buoyancy and hydrodynamic properties.
The transom is the backplate of the boat's hull. It's the most aft (rear) part of the boat.
Port is the left side of a sailboat.
Starboard is the right side of a sailboat
The bilges are the part where the bottom and the sides of the hull meet. On sailboats, these are typically very round, which helps with hydrodynamics. On powerboats, they tend to have an angle.
The waterline is the point where the boat's hull meets the water. Generally, boat owners paint the waterline and use antifouling paint below it, to protect it from marine growth.
The deck is the top part of the boat's hull. In a way, it's the cap of the boat, and it holds the deck hardware and rigging.
Displacement hulls are very round and smooth, which makes them very efficient and comfortable. But it also makes them very easy to capsize: think of a canoe, for example.
The keel is a large fin that offsets the tendency to capsize by providing counterbalance. Typically, the keel carries ballast in the tip, creating a counterweight to the wind's force on the sails.
The rudder is the horizontal plate at the back of the boat that is used to steer by setting a course and maintaining it. It is connected to the helm or tiller.
Tiller or Helm
- The helm is simply the nautical term for the wheel.
- The tiller is simply the nautical term for the steering stick.
The tiller or helm is attached to the rudder and is used to steer the boat. Most smaller sailboats (below 30') have a tiller, most larger sailboats use a helm. Large ocean-going vessels tend to have two helms.
The cockpit is the recessed part in the deck where the helmsman sits or stands. It tends to have some benches. It houses the outside navigation and systems interfaces, like the compass, chartplotter, and so on. It also houses the mainsheet traveler and winches for the jib. Most boats are set up so that the entire vessel can be operated from the cockpit (hence the name). More on those different parts later.
Most larger boats have some sort of roofed part, which is called the cabin. The cabin is used as a shelter, and on cruising sailboats you'll find the galley for cooking, a bed, bath room, and so on.
The mast is the pole on a sailboat that holds the sails. Sailboats can have one or multiple masts, depending on the mast configuration. Most sailboats have only one or two masts. Three masts or more is less common.
The boom is the horizontal pole on the mast, that holds the mainsail in place.
The sails seem simple, but actually consist of many moving parts. The parts I list below work for most modern sailboats - I mean 90% of them. However, there are all sorts of specialty sails that are not included here, to keep things concise.

The mainsail is the largest sail on the largest mast. Most sailboats use a sloop rigging (just one mast with one bermuda mainsail). In that case, the main is easy to recognize. With other rig types, it gets more difficult, since there can be multiple tall masts and large sails.
If you want to take a look at the different sail plans and rig types that are out there, I suggest reading my previous guide on how to recognize any sailboat here (opens in new tab).
Sail sides:
- Leech - Leech is the name for the back side of the sail, running from the top to the bottom.
- Luff - Luff is the name for the front side of the sail, running from the top to the bottom.
- Foot - Foot is the name for the lower side of the sail, where it meets the boom.
Sail corners:
- Clew - The clew is the lower aft (back) corner of the mainsail, where the leech is connected to the foot. The clew is attached to the boom.
- Tack - The tack is the lower front corner of the mainsail
- Head - The head is the top corner of the mainsail
Battens are horizontal sail reinforcers that flatten and stiffen the sail.
Telltales are small strings that show you whether your sail trim is correct. You'll find telltales on both your jib and mainsail.
The jib is the standard sized headsail on a Bermuda Sloop rig (which is the sail plan most modern sailboats use).
As I mentioned: there are all kinds, types, and shapes of sails. For an overview of the most common sail types, check out my Guide on Sail Types here (with photos).
The rigging is what is used to attach your sails and mast to your boat. Rigging, in other words, mostly consists of all kinds of lines. Lines are just another word for ropes. Come to think of it, sailors really find all kinds of ways to complicate the word rope ...
Two types of rigging
There are two types of rigging: running and standing rigging. The difference between the two is very simple.
- The running rigging is the rigging on a sailboat that's used to operate the sails. For example, the halyard, which is used to lower and heave the mainsail.
- The standing rigging is the rigging that is used to support the mast and sail plan.
Standing Rigging

Here are the different parts that belong to the standing rigging:
- Forestay or Headstay - Line or cable that supports the mast and is attached to the bow of the boat. This is often a steel cable.
- Backstay - Line or cable that supports the mast and is attached to the stern of the boat. This is often a steel cable.
- Sidestay or Shroud - Line or cable that supports the mast from the sides of the boat. Most sailboats use at least two sidestays (one on each side).
- Spreader - The sidestays are spaced to steer clear from the mast using spreaders.
Running Rigging: different words for rope
Ropes play a big part in sailing, and especially in control over the sails. In sailboat jargon, we call ropes 'lines'. But there are some lines with a specific function that have a different name. I think this makes it easier to communicate with your crew: you don't have to define which line you mean. Instead, you simply shout 'mainsheet!'. Yeah, that works.
Running rigging consists of the lines, sheets, and hardware that are used to control, raise, lower, shape and manipulate the sails on a sailboat. Rigging varies for different rig types, but since most sailboats are use a sloop rig, nearly all sailboats use the following running rigging:

- Halyards -'Halyard' is simply the nautical name for lines or ropes that are used to raise and lower the mainsail. The halyard is attached to the top of the mainsail sheet, or the gaffer, which is a top spar that attaches to the mainsail. You'll find halyards on both the mainsail and jib.
- Sheets - 'Sheet' is simply the nautical term for lines or ropes that are used to set the angle of the sail.
- Mainsheet - The line, or sheet, that is used to set the angle of the mainsail. The mainsheet is attached to the Mainsheet traveler. More on that under hardware.
- Jib Sheet - The jib mostly comes with two sheets: one on each side of the mast. This prevents you from having to loosen your sheet, throwing it around the other side of the mast, and tightening it. The jib sheets are often controlled using winches (more on that under hardware).
- Cleats are small on-deck hooks that can be used to tie down sheets and lines after trimming them.
- Reefing lines - Lines that run through the mainsail, used to put a reef in the main.
- The Boom Topping Lift is a line that is attached to the aft (back) end of the boom and runs to the top of the mast. It supports the boom whenever you take down the mainsail.
- The Boom Vang is a line that places downward tension on the boom.
There are some more tensioning lines, but I'll leave them for now. I could probably do an entire guide on the different sheets on a sailboat. Who knows, perhaps I'll write it.
This is a new segment, that I didn't mention before. It's a bit of an odd duck, so I threw all sorts of stuff into this category. But they are just as important as all the other parts. Your hardware consists of cleats, winches, traveler and so on. If you don't know what all of this means, no worries: neither did I. Below, you'll find a complete overview of the different parts.
Deck Hardware

Just a brief mention of the different deck hardware parts:
- Pulpits are fenced platforms on the sailboat's stern and bow, which is why they are called the bow pulpit and stern pulpit here. They typically have a solid steel framing for safety.
- Stanchons are the standing poles supporting the lifeline , which combined for a sort of fencing around the sailboat's deck. On most sailboats, steel and steel cables are used for the stanchons and lifelines.
Mainsheet Traveler
The mainsheet traveler is a rail in the cockpit that is used to control the mainsheet. It helps to lock the mainsheet in place, fixing the mainsails angle to the wind.
If you're interested in learning more about how to use the mainsheet traveler, Matej has written a great list of tips for using your mainsheet traveler the right way . It's a good starting point for beginners.
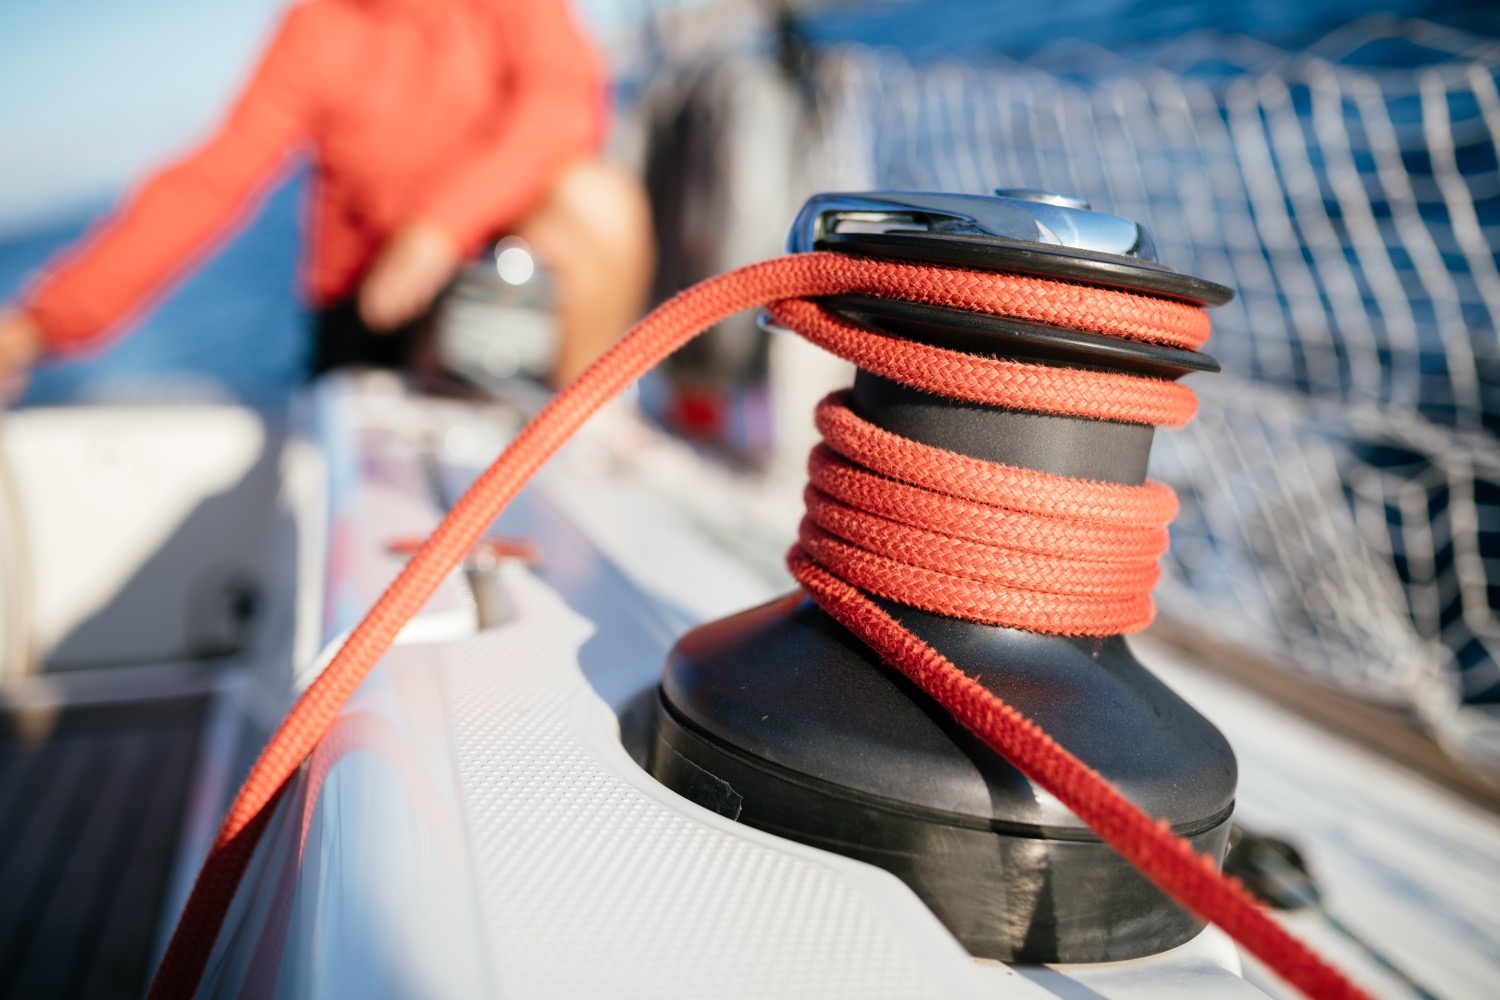
Winches are mechanical or electronic spools that are used to easily trim lines and sheets. Most sailboats use winches to control the jib sheets. Modern large sailing yachts use electronic winches for nearly all lines. This makes it incredibly easy to trim your lines.
You'll find the compass typically in the cockpit. It's the most old-skool navigation tool out there, but I'm convinced it's also one of the most reliable. In any way, it definitely is the most solid backup navigator you can get for the money.
Want to learn how to use a compass quickly and reliably? It's easy. Just read my step-by-step beginner guide on How To Use a Compass (opens in new tab .
Chartplotter
Most sailboats nowadays use, besides a compass and a map, a chartplotter. Chartplotters are GPS devices that show a map and a course. It's very similar to your normal car navigation.
Outboard motor
Most sailboats have some sort of motor to help out when there's just the slightest breeze. These engines aren't very big or powerful, and most sailboats up to 32' use an outboard motor. You'll find these at the back of the boat.
Most sailboats carry 1 - 3 anchors: one bow anchor (the main one) and two stern anchors. The last two are optional and are mostly used by bluewater cruisers.
I hope this was helpful, and that you've gained a good understanding of the different parts involved in sailing. I wanted to write a good walk-through instead of overwhelming you with lists and lists of nautical terms. I hope I've succeeded. If so, I appreciate any comments and tips below.
I've tried to be as comprehensive as possible, without getting into the real nitty gritty. That would make for a gigantic article. However, if you feel I've left something out that really should be in here, please let me know in the comments below, so I can update the article.
I own a small 20 foot yacht called a Red witch made locally back in the 70s here in Western Australia i found your article great and enjoyed reading it i know it will be a great help for me in my future leaning to sail regards John.
David Gardner
İ think this is a good explanation of the difference between a ”rope” and a ”line”:
Rope is unemployed cordage. In other words, when it is in a coil and has not been assigned a job, it is just a rope.
On the other hand, when you prepare a rope for a specific task, it becomes employed and is a line. The line is labeled by the job it performs; for example, anchor line, dock line, fender line, etc.
Hey Mr. Buckles
I am taking on new crew to race with me on my Flying Scot (19ft dingy). I find your Sailboat Parts Explained to be clear and concise. I believe it will help my new crew learn the language that we use on the boat quickly without being overwhelmed.
PS: my grandparents were from Friesland and emigrated to America.
Thank you Shawn for the well written, clear and easy to digest introductory article. Just after reading this first article I feel excited and ready to set sails and go!! LOL!! Cheers! Daniel.
steve Balog
well done, chap
Great intro. However, the overview diagram misidentifies the cockpit location. The cockpit is located aft of the helm. Your diagram points to a location to the fore of the helm.
William Thompson-Ambrose
An excellent introduction to the basic anatomy and function of the sailboat. Anyone who wants to start sailing should consider the above article before stepping aboard! Thank-you
James Huskisson
Thanks for you efforts mate. We’ve all got to start somewhere. Thanks for sharing. Hoping to my first yacht. 25ft Holland. Would love to cross the Bass Strait one day to Tasmania. 👌 Cheers mate
Alan Alexander Percy
thankyou ijust aquired my first sailboat at 66yrs of age its down at pelican point a beautifull place in virginia usa my sailboat is a redwing 30 if you are ever in the area i wouldnt mind your guidance and superior knowledge of how to sail but iam sure your fantastic article will help my sailboat is wings 30 ft
Thanks for quick refresher course. Having sailed in California for 20+ years I now live in Spain where I have to take a spanish exam for a sailboat license. Problem is, it’s only in spanish. So a lot to learn for an old guy like me.
Very comprehensive, thank you
Your article really brought all the pieces together for me today. I have been adventuring my first sailing voyage for 2 months from the Carolinas and am now in Eleuthera waiting on weather to make the Exumas!!! Great job and thanks
Helen Ballard
I’ve at last found something of an adventure to have in sailing, so I’m starting at the basics, I have done a little sailing but need more despite being over 60 life in the old dog etc, thanks for your information 😊
Barbara Scott
I don’t have a sailboat, neither do l plan to literally take to the waters. But for mental exercise, l have decided to take to sailing in my Bermuda sloop, learning what it takes to become a good sailor and run a tight ship, even if it’s just imaginary. Thank you for helping me on my journey to countless adventures and misadventures, just to keep it out of the doldrums! (I’m a 69 year old African American female who have rediscovered why l enjoyed reading The Adventures of Robert Louis Stevenson as well as his captivating description of sea, wind, sailboat,and sailor).
Great article and very good information source for a beginner like me. But I didn’t find out what I had hoped to, which is, what are all those noisy bits of kit on top of the mast? I know the one with the arrow is a weather vane, but the rest? Many thanks, Jay.
Louis Cohen
The main halyard is attached to the head of the mainsail, not the to the mainsheet. In the USA, we say gaff, not gaffer. The gaff often has its own halyard separate from the main halyard.
Other than that it’s a nice article with good diagrams.
A Girl Who Has an Open Sail Dream
Wow! That was a lot of great detail! Thank you, this is going to help me a lot on my project!
Hi, good info, do u know a book that explains all the systems on a candc 27,
Emma Delaney
As a hobbyist, I was hesitant to invest in expensive CAD software, but CADHOBBY IntelliCAD has proven to be a cost-effective alternative that delivers the same quality and performance.
https://www.cadhobby.com/
Leave a comment
You may also like, guide to understanding sail rig types (with pictures).
There are a lot of different sail rig types and it can be difficult to remember what's what. So I've come up with a system. Let me explain it in this article.

The Ultimate Guide to Sail Types and Rigs (with Pictures)

The Illustrated Guide To Boat Hull Types (11 Examples)

How To Live On a Boat For Free: How I'd Do It

How To Live on a Sailboat: Consider These 5 Things
Own your first boat within a year on any budget.
A sailboat doesn't have to be expensive if you know what you're doing. If you want to learn how to make your sailing dream reality within a year, leave your email and I'll send you free updates . I don't like spam - I will only send helpful content.
Ready to Own Your First Boat?
Just tell us the best email address to send your tips to:
Sailboat Refit: Making Roofing Panels
- January 11th, 2017
- Yacht Refit
Now that´s a big one: I get the feeling that most of the items on a boat refit list are so small that a visitor won´t tell the difference. Tiny project steps which in the end will (hopefully) amount to a big leap forward for the boat – such a moment is pending for my King´s Cruiser 33 refit. After making the Teak panels to have a nice classy facing of the ship´s hull in my saloon, it is now the roof I am turning my attention to: Making the roofing panels will significantly improve the look of the boat at once. Here´s how I do it.
Preparing the roofing structure
At first there´s some very important to think through thoroughly before wondering about the outwardness of the new ceiling panels: What will be behind it? As you might have read in my previous article on electric stuff, there´s a whole world behind covered by the panels, namely the wiring of the LED-lights and of course all the wiring that comes down from the mast. Having spoken about that topic before, it´s clear that I will need some spacing between the actual hull and the roofing panels.
This is achieved by attaching wooden stringers to the hull . Since I have only good things to tell about PUR-based glue I went for this adhesive again and manufactured no less than 24 stringers from massive Oak which I brought to form a strong bond with the hull. Pressure is needed to achieve this outcome so this was some tedious work stretching over week: Maximum was three Oak stringers at a time with 24 hours drying time.
After glueing the stringers to the hull I chose to provide for additional mechanical adhesion and put in two stainless steel screws per stringer. After this, the whole construction has been sealed off against damp and moisture with epoxy resin . So I think this is the perfect basis to have the roofing panels attached to. I bought 4 mm Birch plywood which will be the raw material for the panels.
Making a roofing panel gauge model
I am not able and willing to use the old panels as role models for the new ones since I fear that by removing all of the covers inside the boat the measurements won´t be exact anymore – don´t forget, I´ve made new Teak ceiling panels for the ship´s sides which can change everything. So I´ll have to make new ones by trying to get the exact dimensions of each panel from the ceiling onto a raw model , out of the boat and onto the birch plywood.
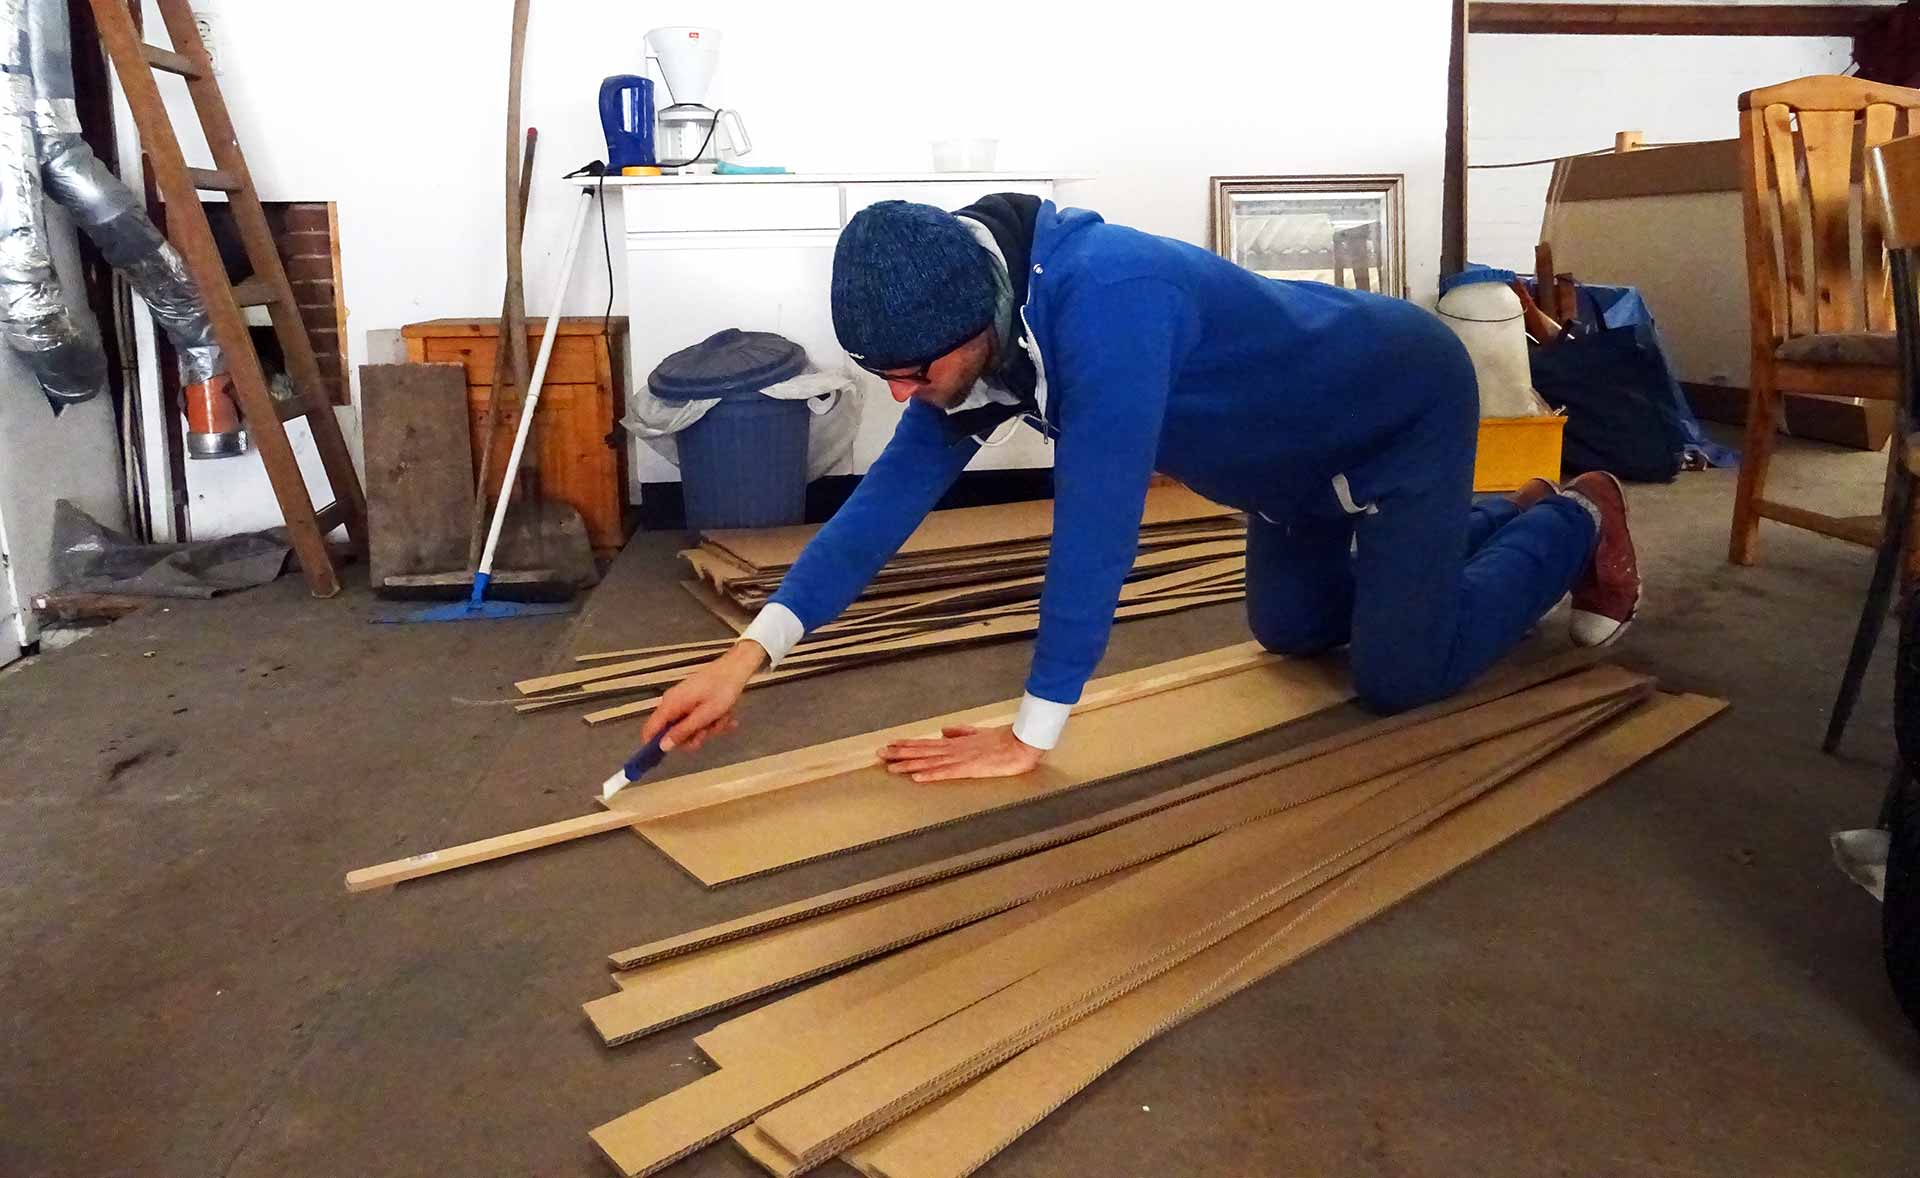
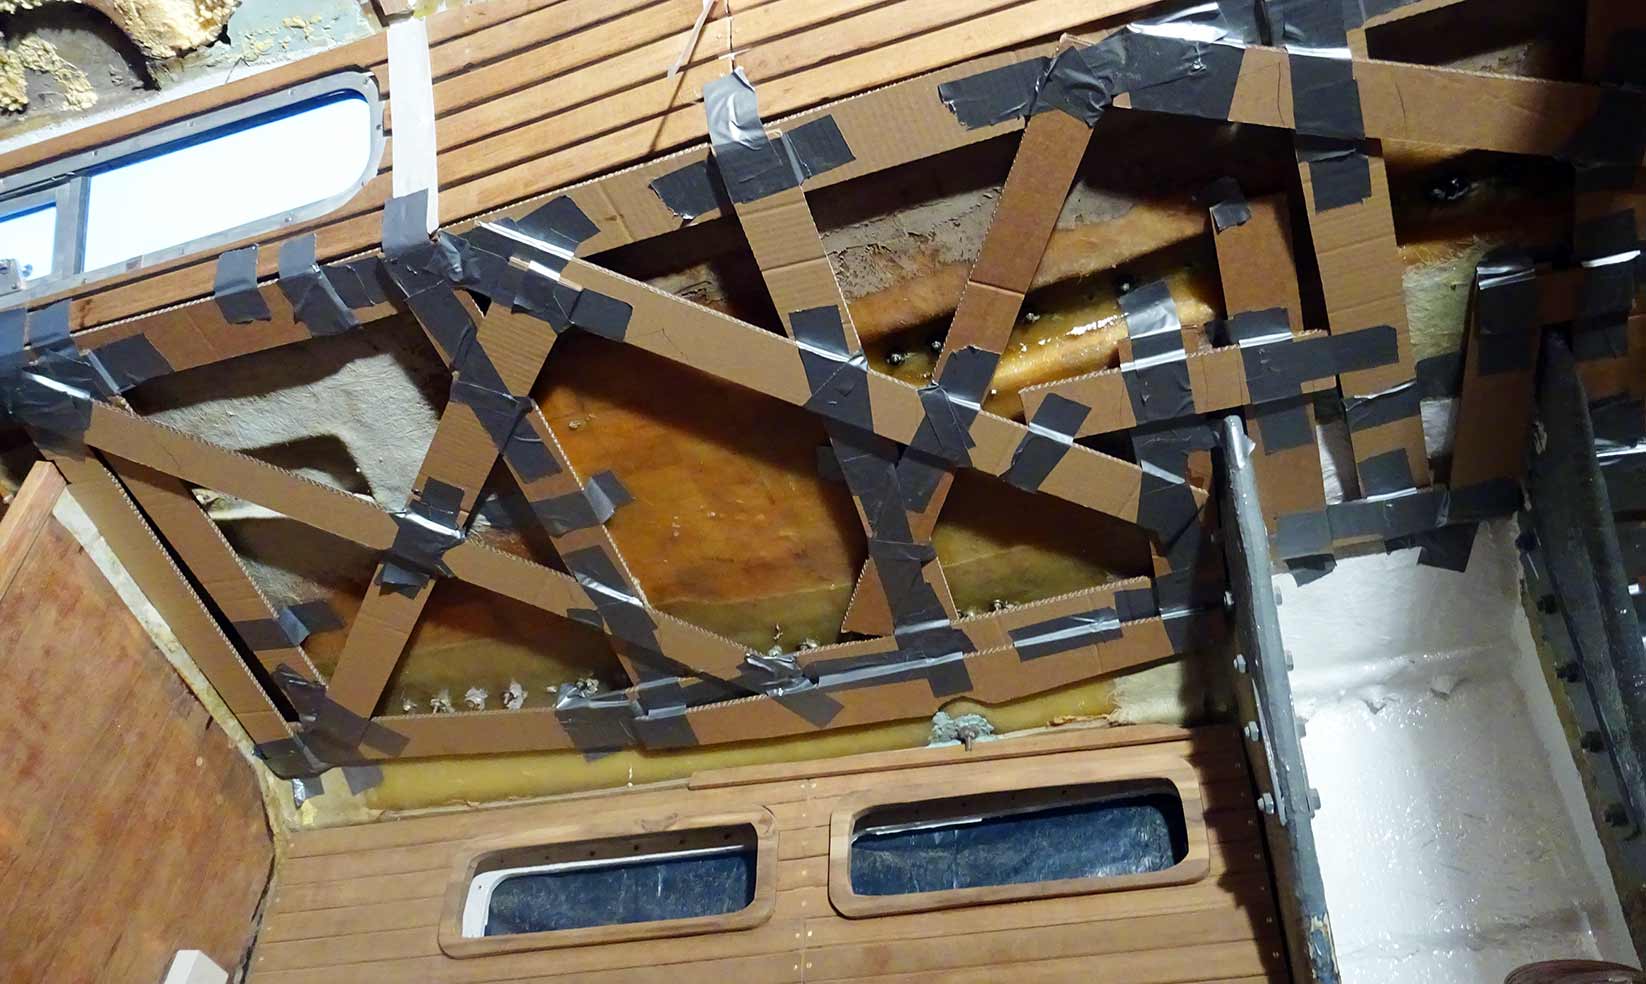
Taking huge cardboard boxes and going down to my knees, I was cutting precisely just strips of about 8 cm width with a carpet knife and took them with me into the boat. Now the fun began: Putting the strips to the ceiling I was trying to match exactly the outline of the panel . At first fixing the strips with Gaffer tape, drawing marks for additional cut outs, taking them off again, cut to size, fit and finally fix the strip to the ceiling with even more Gaffer tape.
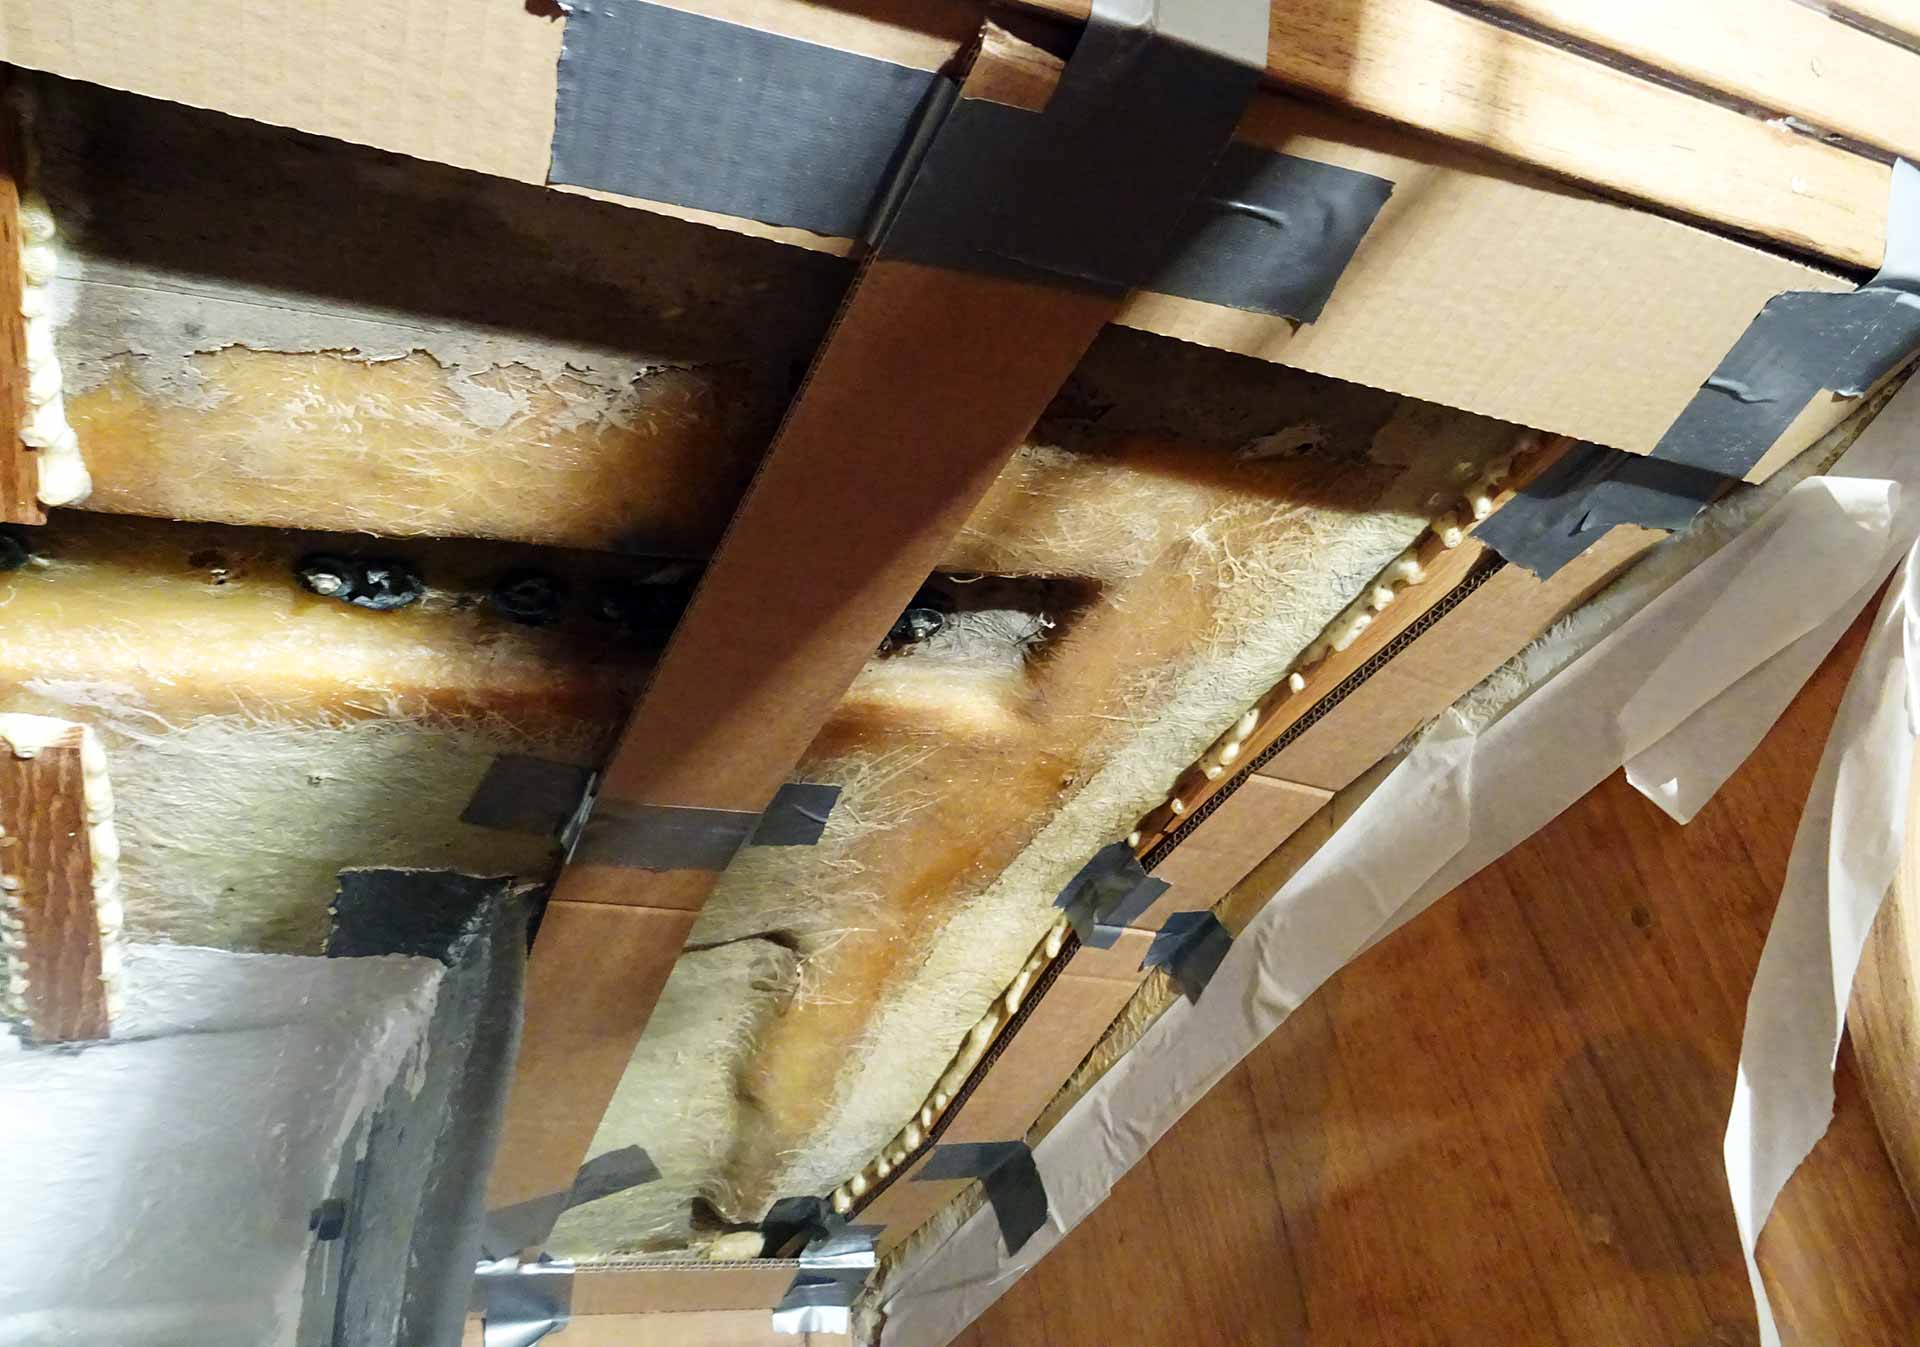
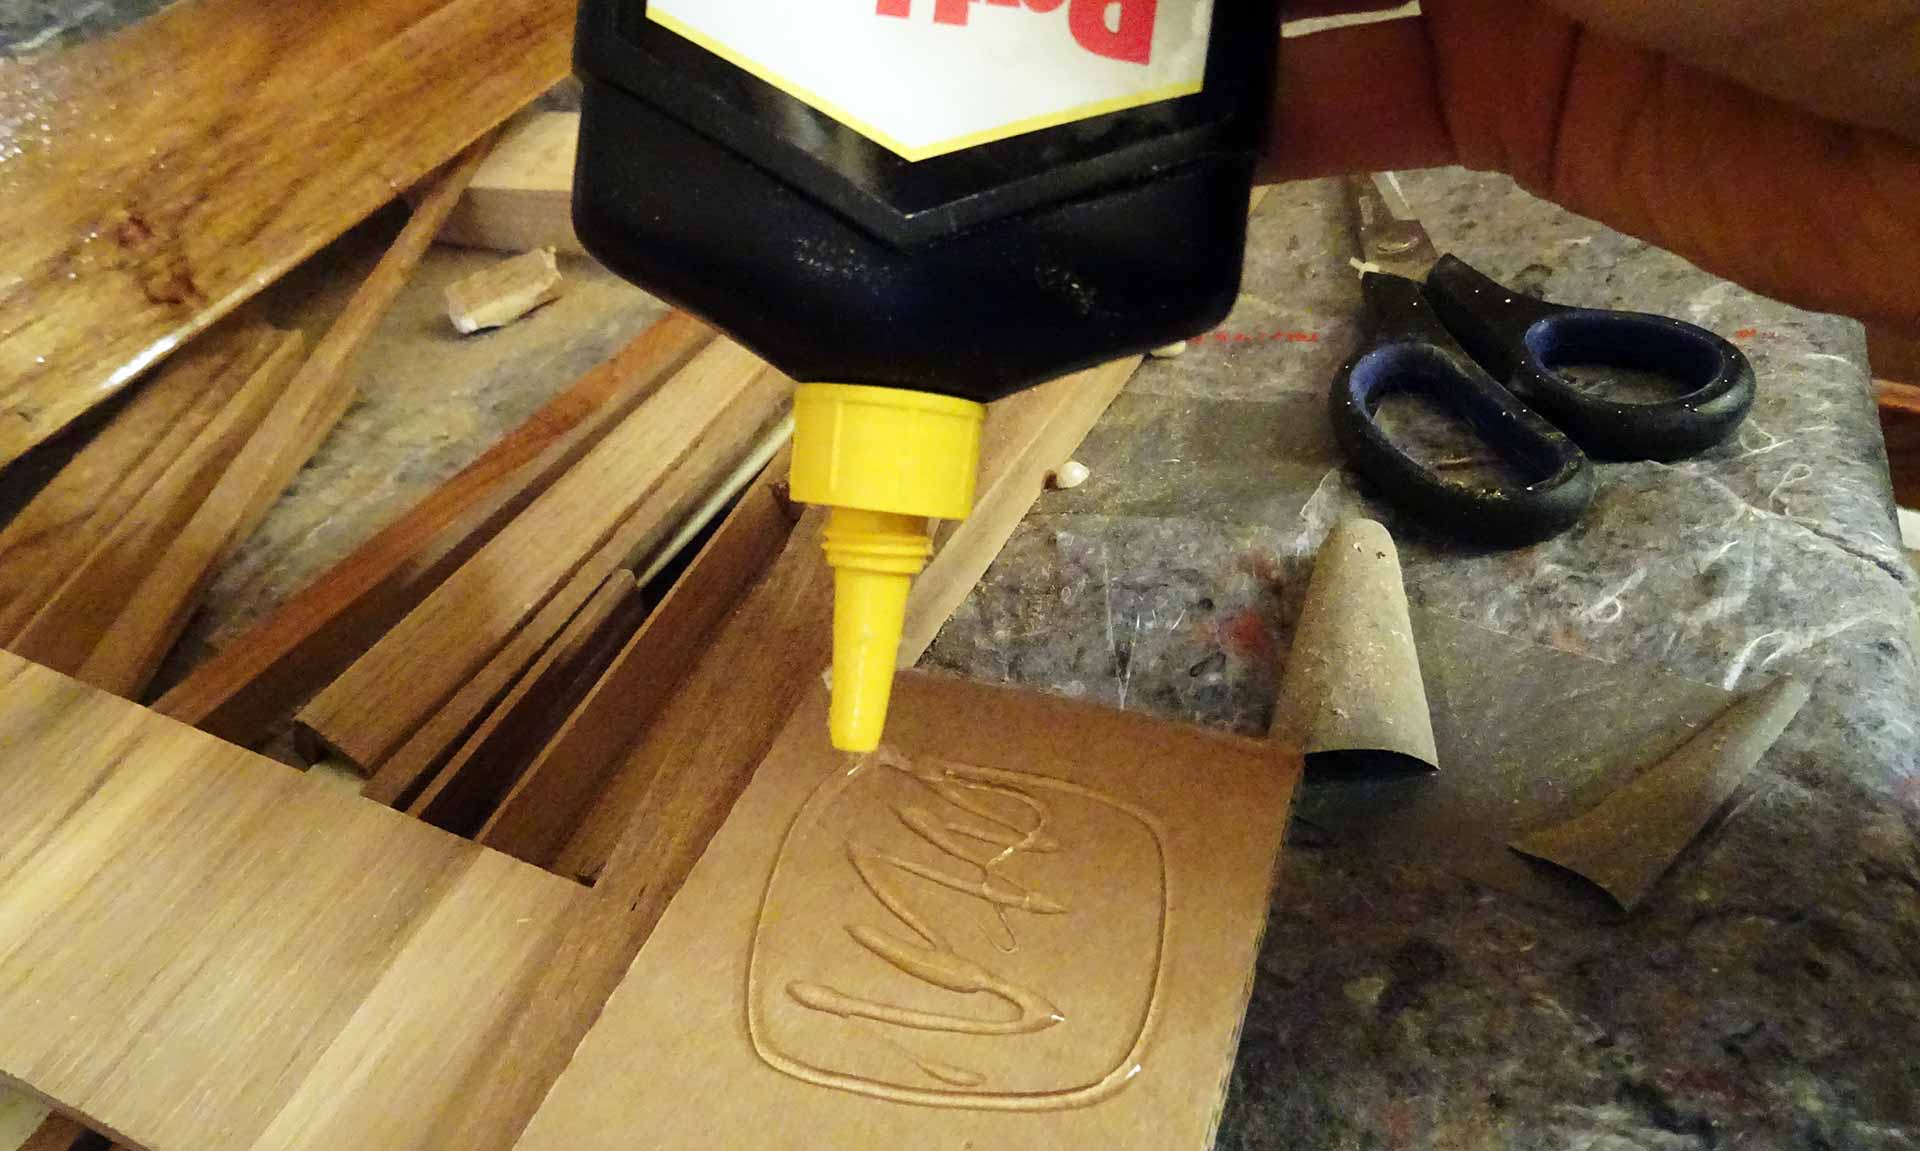
Strip by strip was then brought overhead which naturally took quite some time. Nevertheless, this technique enables me to achieve a pretty nice outcome – as far as I can see, I was able to match the outline dimensions of the panel quite exactly. When two strips meet, I will additionally use some all-purpose adhesive to bring them together.
Working over head is a mess to a near-40 year old neck and after some 2.5 hours of working I did was done with the first of at least 4 covers I´ll have to make for the saloon of my King´s Cruiser 33. There will be strips falling off from time to time forcing me to adjust them neatly again, sometimes glue will drop onto my glasses or – worse – into my mouth (I shouldn´t work with open mouth, I know) and sometimes taking off Gaffer tape to place a correction could destroy neighbouring strips. Anyway, I´ve done it and was quite at ease with my efforts.
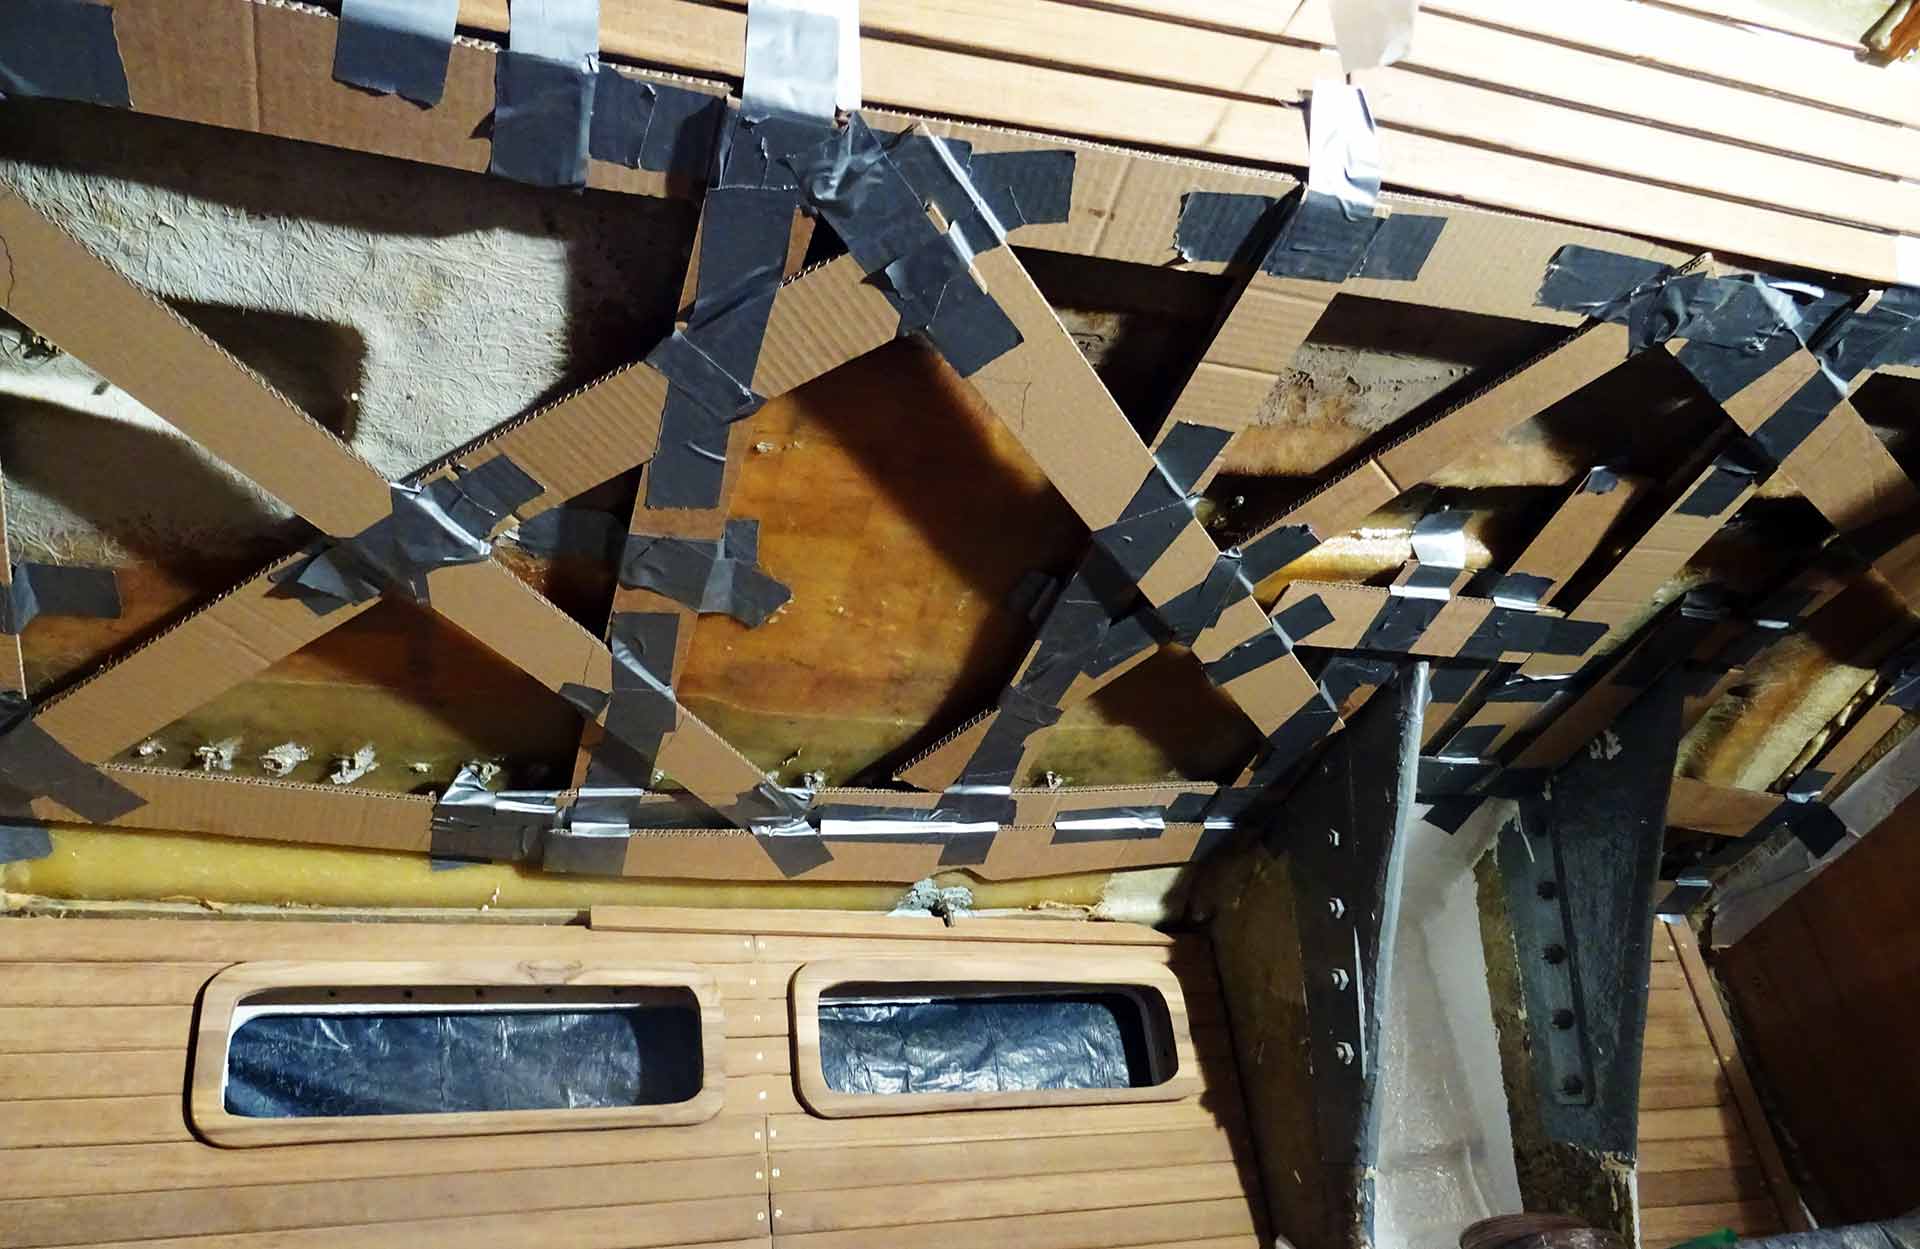
After having done the outlines, following every corner, every chain plate-stringer and exactly all along the bulkheads and the curvature of the deckhouse-structure I added stringers for rigidity crosswise. The whole bunch of cardboard and Gaffer will now be allowed to thoroughly dry before I remove it from the boat.
Leather lining: Should I go for it?
Thinking ahead two steps, I am now not so sure how to proceed when the panels have been cut out: The easiest way would be to have them again sealed with a layer of epoxy resin and then painted plain white. I love the colour I chose for the GRP surfaces some months ago and I think by doing so this will significantly improve the feeling of the boat´s lighting situation. Also, having a painted surface will be easier to keep clean and if necessary to repair .
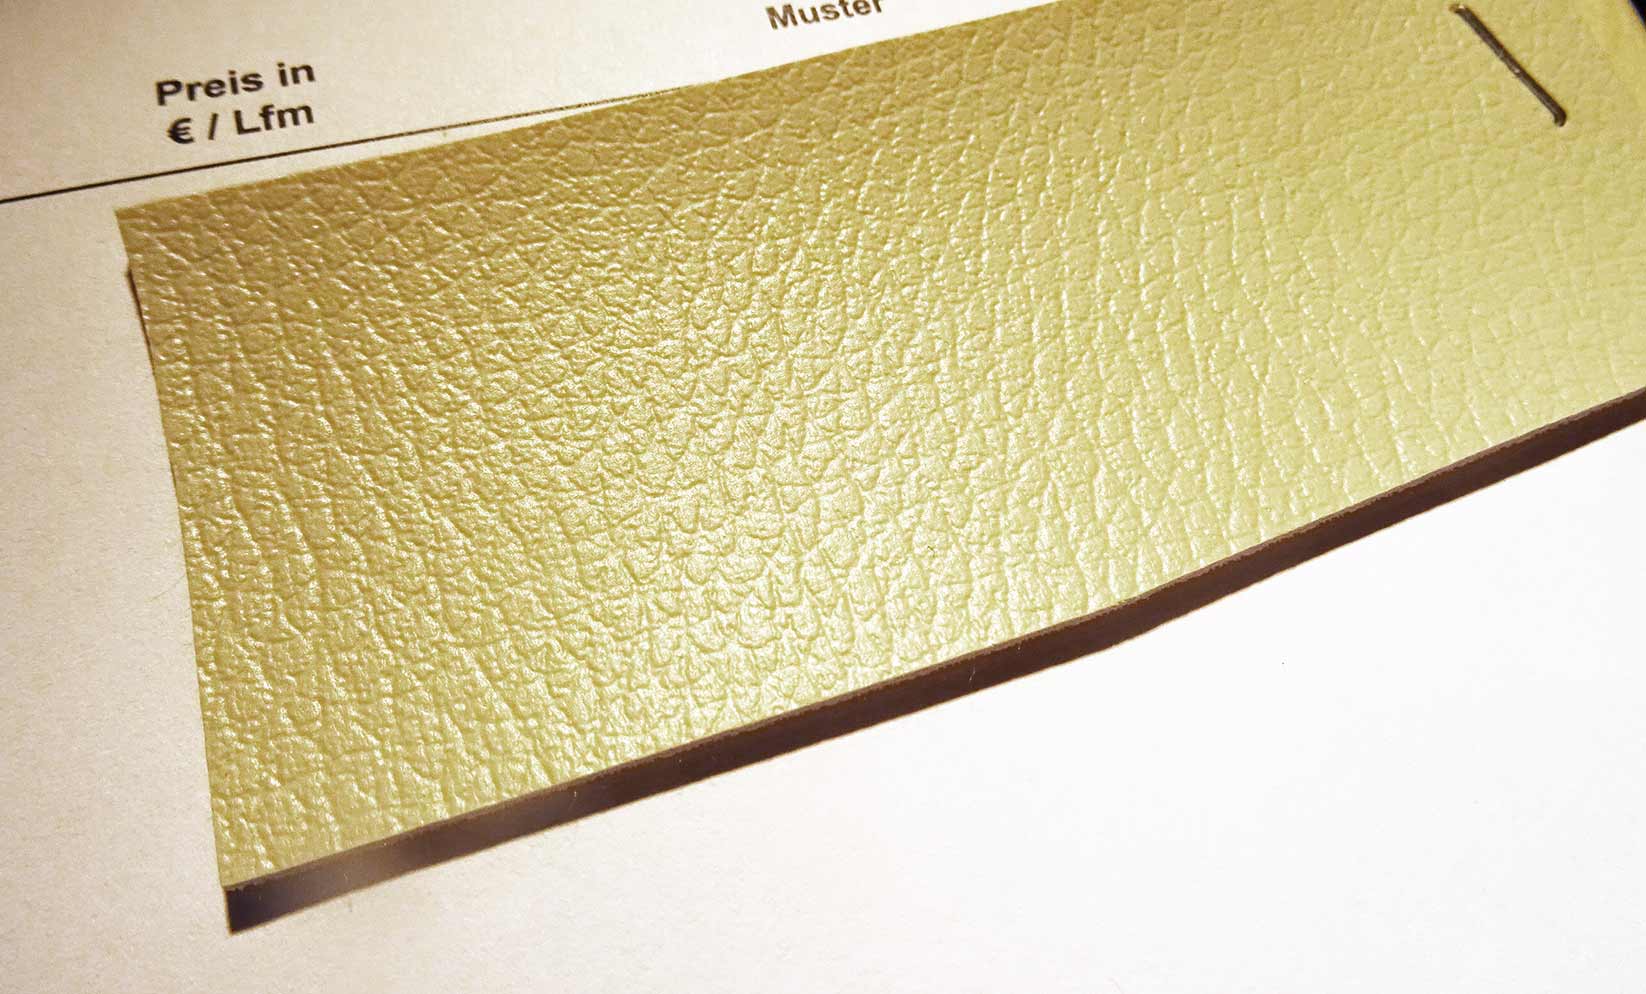
On the other hand: I love the leather covered panels of yachts for the roofing. I simply love it. Not for insulation but for the haptic sensation and the noble looks. I am investing an awful lot of money now into really expensive Teak timber for the ceiling and panels, wouldn´t it be nice to have a comparable classy look over the heads of the crew? Of course, real leather is out of question, but faux leather is relatively cheap, easy to work with and as well easy to clean. Repairing would be a mess on the other hand. Well, I will have some time to think it through before having to make this decision.
Next steps in the process
So, what´s next here? Apart from the fact that the described working steps will have to be repeated three times at least to make the models for the saloon panels, the already finished one will be taken out into the workshop and the outlines transferred to the birch plywood . Utilizing the saw the raw panel will be cut out, sanded and fitted to the hull again.
Along the hull´s stringers there will be stringers on the plywood panels as well to provide stability and to widen the gap between hull and panel to 1.2 cm. That´s the spacing for the cable tubes and the electric wiring. Making the holes for the LED light plinths and leaving a bigger hole for the mounting access for the mast-wiring will follow. This is when I will have to come up with an answer to the faux leather-question.
Quite some work ahead – but it´s increasingly fun to do it.
Other interesting articles:
Everything on the King´s Cruiser 33 by Fiskars , a GRP classic
“Half Way Round” – 3 young men on a Kingscruiser 33- trip (half) around the world
Galley ballet – preparing meals when it´s rocky outside

- My Boats & Boat Articles
- Boatbuilding Plans
- Free Stitch and Glue Boat Plans
- Info about Cedar

Steps in Building a SCAMP sailboat
Links to all my scamp building pages.
Closing in the Cabin
Now that the side and front decks are glued down I can start closing in the cubby / cabin. There are 2 sides and a roof. It's not really a cabin because it's open at the back.
Checking that the pieces actually fit on.

For the most part the sides fit quite well. I will need to trim them slightly at the top but I'll wait till they are glued on before trimming. I had decided where the portholes were to be located. I tried a few spots and cut the opening using the circle cutter. Here is a link to the porthole construction.
After some tweaking I put several coats of epoxy on the sides.

The front curvey bit gets a drain hole, a notch to allow for the thickness of the front deck, and a doubler. Once I had glued on the doubler and made the notch I was able to check the fit and sand the front end of the cabin side.

After cutting the mast case hole I was able to put the roof on but it was too stiff to bend easily. That is a bit of a problem because it does not have any epoxy on yet.
While I think about how to fit the roof on, I bent it on the bench using clamps. A few days in this position helped a lot but it was still quite stiff.

When I went to the farm supply store to get some bird seed I saw that they had a ratchet set with heavy duty strap on sale for 12 dollars. I grabbed one and it worked very well to bend the roof on enough that I could measure and cut the side support pieces. I had kept a piece of ash for this. I split it down the centre at an angle. This will reduce the amount of planing I will have to do to accommodate the angle of the roof.
Gluing the sides on

I spent some time figuring out exactly how the side rail, cubby and doublers all join in and fit together. It is not complicated but I had a senior's moment reading the manual and looking at the flat pieces.
I also spent some time sanding the inside faces of the side pieces and the front with its doubler. I had to figure out how to clamp the sides on before gluing them on. It does not need a lot of clamping but there is a slight curve.
The sides are glued on and clamped. In the end I used mostly rope through the windows to tighten the pieces together.
I did not worry about getting a perfect glue line. I can reach all the edges and will be doing fillets and smoothing out the glue lines later. Since some of the edges are quite visible they need to be nicely done.

Fitting the side support pieces took a bit of time because I checked the roof curve and made sure that there was a straight line between the second and 4th bulkheads. As it turned out the 3 rd bulkhead was just a bit lower. Well within the capability of epoxy to fill. If it had been higher I would have had to trim it. I used straight pieces of wood to check that the front to back lines were ok and curvy battens to check the curve across the boat. When I was satisfied that the fit was as good as I would get, I marked the glue line and glued on the support beam.
I love using the planes when they are sharp and the wood knot free. It took no time at all to cut the angle of the wood to match the roof angle.
I went on to work on other parts and eventually got back to the cuddy.

I had not glued in the mast ramp onto the mast partner. This is there to help guide the mast in when it is being stepped. Some folks, thanks Simeon, suggested that building up the fitting that sticks out of the roof helps keep rain out of the mast area. It allows for a boot to be fitted to the raised lip of the mast opening. I will likely do this after I've glued the roof on.

I glued a couple of doubler along the top edge of the second bulkhead to give me a wider gluing surface.
I had had to get another strap because I could not get an even pressure across the length. Luckily for me Canadian Tire was having a sale and had them at half price. I'll use them later to attach the boat to the trailer.

With the ramp in place I could finalize the roof opening. I could also see if the roof would fit and could be clamped while it set.
It's a good thing I did another fitting because I found that the roof sort of bulged where the opening is located. I tried putting a couple of 2x4 to push the roof down while tightening the straps but it did not work very well.
When I posted the photo of the mast location opening, Simeon Baldwin suggested that the sides could be raised by about 3/4 of an inch to allow a sleeve to be installed around the mast and fastened to this extension. This would reduce the amount of rainwater coming in through the mast opening.

After some fiddling I decided to screw the top section down temporarily with a stick to even out the pressure. This worked perfectly.
I had prepared 2 stiff sticks to support the outer edge while the straps pulled the roof down. Once I was happy this would work I took it apart again and got ready to actually glue the roof down.

I was quite worried but everything went as planned. I coated the underside of the roof with a heavy coat of epoxy which soaked in quite a lot. Then I put a line of glue on all the top surfaces, side supports, bulkhead tops around the mast opening and the support beams. It was easy to lower the roof and the mast partner aligned the roof.
After screwing the (oiled) screws in I positioned the 3 straps and the 2 pieces of wood for the edge and gradually tightened the set up. I had to reposition the side pieces of wood but otherwise everything went down well.

After adding a couple of clamps where the strap had not pulled quite enough at the edges, I went around and removed extra squeezed out epoxy. I found a few gaps and added some epoxy in there. Got my hair completely gummed up in the process.
I did not make any fillets. I will go around when everything is set and nicely cleaned up and fillet the seams.

The roof gets a doubler just behind the third bulkhead which is the opening of the cuddy.
When I checked the fit of the doubler I realized that the roof would not be long enough for the doubler overhang. I prepared and glued a small extension to the roof and glued it in at the same time as the doubler. It's only short about a quarter inch.
The doubler is the right size and aligns perfectly with the side panels so I'm not changing these dimensions
It took a bit of fitting but went on without much of an argument. I added lots of clamps to get proper connection with the roof.
Even though the roof is only 6mm plywood it's turning out to be quite strong and rigid. I had planned several reinforcements but other than a couple of backing boards for cleats and such I will not add more stiffening and will avoid adding weight. I will put a layer of glass on the roof I think.

I took the clamps and straps off and checked the roof. Everything seems to be solid and where it should be.

The curve of the roof piece turned out to be greater than the curve of the side piece (the one with the porthole). This means that the roof overhangs on the side more in some places than others. It also means that the roof piece does not quite fit. There is about 3/16 missing at the very front of the roof. I don't think that's a problem since I'll be trimming the roof to the dimensions of the support piece of wood along the edge. I can also fill the shortage.
The front extension piece went in well and the extra glue needs to be sanded / scraped flush.

I used my new carbide scraper to even out the top of the roof where there was glue squeeze out where I made the small addition. This scraper is a revelation to me and I keep finding ways of using it.
I used my sander with 40 grit paper to trim the doubler/roof line. It worked really well and now I have to decide how to trim the piece of wood that lines the side of the cabin and supports the roof along the edge. it overhangs front and back.
Using 40 grit paper is not entirely easy, or rather it's entirely way too easy to grind too much. If you try this go with a light hand.

Both front and back of the cuddy roof support needed trimming. The hardest was deciding exactly what angle I wanted the trim to follow. I just extended the roof line.
I used the Japanese saw on both the front and the back.

The roof is trimmed and I've filled various spots that had slight gap around the edge of the roof. When I trimmed the support beam I used a flexible batten to show me the curve of the roof, that means that there was a slight curve on the beam. When I glued on the roof the plywood did not curve as much as the batten and this created a slight gap on the very edge. Not a large gap but noticeable.

After the epoxy set I sanded the filling and the edge of cuts.
I used my sander with coarse grit to round the edge. The darker part is where I filled the back of the roof with epoxy.
I was hard visually to see if I was rounding evenly so I made a sanding block cut in the curve I wanted. Funny photo taken from the edge of the block with sandpaper.
The block allowed me to even out the edge and smooth it. I also rounded the curve at the end of the support beam.

I now need to sand and get the mast opening cleaned up.
Simeon Baldwin suggested to me that a higher lip on the edge would allow a boot to be fitted which would prevent rain from coming in. I though this would be a good idea so I prepared extensions to glue on. These are about 3/4 of an inch. Enough for snap fastening to be fitted.
Before gluing I took photos and when I looked at the photos I realized I did not like the look of the extension. This is one of the first times when I decided not to do something that is actually a good idea.
If I decide it's a modification that I would like, it's not difficult to reach the area in the future. Since this boat will be primarily a day sailor, I am not so worried about rain coming in. Besides a camping tent could have a small extension that would cover the back of the cuddy up to the mast and waterproof that opening.

I sanded and cleaned up the edges. I also went around with thickened epoxy to fill any screw hole I had left. There was a small gap around the edge of the mast opening and I filled that.
I still need to even out the front overhang of the roof and round the front and back edges.
A quick sand of the area and I'm ready to glass the roof.

I dug up the fiberglass and cut a suitable piece. I had to think about how to handle the mast opening and decided to cut around it. The mast case is already glassed and the only piece I still need to do is the little ramp. I'll not worry about it in this session.
I taped the loose edge to that the glass would go around the edge nicely but I think that's overkill.

The roof is glassed and the corners are tidy. I had a bit of a worry. My epoxy is starting to crystallize because of the cold shop. While I was rolling it out I noticed some small lumps. That likely means that there is slightly more hardener than necessary. I took whatever lumps I could off the weave and I'm hoping for the best.

The epoxy has hardened normally with just a few little bumps. These will sand out fine. The glass is trimmed and still too soft to sand.
That's the roof done. A need a bit of glass on the mast box but otherwise that's pretty much done too.
I think I'll start getting the boat ready to turn over. I need some sturdy workhorses to support it. The ones I have are just a bit on the short side.
emails: Christine
If you decide to build a boat be careful. These tools can be dangerous. If you don't know how to safely handle something find out. There are lots of forums out there.
This web site reflects my personal ideas and doesn't represent anyone else's point of view. I don't claim to be an expert in anything, just some little old lady muddling along.
Log in or Sign up
You are using an out of date browser. It may not display this or other websites correctly. You should upgrade or use an alternative browser .
Constructing cabin roof
Discussion in ' Wooden Boat Building and Restoration ' started by EStaggs , Apr 6, 2010 .
EStaggs Senior Member
So here I sit trying to figure out how I'm going to build out my cabin roof. Thought I'd come to the pros to see what ideas they might have. Need to build a hard top over an open cabin. Will have 3 panel windshield, two hard sides, and open aft to the fish deck. This will be built on a 23 foot Clippercraft sportfisher, and needs to have enough strength to not be destroyed by a 200lb person. Typically will only have rods, crab pots, and a radar on it, don't intend it to be a platform for spotting or anything. Walls will be 6mm ply, forward panels as well. Considering doing laminated beams with a 6mm panel over them, laminating 3 6mm panels together and doing a single aft beam on the exterior (to preserve headroom) for support, or possibly foam core with 3mm skins on the outside. Any and all advice/ideas are accepted. This needs to be something relatively quickly built, as I am on a deadline. Here she is in templating stock: The roofline will come down around an inch or two before the final sheets are cut. Thanks for your input. E
alan white Senior Member
You've got enough crown to laminate a roof from thin plywood. You could laminate plywood or strip-build it. If plywod alone (no beams), try to achieve 1/2"-9/16"" total. If strip-built over a form, use red cedar 1/2" thick and 10 oz fiberglass cloth inside and out. With low headroom, you can run EXTERNAL longitudinal stringers 2"-2 1/2" tall incorporated (bonded) into 3/8" plywood (good mounts for handrails) a foot or so in on each side. This would stiffen up the plywood enough to obviate the need for any internal beams. I like this approach for speed and because the hand rails can be mounted on the external stringers (which can be wider at the base (1 1/2") and angled to a narrower top surface (3/4"), more or less keystone-shaped in section.
Alan, I was out of town and wasn't able to access this, thanks for posting. So laminating 2 sheets of 1/4" okoume and sheathing it in 6oz woven fabric would be plenty. I had thought about just doing full length hoop style hand holds cut from 2"x4" dimensional lumber. Wasn't sure if I was going to do a longitudinal member underneath it or if it would be enough strength as-is, epoxied down and backed with #12 SS screws. Thanks again. E
It's impossible to advise without seeing plans, but it's probable that 1/2" would be okay. The problem can be where a hatch is located, the break in the ply tends to straighten the curve leading up to it. Then transverse frames would help. Alternately, as said, strip-building the cabin top will work well in such a situation. You needn't glass plywood---- epoxy alone will be fine.
mark775 Guest
Alan, I don't see where he said a hatch will be put in it. There are boats here with external frames but I like it internal if necessary. Because it will carry a crab pot, etc., it needs glass fabric. You can get the Shelman Marine ply in Spokane - It has a fungicidal glue and is wonderfully rot resistant. E, I took a peak at your site - Nice ice box but if you dont put a drain with a P-trap, you will be sorry. No big deal, copper tubing with flare epoxied in place. The P-trap keeps the cold from flowing down and out. Tryt not to drain into bilge if you have another place to drain. IMO, the cabin does not look too tall, if fact, when they are cut down too much, they look chopped; Nice work, E.
- Advertisement:
I'd say that without a hatch, plywood will be consistant in curvature, but if there's a sliding type hatch, a single curved frame could be installed externally, located just across the forward end of the hatch. Alternately, two partial frames could be put inside, and the forward hatch frame could sit above the roof and control the curvature of the roof in the middle. That way there's no head-bumper in the middle when going below.
How can I fix this rotten mahogany cabin wall?
solid Iroko cabin trunk
restoring 1960 cabin cruiser boat kit
1930's Coast Guard Cabin Launch Restoration
What weight fiberglass cloth for a trunk cabin top?
10 ft "cabin" cruiser
Refurbishment of a 1966 Pacemaker 44 Aft Cabin. Green owner. Seasoned boat. Questions
structural wood joinery for cabins and wheelhouses
- No, create an account now.
- Yes, my password is:
- Forgot your password?

- New Sailboats
- Sailboats 21-30ft
- Sailboats 31-35ft
- Sailboats 36-40ft
- Sailboats Over 40ft
- Sailboats Under 21feet
- used_sailboats
- Apps and Computer Programs
- Communications
- Fishfinders
- Handheld Electronics
- Plotters MFDS Rradar
- Wind, Speed & Depth Instruments
- Anchoring Mooring
- Running Rigging
- Sails Canvas
- Standing Rigging
- Diesel Engines
- Off Grid Energy
- Cleaning Waxing
- DIY Projects
- Repair, Tools & Materials
- Spare Parts
- Tools & Gadgets
- Cabin Comfort
- Ventilation
- Footwear Apparel
- Foul Weather Gear
- Mailport & PS Advisor
- Inside Practical Sailor Blog
- Activate My Web Access
- Reset Password
- Customer Service

- Free Newsletter
Pearson Rhodes 41/Rhodes Bounty II Used Sailboat Review

Hallberg Rassy 42 Used Sailboat Review

How to Perform Your Own Pre-Buy Inspection

Beneteau 323 Used Boat Review

How Does the Gulf Stream Influence our Weather?

Can You Run a Marine Air-Conditioner on Battery Power?

Preparing Yourself for Solo Sailing

Your New Feature-Packed VHF Radio

Practical Sailor Classic: The Load on Your Rode

Anchor Rodes for Smaller Sailboats

Ground Tackle Inspection Tips

Shoe Goo II Excels for Quick Sail Repairs

What Oil Analysis Reveals About Your Engine

An Unusual Sailboat Shines a Light On A Sustainable Future

Is It Time to Get an Electric Dinghy Motor?

Bottom Paint 30-Month Update

Battle of the Teak Cleaners — Snappy Teak-Nu vs. Star Brite

New Seacocks for the Offshore Sailor

Bottom Paint Care

Are E-bikes Worth the Extra Weight and Cost?

How to Handle the Head

How to Select Crew for a Passage or Delivery

Preparing A Boat to Sail Solo

Re-sealing the Seams on Waterproof Fabrics

Waxing and Polishing Your Boat

Reducing Engine Room Noise

Tricks and Tips to Forming Do-it-yourself Rigging Terminals

Marine Toilet Maintenance Tips

Learning to Live with Plastic Boat Bits
- Sailboat Reviews
- Sails, Rigging & Deck Gear
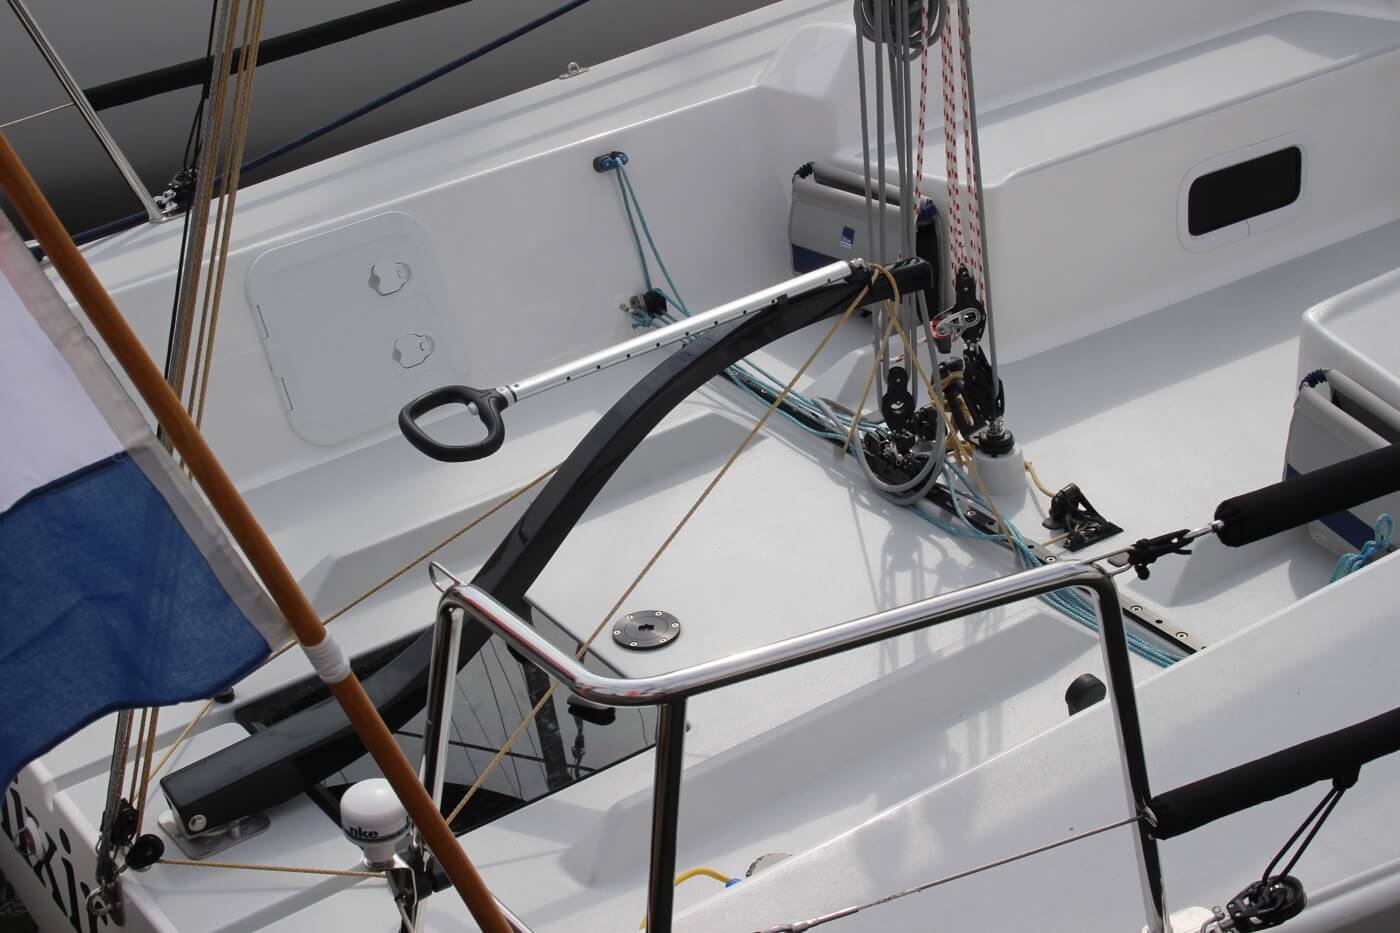
A Practical Look at Sailboat Cockpit Design
Ps outlines what to look for when searching for a comfortable, functional cockpit..

Cockpit ergonomics involve more than a concern about coaming angles and comfortable seating. These are just two items on a long list of attributes that define the space where sailors spend most of their waking time.
At boat shows, the crowd can be divided into those that poke around on deck and those who head directly below. Brokers know the difference between racing sailors and cruisers and which end of the companionway ladder will seal the deal. Racers want performance and scrutinize the on-deck design features that make it all happen, while cruisers look below for the amenities of a house afloat. This stereotype may be too rigid, but from what we’ve seen at recent boat shows, cruisers need to take a closer look at the cockpit and get a feel for how a sailboat will handle underway, as well as serve as a home away from home.
There’s much more at stake than comfort for the crew. Cockpit design and layout drives many boat-handling tasks, ranging from steering and sail trimming to what goes on when its time to reef. Angles of view can even affect watchkeeping.
For example, a high center cockpit and a large overlapping genoa create a 90-degree-plus no see zone, and thats a big deal when it comes to collision avoidance. A large catamaran with a tall bridge-deck cabin can add an even larger no see zone, especially when running on autopilot with no one perched on the elevated helm seat.
In short, many cockpits are optimized for at-anchor enjoyment instead of underway usability. So part of the boat-shopping process should include careful scrutiny of how essential sailing and boat-handling tasks will be accomplished. For starters, note how much contortion it takes to really crank each winch, determine whether or not the line leads favor easy reefing, and check to see how well the cockpit shape contributes to keeping the crew from being washed overboard. These are essential attributes, and for some, they are more vital than galley counter material and the fabric that covers the cushions below.
Grand Prix racers have long favored wide open, low sided, no-transom cockpits that are more of an open deck than a protective trench. In heavy weather, these nothing-to-cling-to cockpits can become perilous. In 1997, during the Hong Kong to Osaka, Japan Race, Americas Cup trials veteran Makoto Namba was at the helm of Escape One when a 20-foot breaking sea washed him out the open transom of the 45-foot racer. In 2006, Dutch Volvo Ocean racer Hans Horrevoets was swept from the deck of ABN AMRO TWO and lost at sea. Closer to home, pro sailor Dan Cianci was tossed over the lifelines of the 50-foot ocean racer Snow Lion. The accident occurred at night, in heavy weather just off the Delaware River mouth. In each case, the cockpit design favored sail trim and line handling over heavy-weather safety considerations. Many ocean racers mitigate such design tradeoffs with careful use of harnesses, tethers, jack lines, and hard points for tether attachment.
Just the opposite design trend can be found in the deep cockpit and conventional closed transom of sailboats such as Ted Hoods 25-year-old design, American Promise. Dodge Morgan sailed the heavy-displacement 60-footer solo around the world. The big, double-head rigged sloop provided a great deal of crew protection and seakeeping ability during Morgans voyage. And for years after he donated the boat to the U.S. Naval Academy, midshipmen also learned to appreciate the cockpit layout-particularly during bad weather offshore.
PS Technical Editor Ralph Naranjo sailed that boat in a gale-strewn trans-Atlantic with an able crew and encountered a nasty 979-millibar low at about 45 degrees North latitude. According to the log, AP was reaching eastward at 9 knots under storm trysail and storm jib with green water routinely sweeping the deck. Seas had silenced the mini-M satphone by regularly immersing the dome shaped antenna in wave faces, eventually flooding the internal circuitry.
It was a rough passage, and little things taken for granted in smoother seas showed their true value. Features like the deep cockpit well, the heavy-duty, water-tight companionway doors, and the massive cockpit drains all proved their worth.
The flip side of the coin is that really bad weather encounters are a rare occurrence for most sailors. More often, 0- to 20-knot sailing conditions prevail. And our coastline is dotted with safe havens in which to hide from the elements. So one of the big challenges facing every designer and naval architect drawing lines for their next new boat is the question of exposure. Will owners use the boat as a dockside second home and be underway only in fair weather, or will they take the cruiser label to heart and leave land well astern? A close look at cockpit layouts will give you some indication of the boats intended use.
We prefer to evaluate cockpit ergonomics from both static and dynamic points of view. On some boats, these underway and at anchor evaluations lead to disparate conclusions. A cockpit that works well underway may be confining in port, or another vessel with a patio-size stern may be altogether dysfunctional at sea. It’s all an issue of trying to do two different jobs with one fixed set of dimensions and appendages. Buyers need to know what attributes they will make best use of.
For monohulls, coping with heel is the first big challenge, and wide-open space, whether its in the cockpit or main saloon, can be a tough challenge. The universal solution to carrying wide beam aft on cruising boats seems to be the ubiquitous cockpit table. It can be a handy centerline support, but it’s a tough addition to a seafaring cockpit in the minds of many traditional sailors. That said, production boatbuilders have gotten much better at making these centerline, folding-leaf tables sturdy enough for sea duty and effective as a handhold.

Industry Trends
Over the last 50 years, mainstream production sailboat design has moved noticeably away from the racer/cruiser defined by Pearson, Tartan, C&C, Cal, Columbia, Ranger, Islander, Ericson, and others. The new boats are roomier with less emphasis on performance under sail. Racers now have their own genre of sailboat, and they are faster, better handling, and more capable than their predecessors. But whats most surprising is that many mainstream cruisers are anything but optimized for long-distance passages and long-term living aboard.
These boats feature convenience, style, and comfort, and the actual design objective in many cases is more focused on weekend cruising and an annual two-week summer harbor-hopping cruise. Easy sail-setting and large boat interiors in shorter waterline lengths prevail, and such trends influence the shape and layout of the cockpit. When it comes to ergonomics, the split between cruisers and racers is more apparent than ever, but theres also some real differentiation within the ranks of cruisers themselves.
In Practical Sailors recent scrutiny of cockpit designs at local boat shows, weve noted four emerging sailboat stereotypes. These include daysailers that feature few, if any, accommodations; racing boats brimming with performance-enhancing hardware; and ocean-going cruisers capable of extended passagemaking. The fourth grouping-larger than all the other three combined-are also labeled cruisers, but with less draft, less stability, and less versatile sail plans, they are more like an SUV designed more for the highway than off-roading in the backcountry.

Sizing Up a Cockpit
The takeaway lesson for us was the importance of making sure that the cockpit of the boat you are about to buy is in keeping with the mission of the rest of the boat. If you are a serious club racer, the centerline table wont be a crew favorite. Those making a double-handed passage on a 40-footer will see a tight, narrow cockpit differently than when eight sail the same boat. So with complete belief in the old adage, different strokes for different folks, heres what we looked for when evaluating cockpit design. It can be used as a helpful buyers guide when you’re surveying your next boat.
Working the winches: All too often, winch location is an afterthought, and fine hardware is stuck on side coamings shaped more as a roof for the aft cabin than as a key component of sail trim. We always like to check sheet leads angles that lead lines to a particular winch and then mimic what cranking with a two-handed winch handle would be like. Look for 360-degree clearance with no knuckle-busting stanchions in the way. Be sure that the winch grinding works on either tack. Genoa sheeting may always put you on the leeward side of the cockpit, but runners and spinnaker guys will usually be worked on a windward winch.

Sheets and halyards: One of testers major complaints was builders habit of running seldom-used halyard lines attached to roller-furling headsails and in-mast furling mainsails all the way aft to the cockpit. Doing so left lengthy line tails cluttering up the area under the dodger where reefing lines, the boom vang, and in some cases, the main sheet all arrived like too many trains in a station.
Theres no perfect mainsheet arrangement, but some are better than others, and the one you choose has a lot to do with how much attention you pay to the nuance of sail trim. The current vogue among serious racers involves 2-to-1 end-boom sheeting: an in-boom lead of the double-ended sheet returns aft via turning blocks near the mast and runs to winches on both sides of the boat (often referred to as Admirals Cup, or German mainsheet). Fast, no-load hand trimming is the upside, but in any breeze, theres good reason to quickly get the sheet on a winch drum. The sheet tail is shorter because of the low ratio (2-to-1) lead. One nuisance is that the sheet can end up bunched up on one side or the other.
Many cruisers prefer higher ratio, multi-part tackles for mainsheeting and may lead each end to a Harken-type adjustment system rather than using a winch. When fast tacking action is not in the cards, this is a user-friendly system.
Some cruisers incorporate mid-boom sheeting because it moves the tackle out of the cockpit than rather then because of how effectively it allows the mainsail to be trimmed. The shortened lever arm means the sheet needs a winch sooner than later. There is also more of a leech-flattening, vang-like effect to this type of sheeting, not the best feature for light-air efficiency.
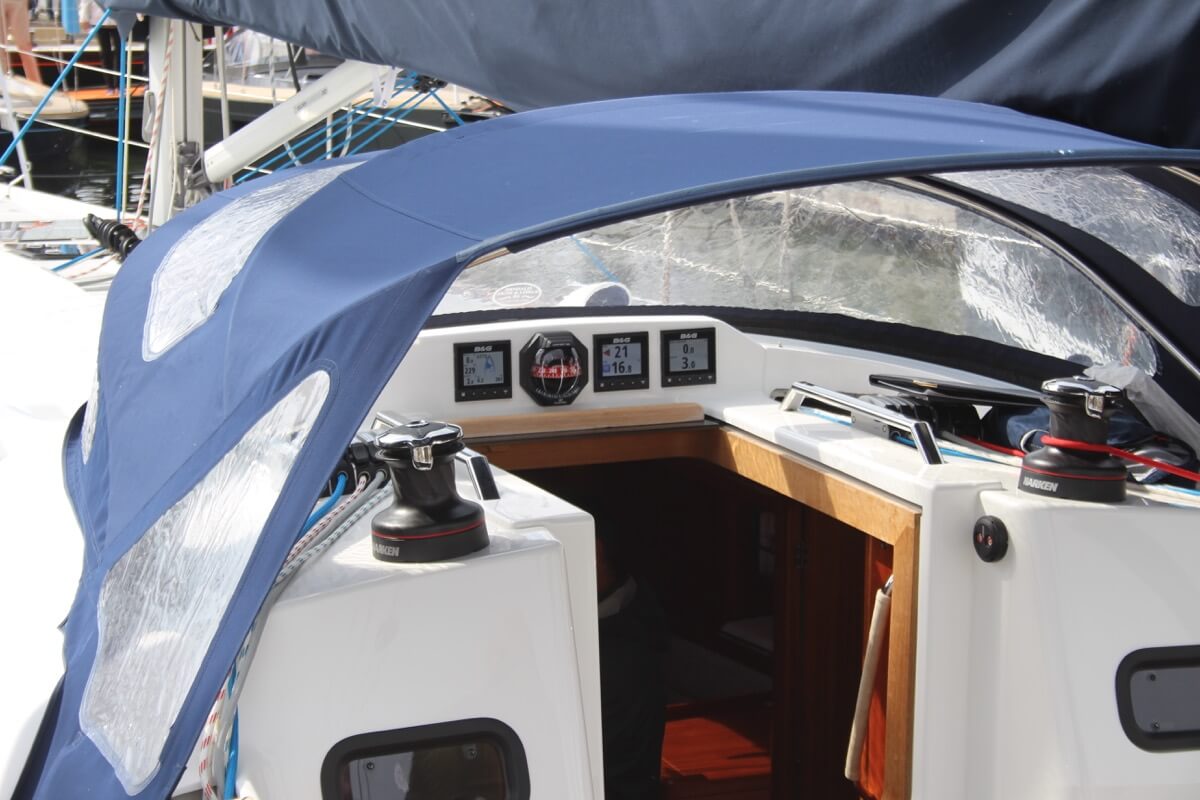
The trend toward travelers roosting on over-cockpit arches, a longtime standard in Hunter Yachts and a recent adoption in some Beneteau lines, helps protect the crew from accidental jibe injuries and allows dodgers and biminis to flourish, but windows in these covers are essential, if a crew is to see whats happening whey they are pulling the strings.

Anticipate the angles: Look at how things will change as heel increases and note where vulnerability lies. We recently ran into a crew who had lost an engine due to the shape of the cockpit. During the design phase, the location for an engine instrument recess was placed within easy reach of the person at the helm. In an upright trim-and even at 30 degrees of heel-all was well, but in a knock down when the cockpit began to flood, the engine instruments ended up in a low spot, and despite their sealed all-weather design, submerging them in saltwater had not been part of the engine manufacturers gameplan. The ensuing corrosion took out the panel and the alarm system, and a novice crew failed to notice the changes in sound and smell as a raw-water blockage in the cooling system went critical.
Those headed offshore need to pay special heed to the companionway and have a feel for what angle of heel sends water down an open hatch. Whats a surprise to many is that the first part of the hatch to reach the water may be the top rather than the lower portion of the companionway. Sticking in a washboard or two will help keep a breaking wave from sloshing below, but it may be of little use in a deep knockdown.
Getting in and out: One of the most important safety features of a good boat is the transitional path that leads a crew from the cockpit to the deck. Good engineering focuses on step heights, deck camber, handholds, and the quality of the nonskid surface. This transition in and out of the cockpit is one of the most repeated movements on the vessel. If a dodger, bimini, or Florida room compromises access, they become a hazard. Small, molded steps are of little help in a seaway.
There is no ideal cockpit that meets everyones preferences, and plenty of bad ideas still persist. No matter what your aims are as a sailor, some things deserve to take precedence. Ample space for entertaining friends for sundowners dockside is nice, but comfort underway, including ergonomic seats for sitting or napping, and secure places to steer and stand watch when the boat is heeled should be a higher priority.
Likewise, sight lines and sensible sheet arrangements should come before drink-holders. Next time you prowl the boat show, spend some time exploring the cockpit and comparing features. It is the hub of the boat.
Rating cockpit attributes is a worthwhile endeavor for a serious boat shopper. Start by rating component parts. It will allow you to more effectively compare and contrast one boat with another, according to your specific sailing plans and needs.
For example: Above, we have focused on seven key cockpit attributes and rated five new boats accordingly. Below is a brief explanation of each of the criteria selected. The result of the data table is not a winner-take-all report card. It’s a means of determining what has been emphasized in a specific cockpit design on a wide variety of very different vessels.
Rating for this attribute reflects both the location of a winch and the way in which crew members must bend, lean, or contort themselves while sheeting. We considered how efficiently a manual winch could be cranked and whether or not an electric winch could be safely operated while retaining a clear view of the sail being sheeted or hoisted.
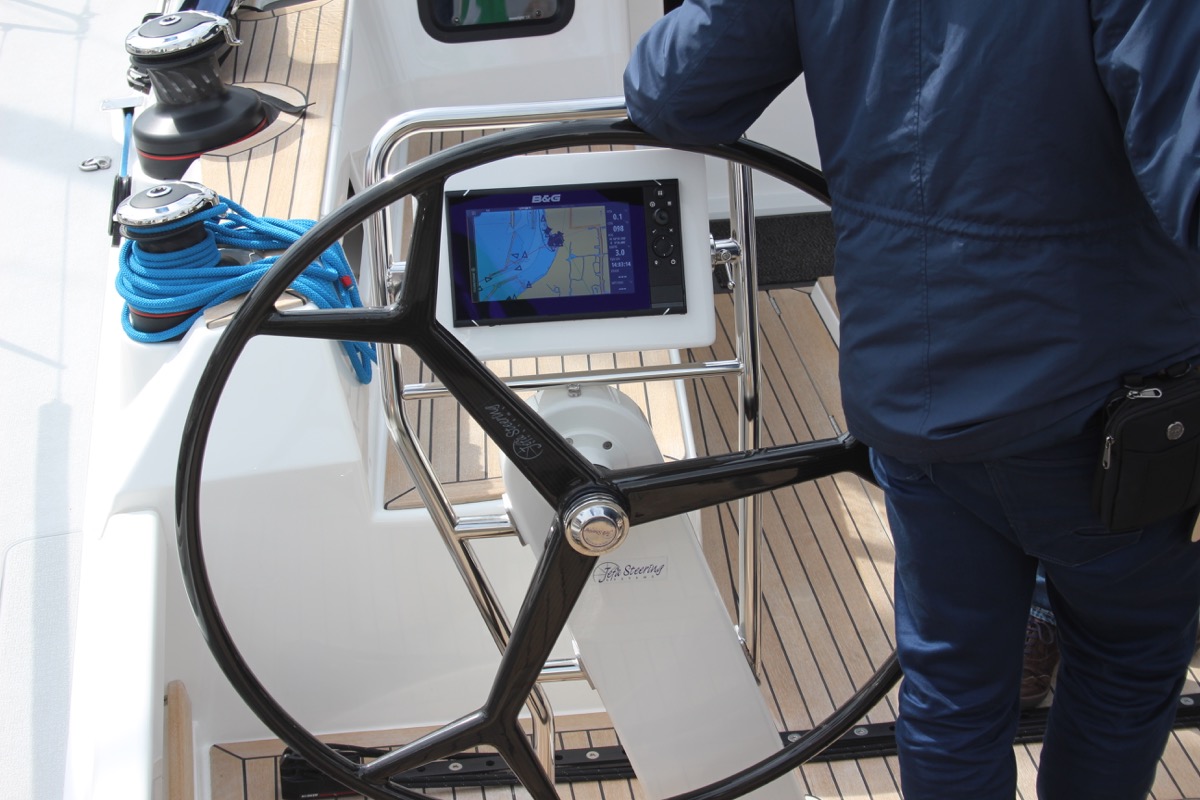
This was not a look at the vessel’s steering hardware, rudder design, or feel of the tiller. It was more focused on helm location and how the person steering the boat could carry on the process comfortably for lengthy periods of time.
We consider the ability to quickly and efficiently reduce and add sail area to be a primary aspect of seamanship. Cockpit layouts teamed up with efficient well-chosen hardware can make or break this facet of cockpit ergonomics. Awkward winch placement, too many lines clustered together around a big bank of rope clutches, and attempting to place sheets, halyards, and reefing lines all in the helmsman’s lap with only one or two undersized winches usually lead to lower ratings.
Collision avoidance requires seeing what’s about to cause trouble well ahead of time, and anything shy of a 360-degree angle of view detracts from the process. We were concerned about view angles and obstructions ranging from dodgers, to deck-sweeping headsails, cabinhouse bulkheads, and other design features that limit the helmsperson’s field of vision. Aboard many multihulls, there’s a growing trend toward providing one perch that offers an all-around view. But when the vessel is operating on autopilot and no one is in the elevated helm seat, watchkeeping efforts are hampered.
When floating on an even keel, it’s easy to get in and out of most cockpits. However, a modest heel of 15 degrees can turn wide-open cockpits with awkward coamings and narrow sidedecks into a hazard. Getting around on a vessel in a seaway requires good nonskid, an abundance of ready handholds, and an unobstructed pathway in and out of the cockpit. Seats need to be usable underway, and the dodger, companionway, and bimini must work in concert.
Short Handing
Because most cruisers sail short-handed, we are always on the look out for features that make watchkeeping more user friendly. These include line leads and winch layouts that allow headsail trimming from the helm and may even offer the chance to tuck or shake a reef from the confine of the cockpit. Crew alone on deck also benefit from deeper-welled open space. Giving the short-handed crew protection from seeping seas and offering well-placed hardware goes a long way to ensure safe, efficient passagemaking.
Entertaining
At anchor and in port, the cockpit changes from an operations center to a backyard patio. Gone is the need for seakeeping attributes, and what counts is how well the area at the aft or center portion of the boat stacks up as a place for stationary fun. Tables that can serve dinner for six or drinks for 10 get high marks. Transoms that fold down, offering access to the sea, are also a current rage. It’s no surprise however, that many of the attributes that drive high scores for entertaining earn a lower grade at sea—the reason many designers and builders have spent time developing fold-up swim platforms and wellreinforced drop-leaf tables ready for sea duty.
VALUE GUIDE: Comparing Cockpit Design
Related articles more from author, leave a reply cancel reply.
Log in to leave a comment
Latest Videos

The No Expense Spared Antigua 60 Cruising Sailboat Soolaimon

How To Buy Sails – With Joe Cooper

Bavaria C42: What You Should Know | Boat Tour

Universal Diesel Engines – What You Should Know
- Privacy Policy
- Do Not Sell My Personal Information
- Online Account Activation
- Privacy Manager
10 Best Small Sailboats (Under 20 Feet)

Last Updated by
Daniel Wade
December 28, 2023
Compact, easy to trailer, simple to rig, easy to maintain and manage, and affordable, the best small boats all have one thing in common: they offer loads of fun while out there on the water.
So whether you're on a budget or just looking for something that can offer ultimate daytime rides without compromising on safety, aesthetic sensibilities, alternate propulsion, and speed, the best small sailboats under 20 feet should be the only way to go.
Let's be brutally honest here; not everyone needs a 30-foot sailboat to go sailing. They come with lots of features such as electronics, entertainment, refrigeration, bunks, a galley, and even a head. But do you really need all these features to go sailing? We don't think so.
All you need to go sailing is a hull, a mast, rudder, and, of course, a sail. And whether you refer to them as daysailers, trailerable sailboats , a weekender sailboat, or pocket cruisers, there's no better way to enjoy the thrills of coastal sailing than on small sailboats.
There are a wide range of small boats measuring less than 20 feet available in the market. These are hot products in the market given that they offer immense thrills out on the sea without the commitment required to cruise on a 30-footer. A small sailboat will not only give you the feel of every breeze but will also give you the chance to instantly sense every change in trim.
In this article, we'll highlight 10 best small sailboats under 20 feet . Most models in this list are time-tested, easy to rig, simple to sail, extremely fun, and perfect either for solo sailing or for sailing with friends and family. So if you've been looking for a list of some of the best small sailboats , you've come to the right place.
So without further ado, let's roll on.
Table of contents
{{boat-info="/boats/hunter-15"}}
The Marlow-Hunter 15 is not only easy to own since it's one of the most affordable small sailboats but also lots of fun to sail. This is a safe and versatile sailboat for everyone. Whether you're sailing with your family or as a greenhorn, you'll love the Hunter 15 thanks to its raised boom, high freeboard, and sturdy FRP construction.
With high sides, a comfortable wide beam, a contoured self-bailing cockpit, and fiberglass construction, the Hunter 15 is certainly designed with the novice sailor in mind. This is why you can do a lot with this boat without falling out, breaking it, or capsizing. Its contoured self-baiting cockpit will enable you to find a fast exit while its wide beam will keep it steady and stable no matter what jibes or weight shifts happen along the way.
This is a small sailboat that can hold up to four people. It's designed to give you a confident feeling and peace of mind even when sailing with kids. It's easy to trailer, easy to rig, and easy to launch. With a price tag of about $10k, the Hunter 15 is a fun, affordable, and versatile boat that is perfect for both seasoned sailors and novices. It's a low-maintenance sailboat that can be great for teaching kids a thing or two about sailing.
Catalina 16.5
{{boat-info="/boats/catalina-16-5"}}
Catalina Yachts are synonymous with bigger boats but they have some great and smaller boats too such as Catalina 16.5. This is one of the best small sailboats that are ideal for family outings given that it has a big and roomy cockpit, as well as a large storage locker. Designed with a hand-laminated fiberglass sloop, the Catalina 16.5 is versatile and is available in two designs: the centerboard model and the keel model.
The centerboard model is designed with a powerful sailplane that remains balanced as a result of the fiberglass centerboard, the stable hull form, and the rudder. It also comes with a tiller extension, adjustable hiking straps, and adjustable overhaul. It's important to note that these are standard equipment in the two models.
As far as the keel model is concerned, this is designed with a high aspect keel as the cast lead and is attached with stainless steel keel bolts, which makes this model perfect for mooring or docking whenever it's not in use. In essence, the centerboard model is perfect if you'll store it in a trailer while the keel model can remain at the dock.
All in all, the Catalina 16.5 is one of the best small sailboats that you can get your hands on for as low as $10,000. This is certainly a great example of exactly what a daysailer should be.
{{boat-info="/boats/hobie-16"}}
There's no list of small, trailerable, and fun sailboats that can be complete without the inclusion of the classic Hobie 16. This is a durable design that has been around and diligently graced various waters across the globe since its debut way back in 1969 in Southern California. In addition to being durable, the Hobie 16 is trailerable, great for speed, weighs only 320 pounds, great for four people, and more importantly, offers absolute fun.
With a remarkable figure of over 100,000 launched since its debut, it's easy to see that the Hobie 16 is highly popular. Part of this popularity comes from its asymmetric fiberglass-and-foam sandwiched hulls that include kick-up rudders. This is a great feature that allows it to sail up to the beach.
For about $12,000, the Hobie 16 will provide you with endless fun throughout the summer. It's equipped with a spinnaker, trailer, and douse kit. This is a high-speed sailboat that has a large trampoline to offer lots of space not just for your feet but also to hand off the double trapezes.
Montgomery 17
{{boat-info="/boats/montgomery-17"}}
Popularly known as the M-17, The Montgomery 17 was designed by Lyle C. Hess in conjunction with Jerry Montgomery in Ontario, California for Montgomery Boats. Designed either with keel or centerboard models, the M-17 is more stable than most boats of her size. This boat is small enough to be trailered but also capable of doing moderate offshore passages.
This small sailboat is designed with a masthead and toe rail that can fit most foresails. It also has enough space for two thanks to its cuddly cabin, which offers a sitting headroom, a portable toilet, a pair of bunks, a DC power, and optional shore, and a proper amount of storage. That's not all; you can easily raise the deck-stepped mast using a four-part tackle.
In terms of performance, the M-17 is one of the giant-killers out there. This is a small sailboat that will excel in the extremes and make its way past larger boats such as the Catalina 22. It glides along beautifully and is a dog in light air, though it won't sail against a 25-knot wind, which can be frustrating. Other than that, the Montgomery 17 is a great small sailboat that can be yours for about $14,000.
Norseboat 17.5
{{boat-info="/boats/norseboat-17-5"}}
As a versatile daysailer, Norseboat 17.5 follows a simple concept of seaworthiness and high-performance. This small sailboat perfectly combines both contemporary construction and traditional aesthetics. Imagine a sailboat that calls itself the "Swiss Army Knife of Boats!" Well, this is a boat that can sail and row equally well.
Whether you're stepping down from a larger cruiser or stepping up from a sea kayak, the unique Norseboat 17.5 is balanced, attractive, and salty. It has curvaceous wishbone gaff, it is saucy, and has a stubby bow-sprit that makes it attractive to the eyes. In addition to her beauty, the Norseboat 17.5 offers an energy-pinching challenge, is self-sufficient, and offers more than what you're used to.
This is a small, lightweight, low-maintenance sailboat that offers a ticket to both sailing and rowing adventures all at the same time. At about 400 pounds, it's very portable and highly convenient. Its mainsails may look small but you'll be surprised at how the boat is responsive to it. With a $12,500 price tag, this is a good small sailboat that offers you the versatility to either row or sail.
{{boat-info="/boats/sage-marine-sage-17"}}
If you've been looking for a pocket cruiser that inspires confidence, especially in shoal water, look no further than the Sage 17. Designed by Jerry Montgomery in 2009, the Sage 17 is stable and should heel to 10 degrees while stiffening up. And because you want to feel secure while sailing, stability is an integral feature of the Sage 17.
This is a sailboat that will remain solid and stable no matter which part of the boat you stand on. Its cabin roof and the balsa-cored carbon-fiber deck are so strong that the mast doesn't require any form of compression post. The self-draining cockpit is long enough and capable of sleeping at 6 feet 6 inches.
The Sage 17 may be expensive at $25k but is a true sea warrior that's worth look at. This is a boat that will not only serve you right but will also turn heads at the marina.
{{boat-info="/boats/laserperformance-laser-sb3"}}
Having been chosen as the overall boat of the year for 2008 by the Sailing World Magazine, the Laser SB3 is one of the coolest boats you'll ever encounter. When sailing upwind, this boat will lock into the groove while its absolute simplicity is legendary. In terms of downwind sailing, having this boat will be a dream come true while it remains incredibly stable even at extraordinary speed.
Since its debut in 2004, the Laser SB3 has surged in terms of popularity thanks to the fact that it's designed to put all the controls at your fingertips. In addition to a lightweight mast, its T- bulb keel can be hauled and launched painlessly. For about $18,000, the Laser SB3 ushers you into the world of sports sailing and what it feels to own and use a sports boat.
{{boat-info="/boats/fareast-18"}}
As a manufacturer, Fareast is a Chinese boat manufacturer that has been around for less than two decades. But even with that, the Fareast 18 remains a very capable cruiser-racer that will take your sailing to the next level. In addition to its good looks, this boat comes with a retractable keel with ballast bulb, a powerful rig, and an enclosed cabin.
Its narrow design with a closed stern may be rare in sailboats of this size, but that's not a problem for the Fareast 18. This design not only emphasizes speed but also makes it a lot easier to maintain this boat. Perfect for about 6 people, this boat punches above its weight. It's, however, designed to be rigged and launched by one person.
This is a relatively affordable boat. It's agile, safe, well-thought-out, well built, and very sporty.
{{boat-info="/boats/chuck-paine-paine-14"}}
If you're in the market looking for a small sailboat that offers contemporary performance with classic beauty, the Paine 14 should be your ideal option. Named after its famous designer, Chuck Paine, this boat is intentionally designed after the classic Herreshoff 12.5 both in terms of dimensions and features.
This is a lightweight design that brings forth modern fin keel and spade rudder, which makes it agile, stable, and faster. The Paine 14 is built using cold-molded wood or west epoxy. It has varnished gunnels and transoms to give it an old-time charm. To make it somehow modern, this boat is designed with a carbon mast and a modern way to attach sails so that it's ready to sail in minutes.
You can rest easy knowing that the Paine 14 will not only serve you well but will turn heads while out there.
{{boat-info="/boats/wd-schock-lido-14"}}
Many sailors will attest that their first sailing outing was in a Lido 14. This is a classic sailboat that has been around for over four decades and still proves to be a perfect match to modern small boats, especially for those still learning the ropes of sailing.
With seating for six people, the Lido 14 can be perfect for solo sailing , single-handed sailing, or if you're planning for shorthanded sailing. While new Lido 14 boats are no longer available, go for a functional used Lido 14 and you'll never regret this decision. It will serve you well and your kids will probably fall in love with sailing if Lido 14 becomes their main vessel during weekends or long summer holidays.
Bottom Line
There you have it; these are some of the best small sailboats you can go for. While there are endless small sailboats in the market, the above-described sailboat will serve you right and make you enjoy the wind.
Choose the perfect sailboat, invest in it, and go out there and have some good fun!
Related Articles
I've personally had thousands of questions about sailing and sailboats over the years. As I learn and experience sailing, and the community, I share the answers that work and make sense to me, here on Life of Sailing.
by this author
Best Sailboats
Most Recent

What Does "Sailing By The Lee" Mean?
October 3, 2023

The Best Sailing Schools And Programs: Reviews & Ratings
September 26, 2023
Important Legal Info
Lifeofsailing.com is a participant in the Amazon Services LLC Associates Program, an affiliate advertising program designed to provide a means for sites to earn advertising fees by advertising and linking to Amazon. This site also participates in other affiliate programs and is compensated for referring traffic and business to these companies.
Similar Posts

Affordable Sailboats You Can Build at Home
September 13, 2023

Best Small Sailboats With Standing Headroom

Best Bluewater Sailboats Under $50K
Popular posts.

Best Liveaboard Catamaran Sailboats

Can a Novice Sail Around the World?
Elizabeth O'Malley
June 15, 2022

4 Best Electric Outboard Motors

How Long Did It Take The Vikings To Sail To England?

10 Best Sailboat Brands (And Why)
December 20, 2023

7 Best Places To Liveaboard A Sailboat
Get the best sailing content.
Top Rated Posts
Lifeofsailing.com is a participant in the Amazon Services LLC Associates Program, an affiliate advertising program designed to provide a means for sites to earn advertising fees by advertising and linking to Amazon. This site also participates in other affiliate programs and is compensated for referring traffic and business to these companies. (866) 342-SAIL
© 2024 Life of Sailing Email: [email protected] Address: 11816 Inwood Rd #3024 Dallas, TX 75244 Disclaimer Privacy Policy
"Better than a New Boat" is what some of our customers say after they have updated looks and function with a composite fiberglass and aluminum Custom Hardtop from Atlantic Towers. If your existing canvas top is looking a little tatty, before you commit for an expensive new bimini check out our full range of Custom Hardtops for boats in the 20 foot to 60 foot + size range.
Atlantic's family of custom ATL self trimming aluminum extrusions allows for Custom Hardtops of fiberglass and aluminum to be constructed with out the expense of a mold or time consuming edge finishing. ( click here for full technical information ) Typically 1/3 weight and 1/2 the cost of solid glass aftermarket hardtops, here are some of the reasons to consider an Atlantic Towers Custom Hardtops:
- LIGHT WEIGHT: A typical 70-80 square foot top weighs less than 150 pounds including supports and mounting hardware.
- STRONG: One piece all welded construction, means no bolted connection between heavy fiberglass lid and legs.
- FULLY ENGINEERED structure means no on-site welding and fitting. Atlantic Towers hardtops arrive ready to install.
- ENCLOSURE fits easily in optional track system, with hardtop overhang to protect from rain and spray (enclosure by others).
- LONGER LIFE from your enclosure. Fitting enclosures to a stable hardtop instead of a bimini reduces stress on zippers and fittings.
- REINFORCED to accept mounting of antennas, radar, search lights, and other equipment
- CONCEALED WIRING: Exclusive ATL self trimming mounts and hollow frame allow concealment of cables and equipment mounting bolts.
- CUSTOM DESIGN using our library of 1000s of production boat specs, allows customers to choose from a number of design possibilities or develop one of their own with the assistance of our design engineers.
Custom Fishing Hardtop

If you have been looking for a solid, watertight enclosure that looks great and is priced right, you've found it. Owners of smaller walk-around style boats have found Atlantic's popular Custom Fishing HardTop to be the ideal solution. A full 4 Rod Rocket Launcher is standard, along with mounts for Halogen Spreader Cockpit Floodlights, a variety of antennas and Radar.
Each Tower is also as stylish as it is durable. To ensure design continuity, each Custom Fishing HardTop is custom fabricated to match the existing lines of your boat's windshield.
Atlantic's Hardtops are shipped complete with all the components and guidelines needed for easy "bolt-on" installation. No welding is required' eliminating the possibility of damaging your boat's finish. The best part is, there is no need to leave your boat at some strange facility for days or even weeks, while your pipe work is being completed.
Standard Features One piece all-welded top frame of Atlantic's proprietary ATL6 aluminum extrusion and supporting legs of schedule 40 aluminum measuring nearly 2" O.D. finished in 320 spiral texture and bright dip anodized. High quality hand laid fiberglass top . 360 degree overhanging edge for weather protection, with provision for canvas track installation . Two side mount antenna plates and two halogen light mounts aft . Overhead hand rail running port to starboard just aft of helm seat -Rectangular carlins (roof beams) for added strength and to allow installation of reel hangers, rod racks and other equipment . Custom aluminum fittings for attachment of supporting legs to boat . Stainless steel hardware . Aluminum backup plates.
Atlantic's Custom Fishing Hardtop is specifically designed for retrofitting to walk around and express style boats. With it's unique cantilevered design, the Custom Fishing Hardtop requires no forward supports in it's normal configuration. Nothing to obstruct your field of view from the helm, nothing to interfere with front or side opening windshields, only clean lines and nothing to interfere with an enclosure. Strong enough to support hundreds of pounds of gear, and shrug off the beating a boat takes running offshore, yet very light weight overall. In fact a Custom Fishing Hardtop weighs less than 100 pounds for most applications.
Each Custom Fishing Hardtop is made from high strength corrosion resistant aluminum alloys. The aluminum is spiral finished with a fine 320 abrasive, before it is given a chemical cleaning process called "bright dip" which gives it the appearance of brushed chrome, or brushed stainless. After bright dip, it is clear anodized, which is the build up of a hard clear oxide finish for maximin salt water protection. The perimeter hardtop frame is shaped using our proprietary ATL-6 aluminum extrusion. This extrusion provides a self-trimming recess for the hand laid fiberglass top surface, allowing it to be securely fitted to the all welded structural frame with no exposed fasteners.
Using our proprietary database, each Atlantic Towers Custom Fishing Hardtop is custom designed and fabricated to order for your individual boat. The leading edge of the Custom Fishing Hardtop is shaped to conform to the shape of the windshield on your boat, for a factory installed look, and easy fit of a wrinkle free enclosure. The arch style legs are stylish, strong, and make for easy installation. The pipe used to fabricate the legs is 1 1/2" schedule 40 marine grade aluminum pipe, which measures 1.90" on the outside with a very heavy wall thickness.

Base Price: $4999* * Full width or expanded area top (most walk-around style boats with recessed side decks are at standard pricing, tops for traditional express style boats, larger runabouts, and extra wide walk-arounds require a top of more than 30 square feet at additional cost) $600.00 Traditional Leg Option Add $800
Custom Hardtop

All Atlantic Towers Custom Hardtops are completely engineered products. They are ready for installation without any field welding or additional fabrication when they leave our plant. As a result, they can be packed and shipped anywhere in the world.

Or for considerable freight savings, Supporting legs and structure may be designed to demount using one of several Atlantic Towers custom hardware fittings. Larger tops may then be shipped "flat" as in the photos below.

SAILING SCHOOL
12 knots sailing courses.
Weather forecast
Learn how to read clouds and winds like a pro

Competent Crew
Introduction to sailing. Learn how to become an active crew

Bareboat Skipper
Recreational sailing yacht skipper of vessels up to 78 feet

Issued documents

10 days live aboard course on power or sailing yacht. The key objective of the course is to teach candidates to become a recreational sailing yacht skipper and be able to charter and handle big cruising yachts on their own.
Ideal for those who already have little sailing experience and would like to learn coastal navigation.
- navigation at sea
- collision regulations
- practice at sea 200nm
- Skipper on a yacht up to 78ft. / 24m
- 20 miles offshore in day time
- in moderate weather conditions
5-day sailing course on board of a cruising yacht. The main objective of the course is to teach basic sailing terminology, parts and functions, basic sail trim, helm commands, seamanship and safety.
Ideal for candidates with little to no previous sailing experience who wish to train to become an active crew member on a power or sailing yacht.
- no special requirements
- Crew on a yacht up to 78ft. / 24m
- in sight of land and in fair weather
- only with professional skipper
Choose your sailing program. Where to start?
Introduction to sailing, on the coast.
Sailing knots - 3 hours
Understanding of the boat - 3 hours
On the water
Basic keelboat - 3 hours
Basic cruising
Safety on board - 3 hours
Live aboard sailing boat - 5 days
Live aboard power boat - 7 days
Bareboat cruising
Mandatory shore-based course for navigation and collision regulations at sea
Passage planning
Collision regulations
Practice at sea
Sailing boat - 10 days
Motor boat - 7 days
Advanced coastal cruising
Take additional shore-based courses prior to practice at sea
Long-term passage planning
Tidal navigation
Night sailing
Celestial navigation
Live-aboard course in tidal waters
Sailing yacht - 7 days
Upcoming courses

Blue water sailing practice

Availability
Competent crew

Marine weather forecasting

- Quick Facts
- Sights & Attractions
- Tsarskoe Selo
- Oranienbaum
- Foreign St. Petersburg
- Restaurants & Bars
- Accommodation Guide
- St. Petersburg Hotels
- Serviced Apartments
- Bed and Breakfasts
- Private & Group Transfers
- Airport Transfers
- Concierge Service
- Russian Visa Guide
- Request Visa Support
- Walking Tours
- River Entertainment
- Public Transportation
- Travel Cards
- Essential Shopping Selection
- Business Directory
- Photo Gallery
- Video Gallery
- 360° Panoramas
- Moscow Hotels
- Moscow.Info
- Museums of History and Politics
Cabin of Peter the Great
The first residential building to be built in the newly founded city of St. Petersburg was a wooden house or cabin, intended for Tsar Peter himself. The cabin is very small - only 60 square meters in area and is a strange combination of a traditional Russian house or izba and a Dutch home with large and elaborate windows and a high roof covered with wooden tiles. Tsar Peter lived in this house between 1703 and 1708 and the living room, bedroom and study, still filled with Peter's original belongings, continue to bear the mark of his presence. Peter the Great wanted all the houses of his new city to be built of stone, the way it was done in Europe. But he could not afford a stone house at the time, so he ordered the walls to be painted as if the house was made of bricks.
Hidden from wind and rain inside a red brick pavilion, the first house built in the city of St. Petersburg is still open to the public. During the Second World War the Cabin of Peter the Great was the first museum to reopen in 1944 after the dramatic 900-day Siege of Leningrad.
Accommodation near the Cabin of Peter the Great
Saint petersburg hotel, soviet-era standard hotel boasting spectacular views across the neva river, aristos boutique hotel, simple mini-hotel on a quiet side street near gorkovskaya metro station, tradition hotel, elegantly fitted mini-hotel with views on the peter and paul fortress, apartments on voskova 2, homely, affordable two-bed apartment in pretty petrograd side setting, troitskaya ploshchad apartment, cozy one-bedroom apartment in fascinating soviet-era building with great views, hostel 1912, friendly hostel offering clean, low-cost accommodation on the petrograd side, dining near the cabin of peter the great, u gorchakova, good-quality russian and ukrainian cuisine in rustic-themed interiors, fresh point, local chain serving fresh sandwiches and tasty homemade soups with takeout, demyanova ukha, landmark restaurant from the soviet era, named after a famous fish soup.
We can help you make the right choice from hundreds of St. Petersburg hotels and hostels.
Live like a local in self-catering apartments at convenient locations in St. Petersburg.
Comprehensive solutions for those who relocate to St. Petersburg to live, work or study.
Maximize your time in St. Petersburg with tours expertly tailored to your interests.
Get around in comfort with a chauffeured car or van to suit your budget and requirements.
Book a comfortable, well-maintained bus or a van with professional driver for your group.
Navigate St. Petersburg’s dining scene and find restaurants to remember.
Need tickets for the Mariinsky, the Hermitage, a football game or any event? We can help.
Get our help and advice choosing services and options to plan a prefect train journey.
Let our meeting and events experts help you organize a superb event in St. Petersburg.
We can find you a suitable interpreter for your negotiations, research or other needs.
Get translations for all purposes from recommended professional translators.
- Submit News
- Purchase Webinar Listing
ArchShowcase
- Submit New Showcase
- Submit New Event
- Submit New Video
- Submit New YouTube Video
- AECCafe Media Kit
- Banner Ad Specifications
- eMail Blast Specifications
Back to 'AECCafe Blogs'
Subscribe to aeccafe.

Submit Your Project
Recent posts.
- AS Barcelona Home Renovation Project, Spain by C & Arquitectura
- Huanggang Skyscraper Redefines the Shenzhen Urban Landscape by Aedas-designed
- Hamdan Bin Rashid Cancer Hospital, Dubai at UAE by Stantec
- Two-family house in Yawata Japan by Hirokazu Taniguchi
- 40 Spring Gardens, Manchester, UK by SpaceInvader
- Entries RSS
- Forums New posts Unanswered threads Register Top Posts Email
- What's new New posts New Posts (legacy) Latest activity New media
- Media New media New comments
- Boat Info Downloads Weekly Quiz Topic FAQ 10000boatnames.com
- Classifieds Sell Your Boat Used Gear for Sale
- Parts General Marine Parts Hunter Beneteau Catalina MacGregor Oday
- Help Terms of Use Monday Mail Subscribe Monday Mail Unsubscribe
Grab rail and Cam Cleat Mounting Cabin Roof
- Thread starter Squidd
- Start date Mar 6, 2012
- Featured Contributors
- Musings With Maine Sail

Now I've seen the many options and your specific epoxy filled plug method, but they assume there is a core to drill, fill and protect... On my boat there is a 1" hollow space between cabin roof and inner liner... I understand "thru bolting" is the prefered method of attachment, but with the hollow core, I'm worried the inner and outer liners will compress and I won't be able to get a good seal, not to mention, even with washer or backing plate, I'm really only held on by one 1/4" layer of fiberglass...? Whats a fellow to do...? Drill a 1" hole from the bottom up, fill gap by adding a wood plug, drill thru and then use an even larger backing plate on the interior...then I'm still only being held by the 5/16" outer liner...?? If that's the case I think I may just drill the 1" holes on the inner liner, thru bolt and washer to the outer liner and put the plastic plugs on the interior... Thing is, I have 14 attachments on the grab rails, the 4 on the cam cleats I want to add and another 4 on the deck organizer/blocks I want to install...That's a lot of bolt heads in the cabin ceiling...

Squid Washers and plugs worked like a charm on my PY26. I only used the washers and plugs in the ares you show in your pic when I mounted the 4 sheave line organizer. I mounted 4 cam cleats on the aft end of the cabin top and foudn solid glass there. I drilled & tapped the glass andmounted the cleats with machine screws. for 10 years this was fine and weas used for the spinnaker halyard and the vang, among others. Matt
py26129 said: Squid Washers and plugs worked like a charm on my PY26. I only used the washers and plugs in the ares you show in your pic when I mounted the 4 sheave line organizer. I mounted 4 cam cleats on the aft end of the cabin top and foudn solid glass there. I drilled & tapped the glass andmounted the cleats with machine screws. for 10 years this was fine and weas used for the spinnaker halyard and the vang, among others. Matt Click to expand

GorillaToast
This may be too late, but on the boat I just sold I had the same problem. What I did was drilled 1/4" holes for the bolts from the top, thru the roof and liner, then used a hole saw to drill 1" holes in the liner. Using bolts that were short enough to not reach the liner, I installed 1"fender washers, lock washers, and nuts and snugged them up to the solid coach roof. Then I got white plastic snap-in plugs from the hardware store to cover the holes. (Well, actually I was going to, but I sold the boat first.)
Squidd said: Yeah, now you tell me... Actually the nut/bolt/washer/plug is what someone did on the halyard block shown in the first post... Considering the thickness of the outer layer, it's not bad for a "shear load" like the block, and "maybe" oK for a pull load like the rails... I was a little leary of the pull load on the rails but I think the epoxy plug and thru bolting should give me a big enough chunk of material grabbing that the wood rail will probably break first... The original rails were just screwed in from the top in to the outer layer and held up well for some time... Click to expand
On the other hand the force on a grab rail when it is needed is the same inshore as when crossing an ocean.
- This site uses cookies to help personalise content, tailor your experience and to keep you logged in if you register. By continuing to use this site, you are consenting to our use of cookies. Accept Learn more…
Amazing Architecture
- {{ post.title }}
- No result found
- A Smart Passive House with Green Roof in Moscow, Russia by S...
A Smart Passive House with Green Roof in Moscow, Russia by Snegiri Architects

Completed in 2018 by Russian architceture firm Snegiri Architects , the cottage was created as a “passive house”, with the ability to save 90 percent more energy than a regular home thanks to a little technical know-how. The building stands with most of its rooms and windows facing the sun, in order to trap more natural heat and light. The building is also equipped with a ventilation system and the Swedish plate technology, which combines the design of a heated monolithic foundation plate with a floor heating system. Finally, the home is insulated with cold-proof mineral wool covered with larix wood, saturated in flax oil.
Architect's statement: One of this project’s most significant characteristics is its full integration into environment – we sufficed in keeping existing trees on construction site, and minimally noticeable building does not surpass the landscape, becoming its organic extension, by courtesy of the green roof .
Hill House’s roof is green literally – with a live “carpet” of plants: stonecrop and dwarf plants such as wild chamomile.

This project can undoubtedly be called a “ passive house ”. Terrace and most windows and rooms are oriented to the sun side, getting as much sun as possible. Building is equipped with energy-saving windows, ventilation system with air recuperation, and is completely winterized: foundation with cold-proof Swedish plate, carcass with monolith, with cold-proof mineral wool covered with larix wood saturated in natural flax oil.
Project client is a man fond of innovations, admirer of modern technologies and gadgets, because of that project is equipped with the “ smart house ” system along with guarding system. Near the house there is a parking spot with Tesla car charger.
Apart from passion for modern science achievements, client also loves history, being art and vintage furniture collector, which has influenced house interior.

Connect with the Snegiri Architects
By Naser Nader Ibrahim
- Cabin House
- Forest House
- Russian Architect
- Wooden House
- Passive House
- Snegiri Architects
- Snegiri Architecture
- Nikita Kapiturov
- Victoria Dementieva
- Smart House
Leave a comment
AL alexey - 2 years ago It is very strange to read about a passive house. Give a link to this project in the base of passive houses please
Related articles

Suncrest Residence in Pinecrest, Florida by SDH Studio Architecture + Design

Narrabeen relocatable home by buck&simple: doers of stuff

Ribbon House in Canberra, Australia by Rob Henry Architects

pb House, Córdoba, Argentina by A+R MONDÉJAR ARQUITECTOS
IMAGES
VIDEO
COMMENTS
Most boats built in the 70s were built with polyester resin. A significant difference between epoxy and polyester resins is epoxy's much better adhesive strength. Getting resin to adhere to plywood is a challenge because of the large areas of hard grain. The resin will soak into the softer parts and bond there, but not bond to the hard areas.
The added bonus was that this created two "pillars" (the trunks themselves) inside the cabin which not only seriously reinforced the cabin roof, but provided space to mount shelving to either side of the cabin door and provide stowage space for a 30 qt. cooler, 8 gallons of water, a small hand pump brass faucet, a 55 Ah battery, an electrical ...
Nautical expressions can get somewhat confusing when referring to ceilings, which are really slats, and roofs, which are overheads. So for this article I decided to use common terms. "Roof" means the underside of the fiberglass deck that forms the actual roof of the cabin, and also includes the underside of the lower deck, forward of the bunks.
Cabin. Most larger boats have some sort of roofed part, which is called the cabin. The cabin is used as a shelter, and on cruising sailboats you'll find the galley for cooking, a bed, bath room, and so on. Mast. The mast is the pole on a sailboat that holds the sails. Sailboats can have one or multiple masts, depending on the mast configuration.
First step: Cutting strips of cardboard for a gauge model. Taking huge cardboard boxes and going down to my knees, I was cutting precisely just strips of about 8 cm width with a carpet knife and took them with me into the boat. Now the fun began: Putting the strips to the ceiling I was trying to match exactly the outline of the panel.
Is the cabin roof on a oday 22 cored throughout or just around the mast step? I drilled a few holes by the companionway and forward hatch to check for moisture and it seems to be hollow. I wasn't sure if this was normal or why it would be built this way. The core under the mast step has the...
Don't know how thick the cabin roof is but I do know there is a liner inside with a space between the deck and the cabin roof. You will probably have to drill a larger hole in the liner to get the bolt against the deck. Going though both will probably cause the liner to distort as the bolt tightens. Let us know how your mast raising system ...
The curve of the roof piece turned out to be greater than the curve of the side piece (the one with the porthole). This means that the roof overhangs on the side more in some places than others. It also means that the roof piece does not quite fit. There is about 3/16 missing at the very front of the roof.
Additional efforts (and questions!) detailed by cabin. Forward (V-berth) cabin. New mattresses replacing some truly ancient foam will give Mairen a cushier cabin! Her cabinets are a significant change. Currently considering mural artwork on the hull - maybe hers. Maybe a street artist we met in Mexico. Forward head
DetailsIf your removable cabin headliner needs revamped, this is the DIY for you. In today's video, we're going to show you how to give your cabin interior an upgrade with new vinyl-wrapped headliner panels. Watch the video at the end of this blog to see how the process is done. This is a very easy DIY and a great way to revitalize your boat cabin with an updated, modern look. Let's get ...
alan white Senior Member. You've got enough crown to laminate a roof from thin plywood. You could laminate plywood or strip-build it. If plywod alone (no beams), try to achieve 1/2"-9/16"" total. If strip-built over a form, use red cedar 1/2" thick and 10 oz fiberglass cloth inside and out.
Working the winches: All too often, winch location is an afterthought, and fine hardware is stuck on side coamings shaped more as a roof for the aft cabin than as a key component of sail trim. We always like to check sheet leads angles that lead lines to a particular winch and then mimic what cranking with a two-handed winch handle would be like.
DetailsReplacing the headliner in your boat, RV, automobile or other vehicle is a great way to update the look and feel of your boat or automotive interior. This simple fabric refresh can help to modernize and update your boat cabin. There's not a lot of natural light in a boat cabin or RV interior. Removing and replacing dingy, worn-out headliner can also greatly increase the brightness and ...
Jan 22, 2008. 198. Montgomery 17, Venture of Newport, Mirror sailing dinghy, El Toro sailing dinghy Mound, MN -- Lake Minnetonka. Nov 18, 2009. #8. ChrisNC said: In getting to know my new '77 Venture 25, I discovered that I need to do some work to the cabin roof. I had noticed that walking on the roof produced an unseemly amount of flexing.
This is a sailboat that will remain solid and stable no matter which part of the boat you stand on. Its cabin roof and the balsa-cored carbon-fiber deck are so strong that the mast doesn't require any form of compression post. The self-draining cockpit is long enough and capable of sleeping at 6 feet 6 inches.
Contact our knowledgeable sales staff 6 days a week to discuss the Custom Hardtop possibilities for your boat, and to receive a fast and accurate quotation. (Telephone 800-831-8889; Fax 609-361-8500; email: [email protected] ) Shipping. All Atlantic Towers Custom Hardtops are completely engineered products.
Competent crew. Montenegro / Croatia. Learn to sail on catamaran or monohull. This program is ideal for those candidates who wish to become an active crew member on a power or sailing yacht or to learn how to operate small sailing…. 5. 7 days. live aboard. from $131. per person per day.
To remove them, remove all the screws on the inside and the trim ring. Then use a stiff putty knife or a stiff scraper blade on an oscillating tool to slice through the sealant between the frame and the cabin side. Now gradually and gently pry the frame out of the cabin side. Go gently so the frame is not bent.
Cabin of Peter the Great The first residential building to be built in the newly founded city of St. Petersburg was a wooden house or cabin, intended for Tsar Peter himself. The cabin is very small - only 60 square meters in area and is a strange combination of a traditional Russian house or izba and a Dutch home with large and elaborate windows and a high roof covered with wooden tiles.
Article source: Destilat "The Ritz Carlton Moscow" hotel, located in the centre of Moscow, is one of the city's top addresses - not least due to its O2 lounge bar on the 12th floor with its approximately 1.100-sq m roof terrace. Architects: Destilat Project: Roof terrace of the Ritz Carlton Hotel Location: Moscow, Russia It attracts visitors from […]
576. Island Packet IP31 Lake St. Louis, Montreal. Mar 7, 2012. #3. Squid. Washers and plugs worked like a charm on my PY26. I only used the washers and plugs in the ares you show in your pic when I mounted the 4 sheave line organizer. I mounted 4 cam cleats on the aft end of the cabin top and foudn solid glass there.
350 000 $. Client: Private. Status: Built. Typology: Residential › House. Completed in 2018 by Russian architceture firm Snegiri Architects, the cottage was created as a "passive house", with the ability to save 90 percent more energy than a regular home thanks to a little technical know-how. The building stands with most of its rooms and ...